WK4DS Amateur Radio Blog
Search Posts

Chito Branch Reserve: First FT4 Contacts, Meeting a Fellow Park Hunter, and the Quest for 1000
Doug's been activating Chito Branch quite a bit lately, and if I'm being honest, we seem to be in a friendly race to see who hits 1000 contacts from this park first. Spoiler alert: he's winning. But it was great to finally shake hands with someone who understands the appeal of spending beautiful Florida mornings in a park with Spanish moss hanging from the trees, headphones on, working the world.
February 10, 2026 • US-5524
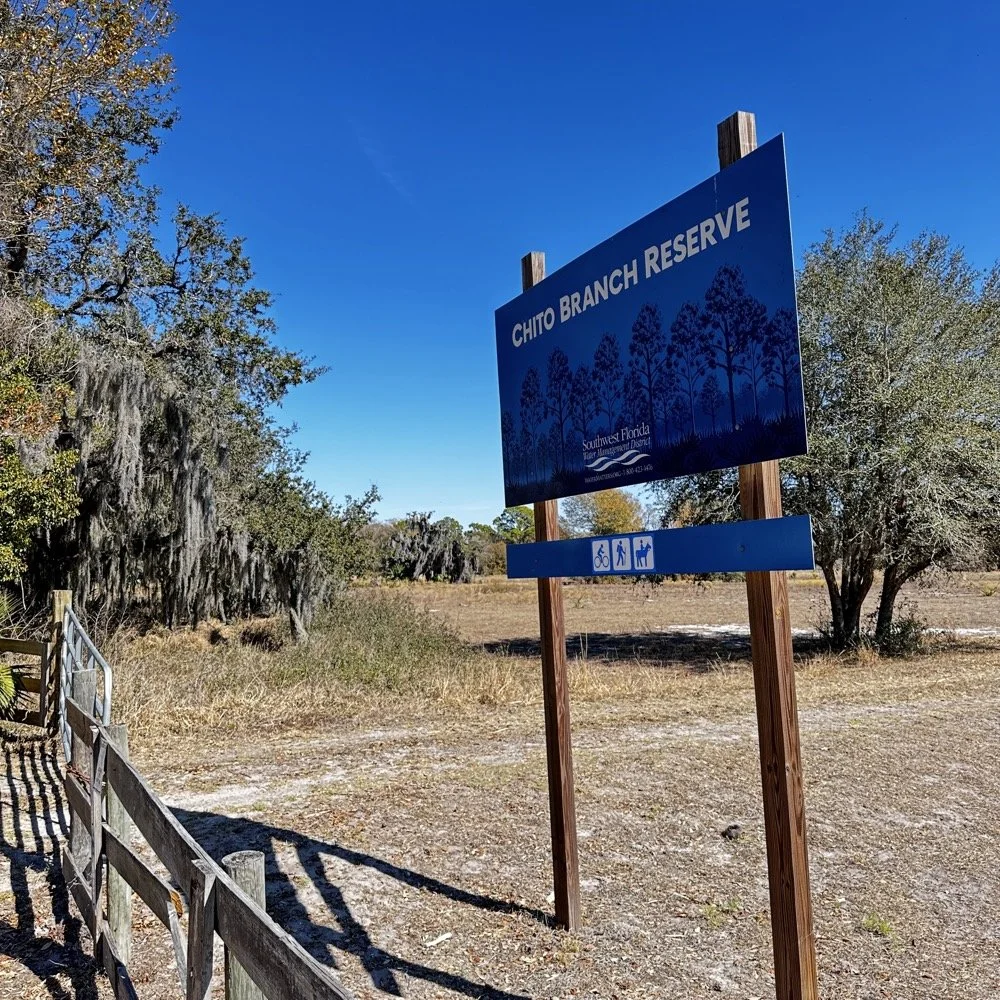
Sometimes the best part of a POTA activation isn't the DX you work or the pile-ups you run! it's meeting another operator face-to-face who's been chasing the same goals you have. Today at Chito Branch Reserve, I finally got to meet Doug, KQ4SXW, in person.
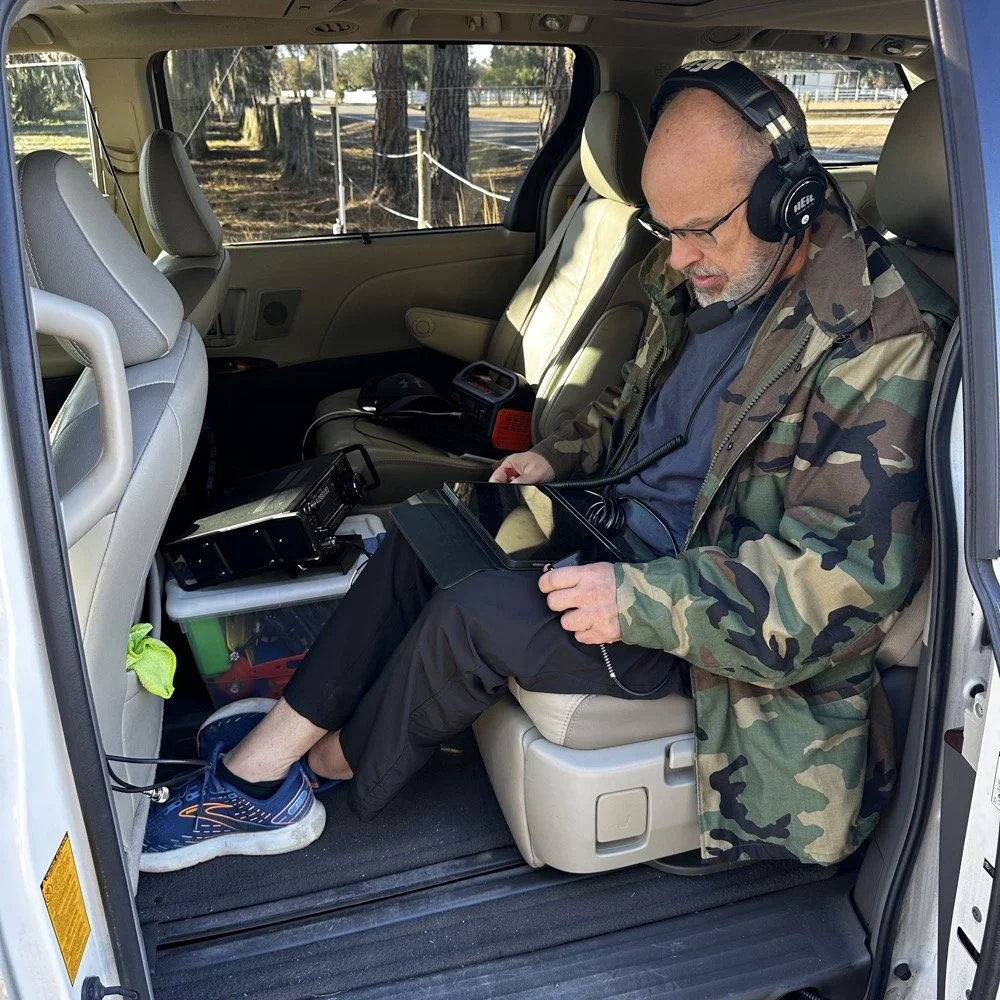
I finally got to meet Doug, KQ4SXW
Doug's been activating Chito Branch quite a bit lately, and if I'm being honest, we seem to be in a friendly race to see who hits 1000 contacts from this park first (well, between us at least). Spoiler alert: he's winning. But it was great to finally shake hands with someone who understands the appeal of spending beautiful Florida mornings in a park with Spanish moss hanging from the trees, headphones on, working the world.
The Setup
I rolled into Chito Branch mid-morning with my usual portable arsenal. The park is close to where I'm staying in Tampa, which makes it an easy choice for activations, and I've been systematically building toward that 1000-contact milestone. As of today, I'm sitting at 769 QSOs logged from US-5524, so I'm getting close.
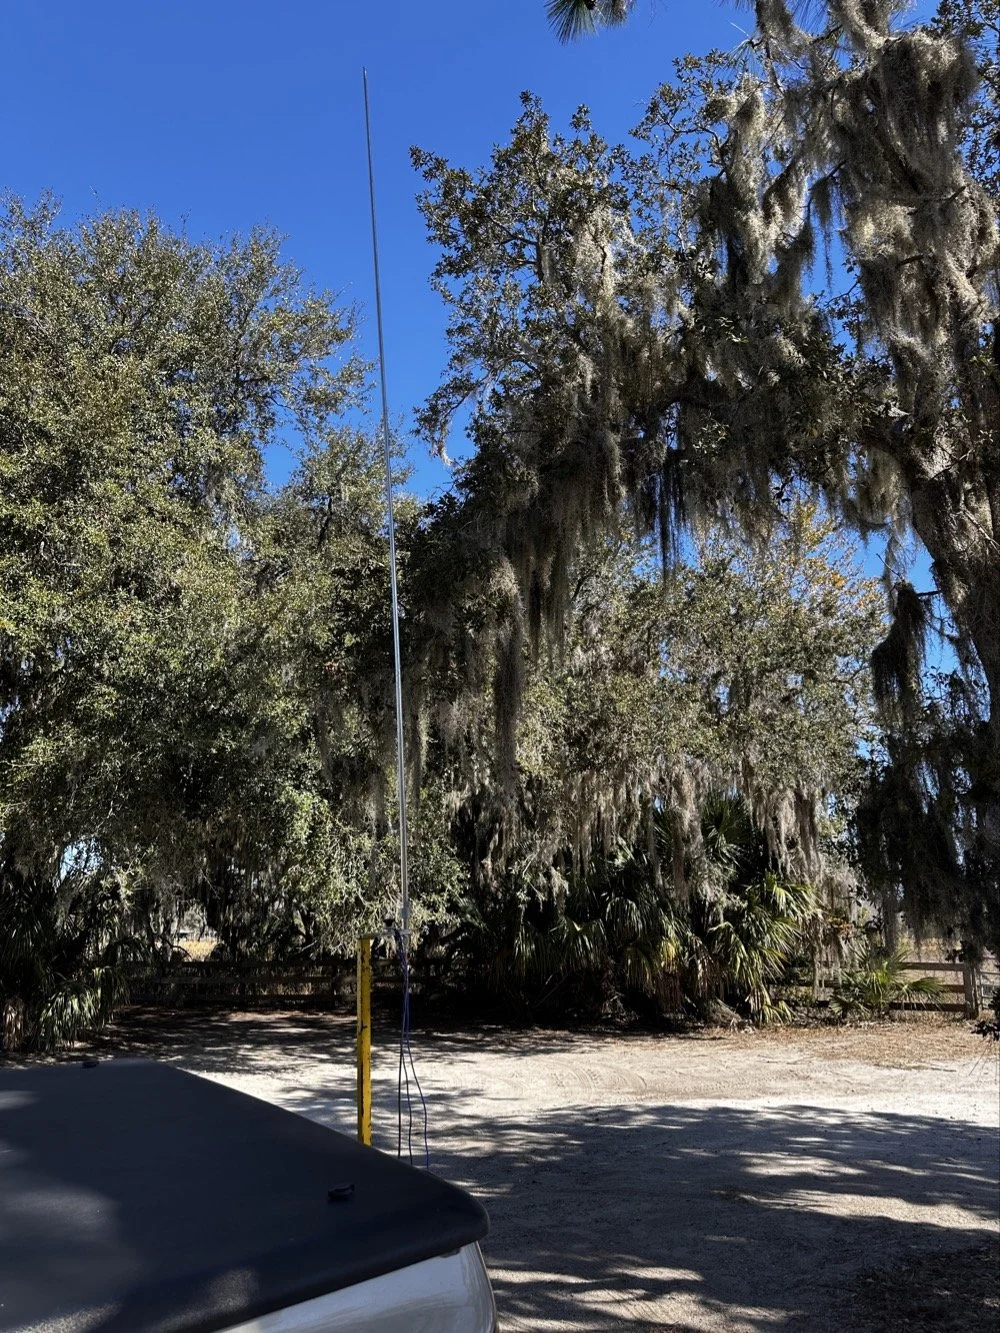
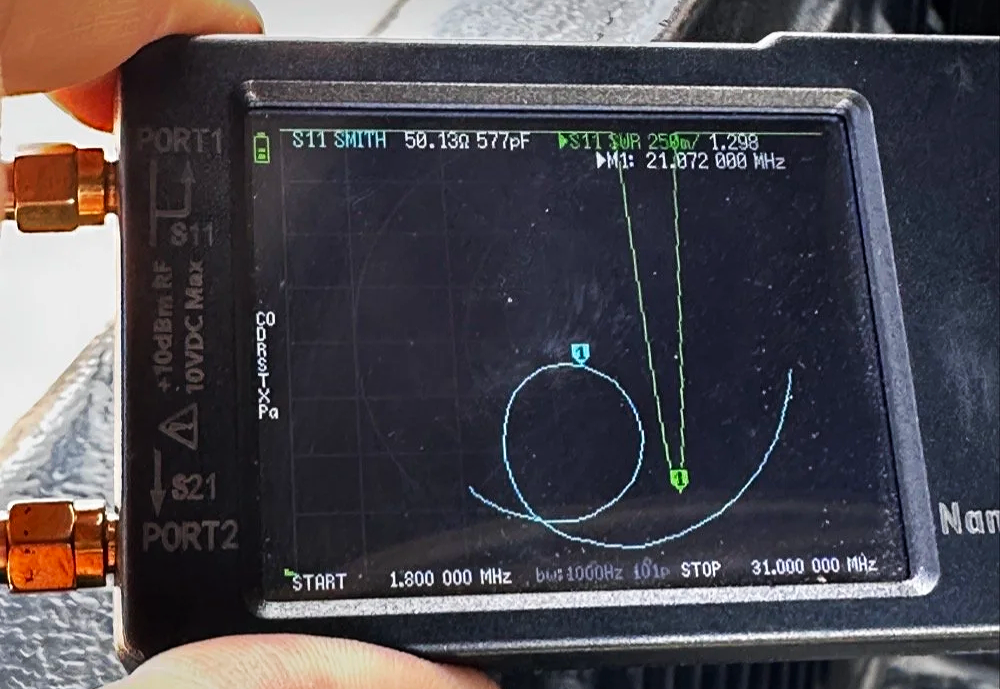
For antennas, I ran my 1/4-wave vertical with two counterpoise wires, tuned for each band. Simple, effective, and quick to deploy. I use the nanoVNA to utne the antenna with. As you can see in the plot above, I get it to something less than 1.5:1 SWR and call it good, I have found that if I get it to that level that I dont have any trouble making contacts at all. I have done OK with the SWR higher in the past…much higher actually, but it is a lot tougher to make contacts like that.
The main rig was the sBitx V3 from HF Signals for digital modes, and I brought along the Ten-Tec Scout 555 for some 15-meter CW work since the bands were looking promising.
Speaking of which… let me tell you about my grid square insurance policy.
A Sticky-Note Solution to a Real Problem
If you operate FT8 or FT4, you know that your grid square locator needs to be correct. It matters for awards, for logging accuracy, and frankly, for not looking like you don't know what you're doing. Recently, I completed an entire activation with the wrong grid square set in the software.
Not ideal.
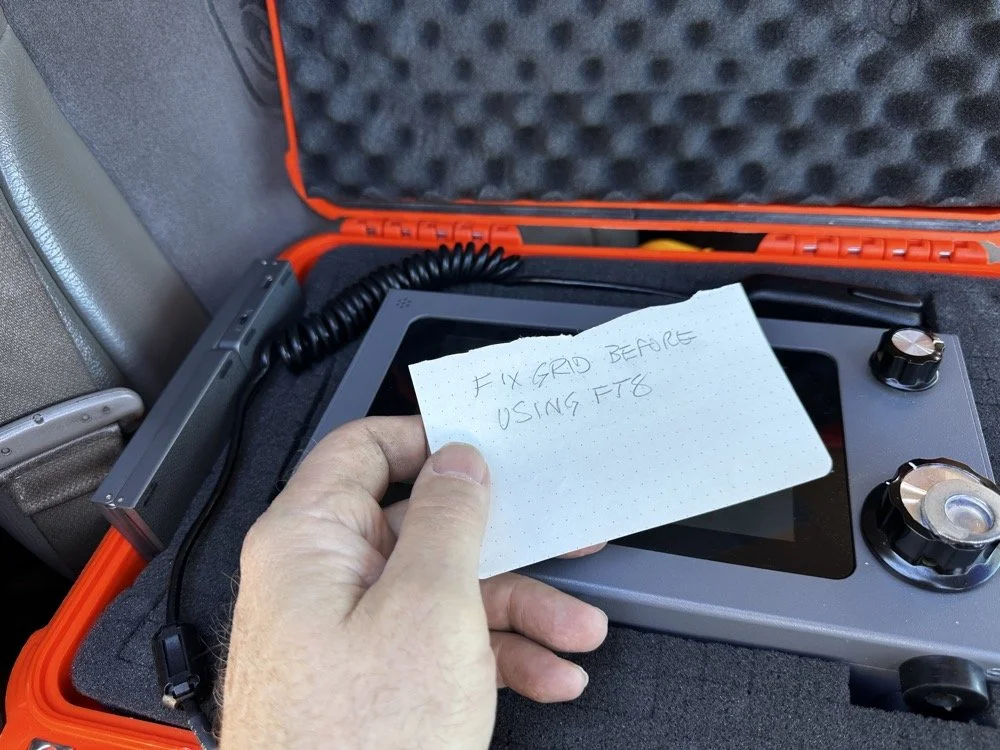
Sometimes the best solutions require the simplest answers…
So I came up with a foolproof solution: I now keep a note in my radio case that says "FIX GRID BEFORE USING FT8." It sits right on top of the sBitx when I open the case, impossible to miss. I also store the Bluetooth keyboard in the case with the radio so I can easily update the grid square in the field without fumbling around with the tiny on-screen controls.
Is it a high-tech solution? No. Does it work? Absolutely. Sometimes the best fixes are the simplest ones.
Starting with FT8 on 20 Meters
After getting the sBitx fired up…with the correct grid square, thank you very much… I started the activation with FT8 on 20 meters. I spotted myself on POTA and the responses started rolling in. There's something satisfying about watching those waterfalls fill up with decodes and seeing callsigns appear in the queue.
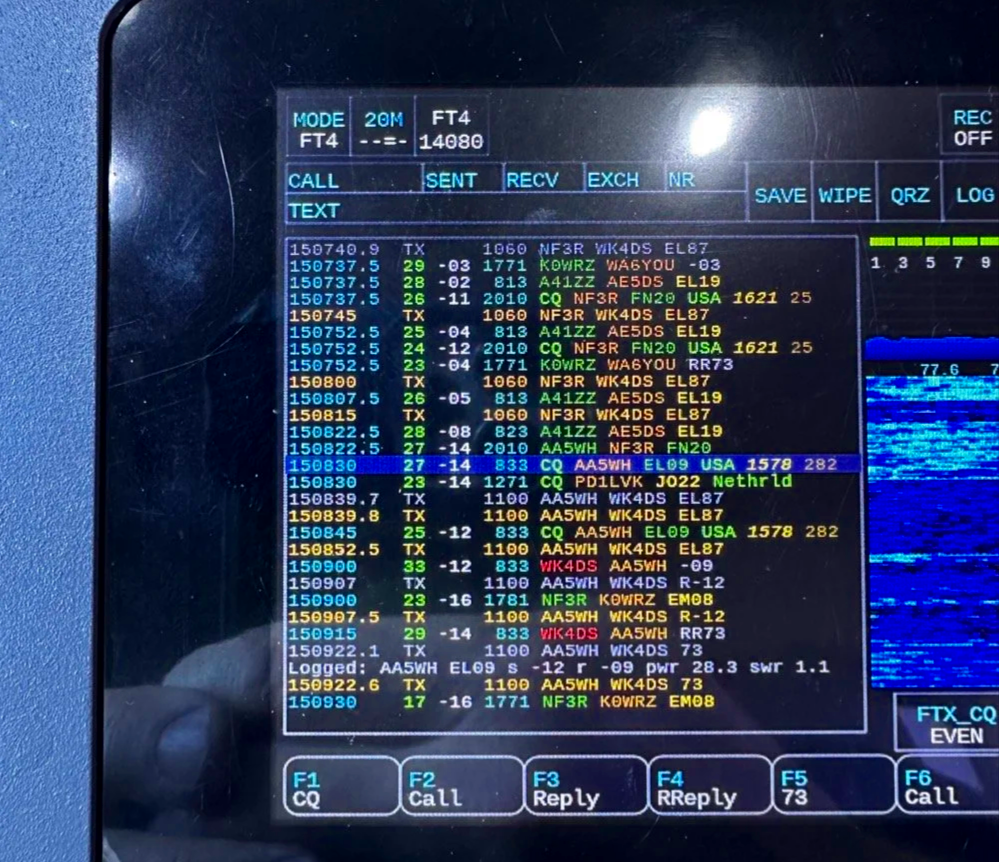
My very 1st FT4 QSO with the sBitx!
I worked through a solid session and logged about 18 contacts on 20-meter FT8. The band was cooperative, signals were good, and the activation was off to a strong start. Something to note about my sBitx V3 is that it has developed a sort of internal noise on 20 meters that lingers in the CW portion of the band. It goes down in frequency as the radio warms up so I have to figure out what is causing this problem when I get home the next time. I have it on the list right next to fixing my microphone pre-amp circuit for proper operation as well.
First FT4 Contacts at a POTA Park
After the FT8 run, I decided to try something new: FT4. I've run plenty of FT8 from parks, but FT4 was uncharted territory for me in the field.
FT4 is faster than FT8, cycling every 7.5 seconds instead of 15, which makes it great for contesting or when you just want to move quickly through a pile-up. I updated my spot on POTA again and started calling CQ. To be honest, I had used it a little in the shack before with no luck so I didn’t hold my breath today, To me utter surprise, I saw a QSO forming in the call feed on the left! Then it finished and logged it! I hurriedly got out my phone and snapped a quick photo to share with you guys…
First contact: AA5WH on 20 meters. Clean decode, solid signal, contact in the log. Then I switched to 15 meters and worked N1KLF. Two FT4 contacts, my first ever from a park, and honestly? I was pretty stoked. There's something satisfying about trying a new mode and having it just work.
15 Meters CW Was Alive
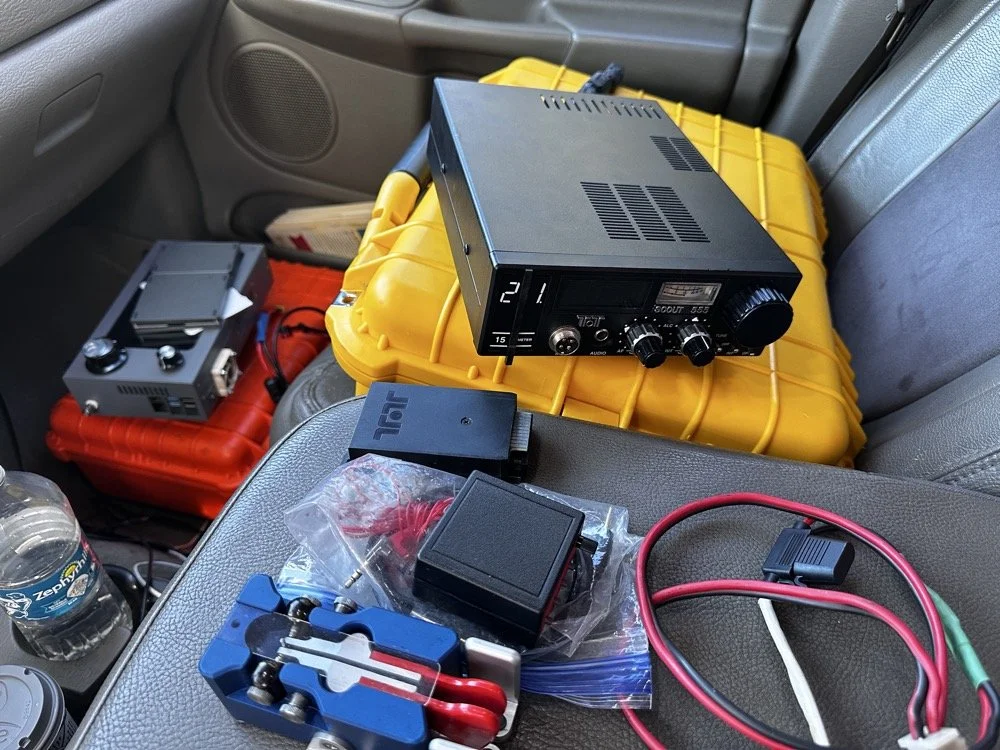
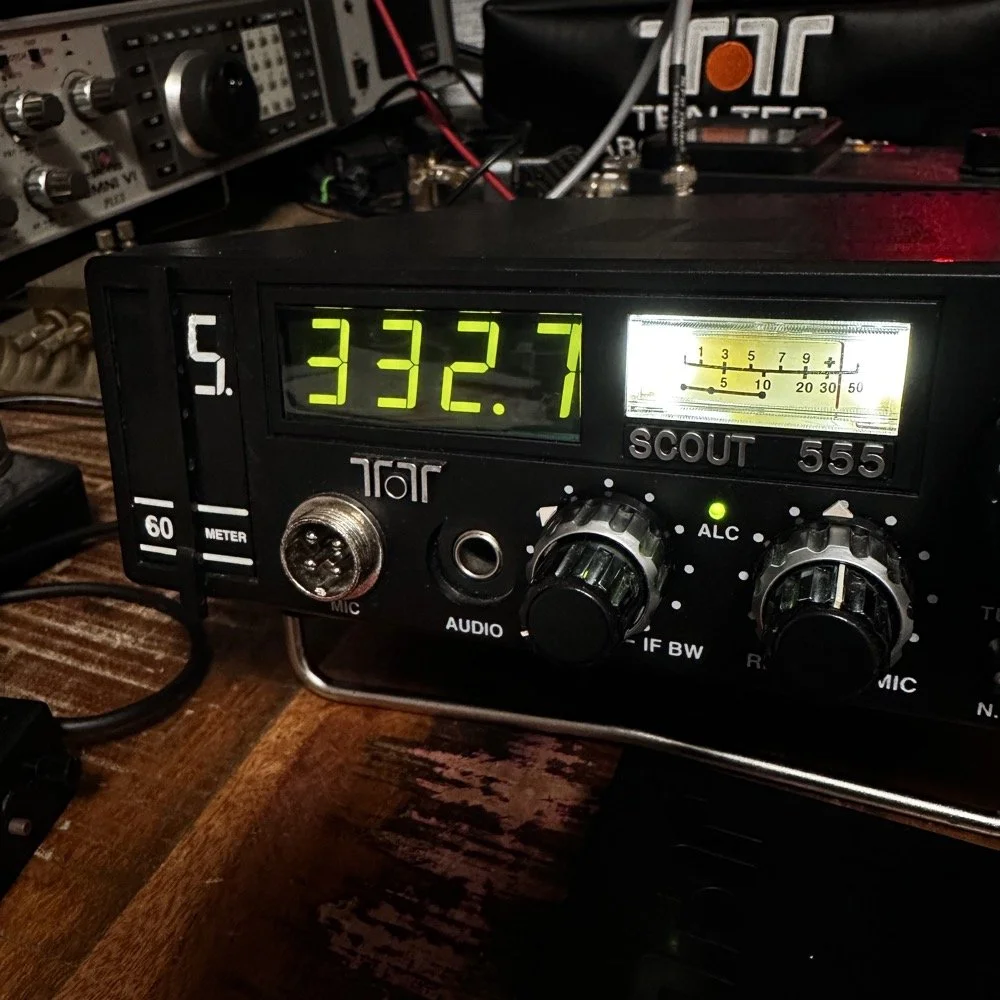
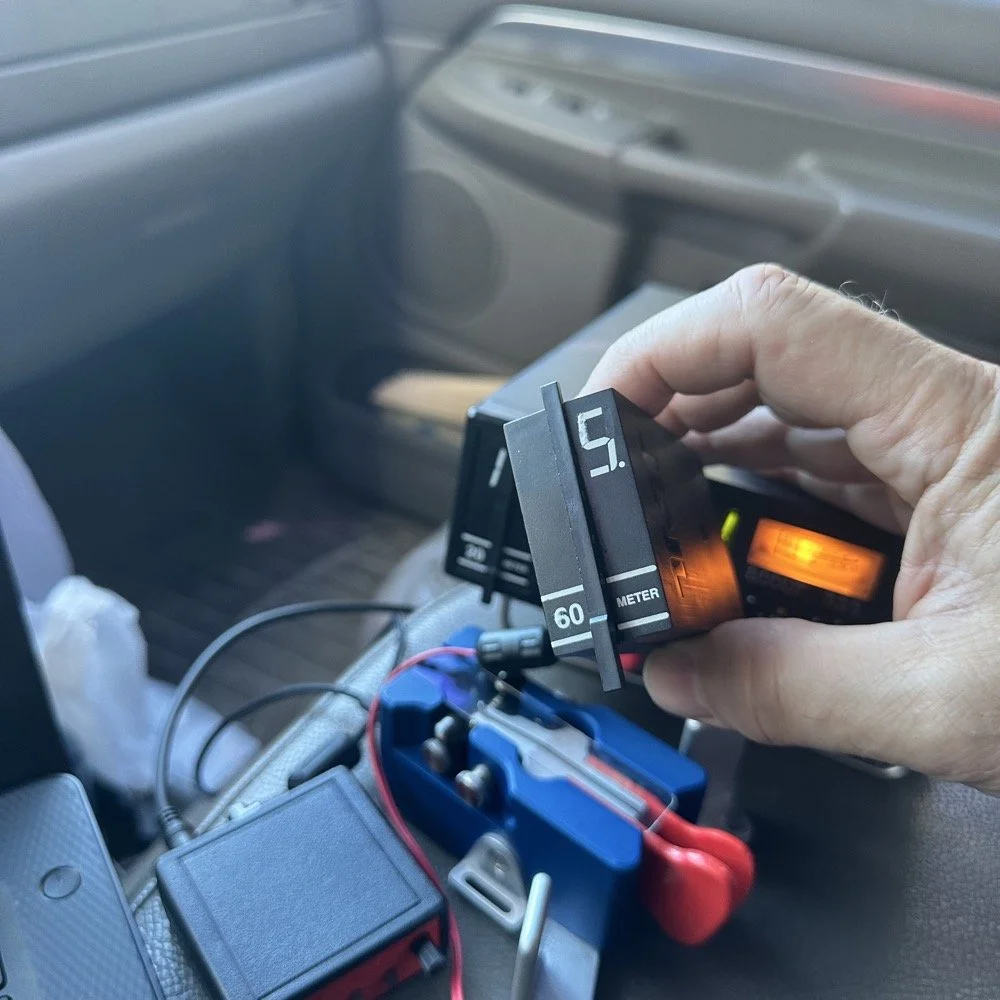
The TenTec Scout 55 is pictured with the HF Signals sBitx V3 where I was changing over to CW after working 2 digital modes today.
After the FT4 session, I switched gears completely. I packed up the sBitx and pulled out the Ten-Tec Scout 555 for some CW on 15 meters. The band was in great shape, though there was a bit of QSB rolling through. I got the radio all connected up to the keyer and then plugged in the Travler. My Begali Traveler key has become one of my favorites—smooth action, compact enough for portable ops, and it just feels good. It is sensitive, but that is how I use my keys, I prefer a light action myself and that is why I made my own paddles back in the day. N3ZN (Tony) and I2RTF(Pietro) make some of the nicest keys around at the moment and I am glad I have one from each.
DX Contacts That Made It Worthwhile
Right out of the gate, I snagged some DX that made the whole activation worthwhile:
EA4MZ in Spain
DD1LD in Germany
YV1GIY in Venezuela
PY5XT in Brazil
Four different countries, all on 15-meter CW with 40 watts and a telescoping 1/4 wave vertical, what more can you ask for? Days like this remind me why I love this hobby. Some of them were a little on the weak side but the Jones filter in the Scout actually helps if you open it up instead of closing it down. This seems counter intuitive, but opening the filter up just ever so slightly will let a lot more of the other operators signal though and just a little of the background noise, it is almost like having them turn their power up 50% or something, if you have not tried it with your Scout 555, I suggest you find a signal you can barely hear and give it a shot.
43 QSOs and Counting
By the time I packed up, I had 44 contacts in the log, though one turned out to be a duplicate, so 43 that counted. Not a huge number, but solid for a few hours of casual operating across three modes (FT8, FT4, and CW) and two bands.
Meeting Doug in person was the cherry on top. It's always good to connect with like-minded people in the hobby, especially when you're both chasing the same quirky goals. A thousand contacts from one park? Yeah, it's a bit obsessive. But things like that are what makes it fun.
SIDE QUEST TIME:
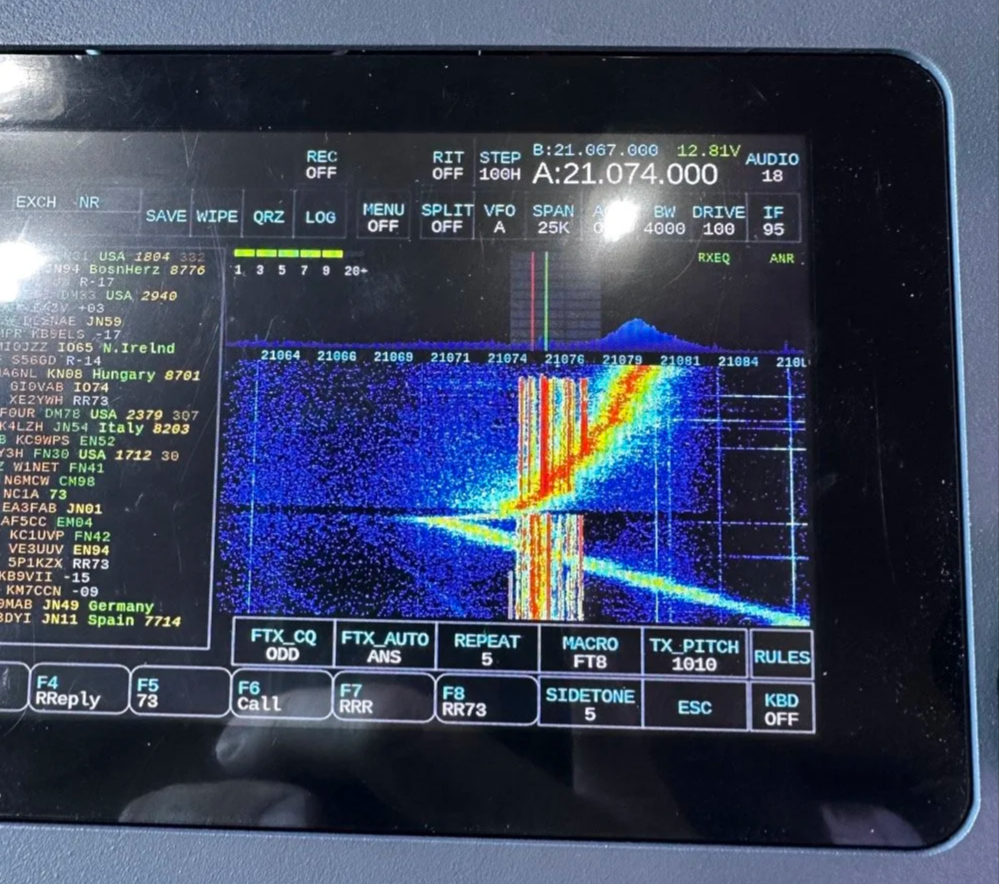
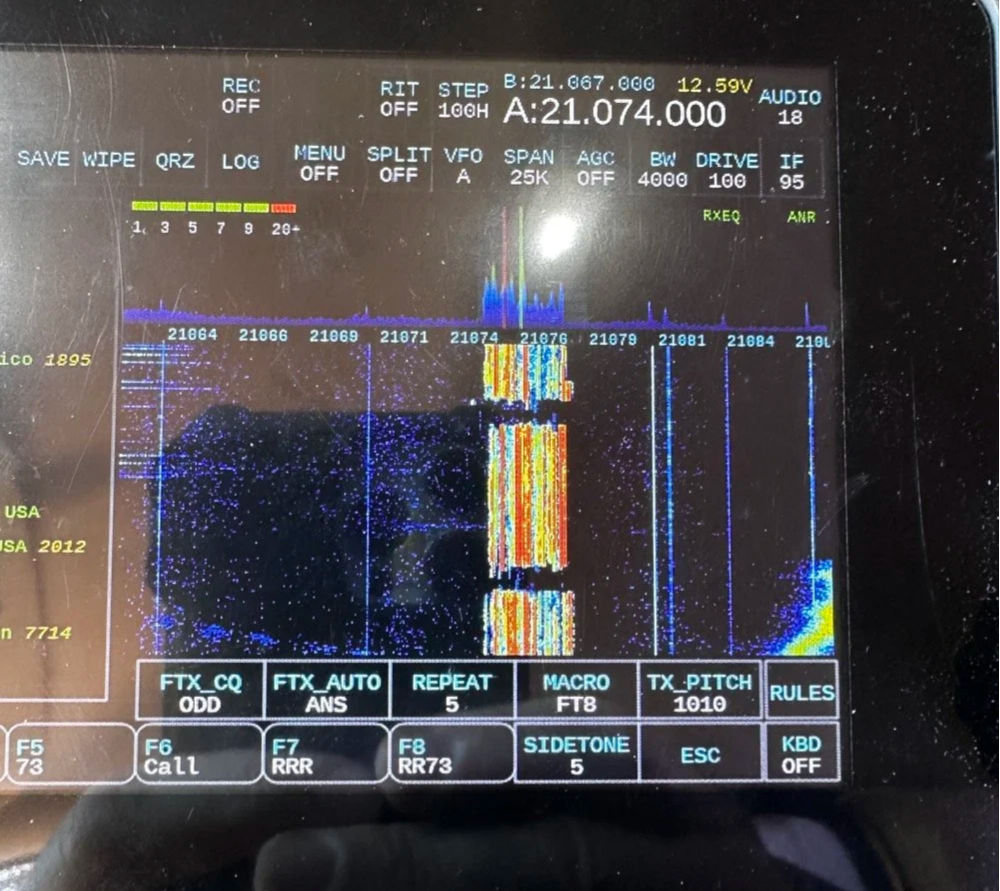
I ran into a unique problem today that is worth mentioning here. I was charging my computer with an inverter that I have wired into the cab of my truck. I was also running the truck so I could power the inverter and charge the computer as well as the sBitx V3 at the time. Well it turn out that I have some issues with this inverter that need resolving. The next few photos show the RF hash that this inverter is producing when under load! It is unreal how bad it was, I couldn’t believe all I had to do was simply shut off the engine and unplug the power cord from the logging computer and it went completely away…
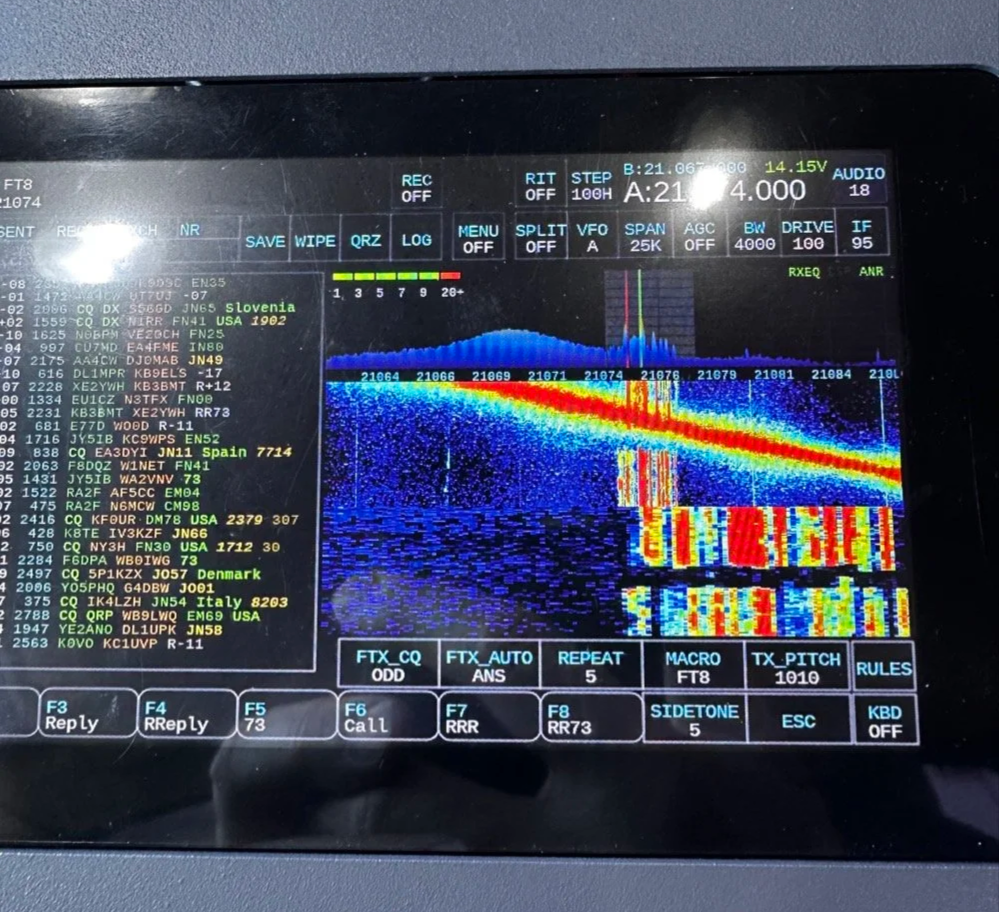
The above photo shows the hash of running both devices on the inverter with the engine running on the truck.
The next photo shows what happened when I shut off the truck and unplugged the computer.
The last photo shows what the band looked like once I went around to the other side of the truck and powered off the inverter completely. This goes to show that you need to check these things if you plan to use RF devices like radios in the presence of RF trash generating devices like this inverter… Better inverter coming up!
END SIDE QUEST
Hit me up!
231 contacts to go until I hit the big 1000 from Chito Branch. At this rate, it'll take a few more activations, but I'm not in a hurry. Well, maybe a little… Doug's still ahead of me.
If you're in the Tampa area and see someone set up at Chito Branch Reserve with a vertical antenna and a tablet running digital modes, stop by and say hello. Chances are it's either me or Doug, and either way, you'll be in good company.
**Gear Used This Activation:**
- **Radios:** HF Signals sBitx V3, Ten-Tec Scout 555
- **Antenna:** 1/4-wave vertical with dual counterpoise wires
- **Key:** Begali Traveler
- **Digital Mode Software:** JJ and the sBitx 64 bit Development team version 5.301 (FT8/FT4)
- **Computer:** Dell Inspiron with Linux and HAMRS
- **Accessories:** NanoVNA for antenna tuning
Have you tried FT4 for POTA activations? What's your go-to mode for portable operations? Drop a comment below or find me on Facebook or shoot me an email on here.
What is FT4 and how is it different from FT8? FT4 is a digital mode similar to FT8 but with a faster cycle time (7.5 seconds vs 15 seconds), making it better suited for contests and quick pile-ups.
What equipment do I need for POTA FT4 activations? You need an HF transceiver capable of digital modes, a computer or tablet running WSJT-X software, an interface between your radio and computer, and a suitable antenna for your chosen bands.
Where is Chito Branch Reserve located? Chito Branch Reserve (US-5524) is located in the Tampa Bay area of Florida and is part of the Southwest Florida Water Management District.
How many contacts do you need for a valid POTA activation? You need a minimum of 10 QSOs to qualify for a valid POTA activation.
You can help support this website by using these Amazon Affiliate Links:
QRP/Portable Radios:
Antennas & Tuning:
CW Equipment:
Power & Accessories:
Organization & Transport:
BONUS ITEMS
73,
David WK4DS

Joint POTA Activation with NA2B at Moody Branch: 104 CW Contacts in 4 Hours
Today I went to a POTA park to meet up with Chas NA2B, another amateur radio operator that lives just down the road from Chito Branch nature Reserve where I have been spending a lot of time here lately. He saw I was at the park on the spot page and simply hopped in the car and drove over for an eyeball QSO and to see if I wanted to meet up with him at some point and setup for an activation.
Today I had the pleasure of meeting Chas NA2B for our first joint POTA activation at Moody Branch Wildlife Management Area (US-6317) in Florida. What started as a chance encounter on the POTA spot page turned into a memorable 4-hour operating session that netted 104 total CW contacts between our two stations.
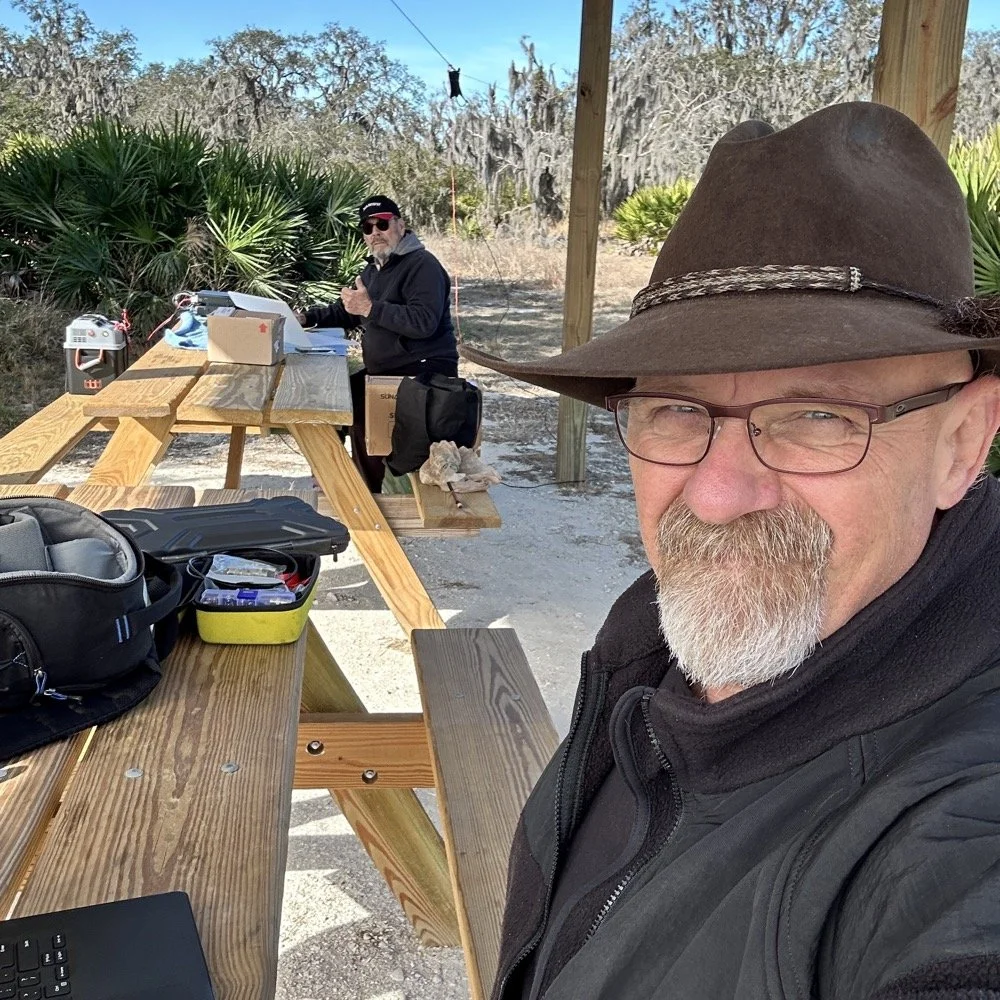
Today I went to a POTA park to meet up with Chas NA2B, another amateur radio operator that lives just down the road from Chito Branch nature Reserve where I have been spending a lot of time here lately. He saw I was at the park on the spot page and simply hopped in the car and drove over for an eyeball QSO and to see if I wanted to meet up with him at some point and setup for an activation.
This blog post will be an amalgamation of both discussing the activation as well as my new friend.
Planning the Activation
We communicated a good bit over the past week via text to line up a good day, (turns out every day is a good day for Chas…haha) and chose Tuesday as I had some business to attend to on Wednesday and the weather was way warmer than the previous day. The weather actually turned out to be about perfect to be honest about it. We agreed on Moody Branch US-6317 and 9:30 as the start time. We had planned to operate till about 2 if things were going good so on the day of, I load up the truck and head out. It takes about an hour to get there from where i was staying so I stopped and grabbed coffee and snacks along the way. Who doesn’t want a caffeinated CW op on the other end of their QSO???
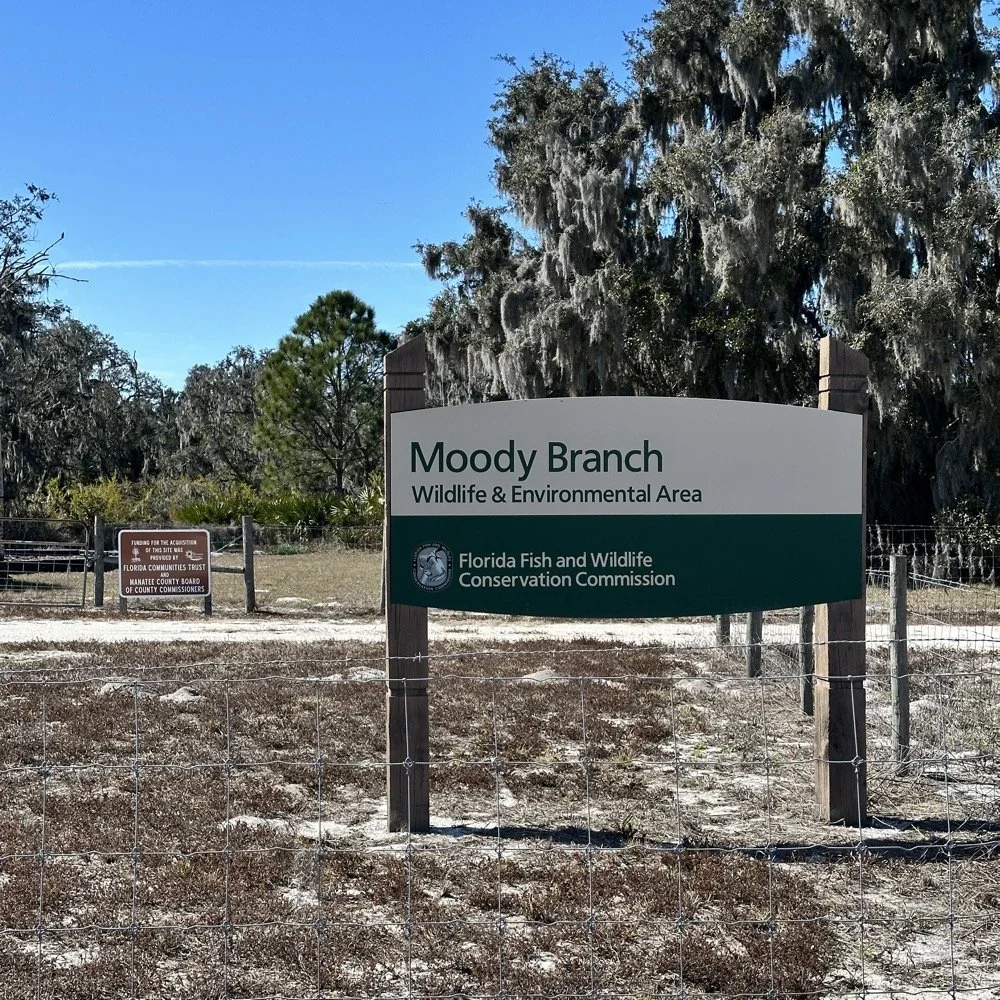
When I get there I am greeted with the standard issue Florida DNR signage and to my amazement there is a pavilion for us to operate from! Now to be fair, Chas had told me about it and the proximity to the parking lot. You see it was literally 15 feet from my truck to the table. Having the table this close allowed for an incredible amount of gear to be brought out. HaHa
Chas had already arrived and was setting up in the back of the pavilion so that I could have the closer spot and access to some really good trees to hang my antenna in. I decided to setup the antenna “properly” by putting the antenna tuner at the antenna instead of at the radio. This should provide better radiation than using the tuner to match the feedline as part of the antenna system. I simply set the case on the ground and set the tuner on top of it and tied the antenna wire to the case itself. The distance was about 50 feet from the table so I had to couple both of my longest coax cables together just to reach the tuner out by the tree.
The Setup: Remote Antenna Tuner Configuration
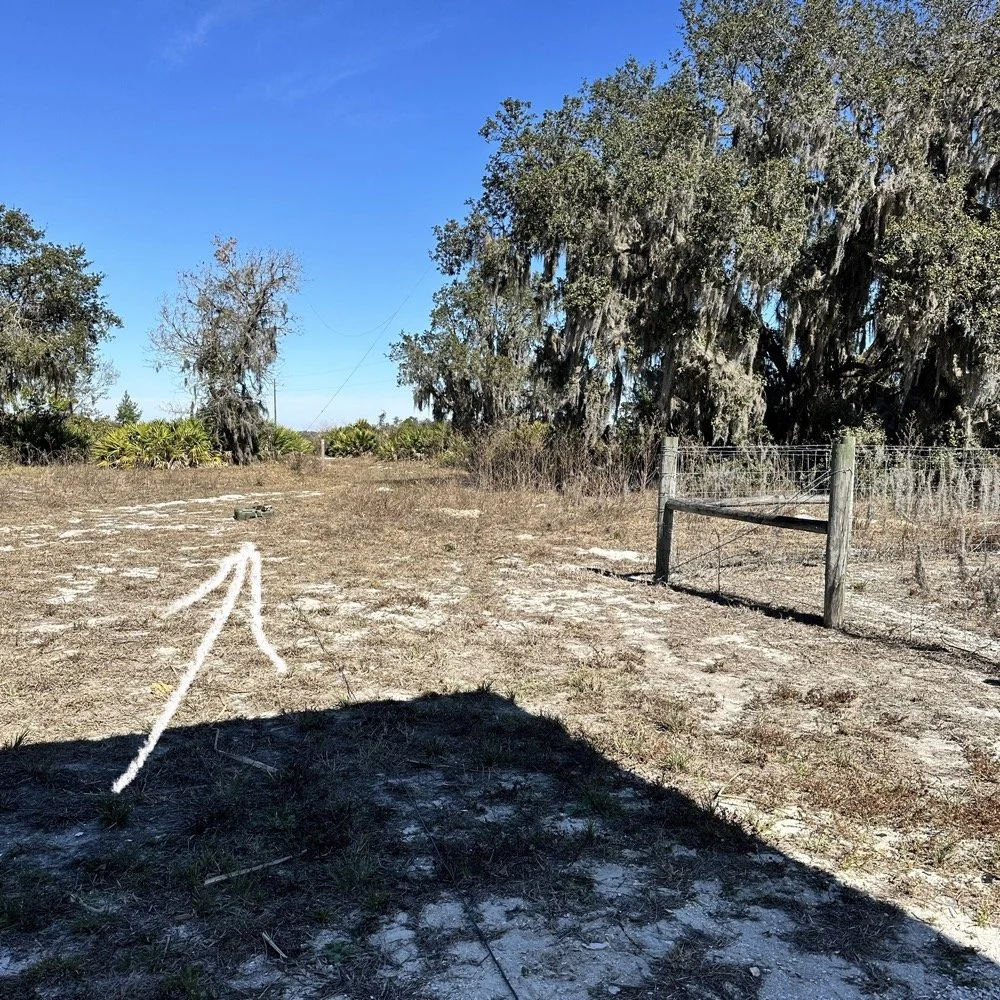
I put the antenna tuner way out here on purpose. The remote tuner setup keeps the feedline from becoming part of the radiator. This is important at it creates a more efficient antenna overall.
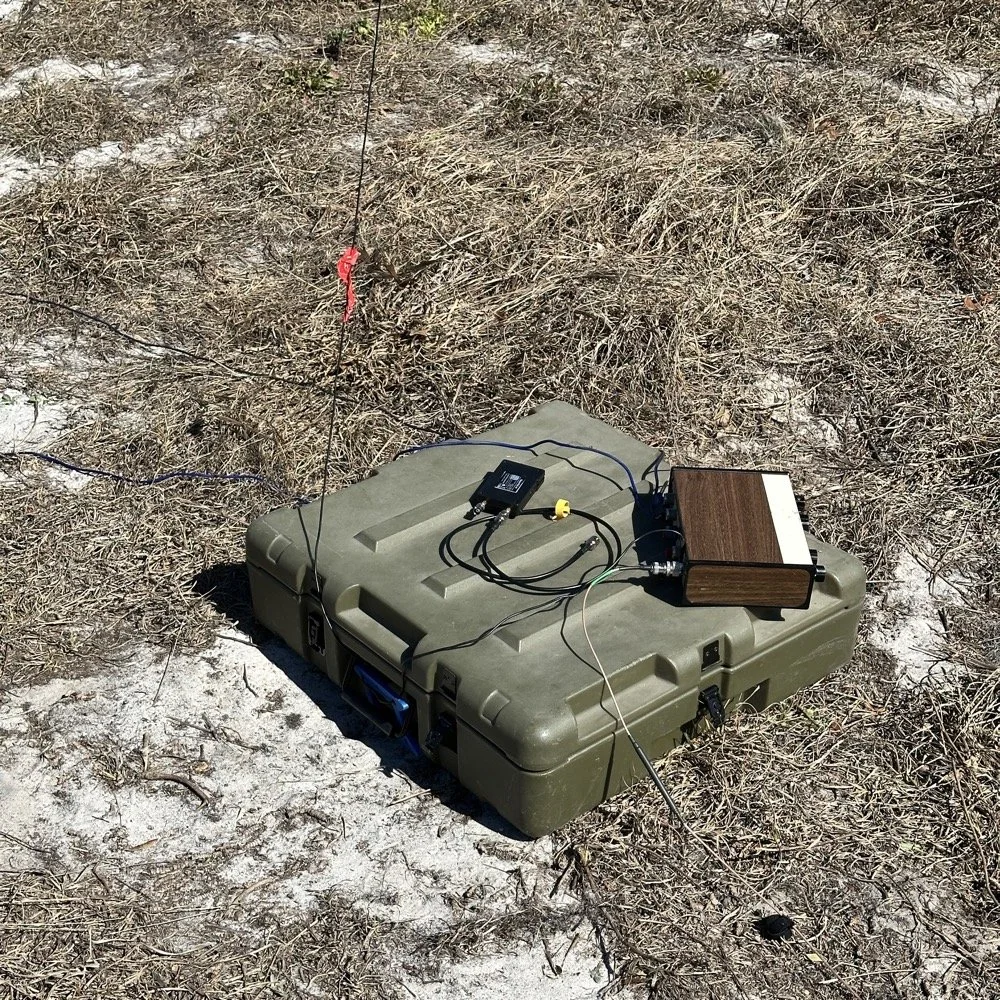
Since it was so far from the table, I just left the nanoVNA with the tuner so it would be nearby when I wanted to make band changes, of which there was many!
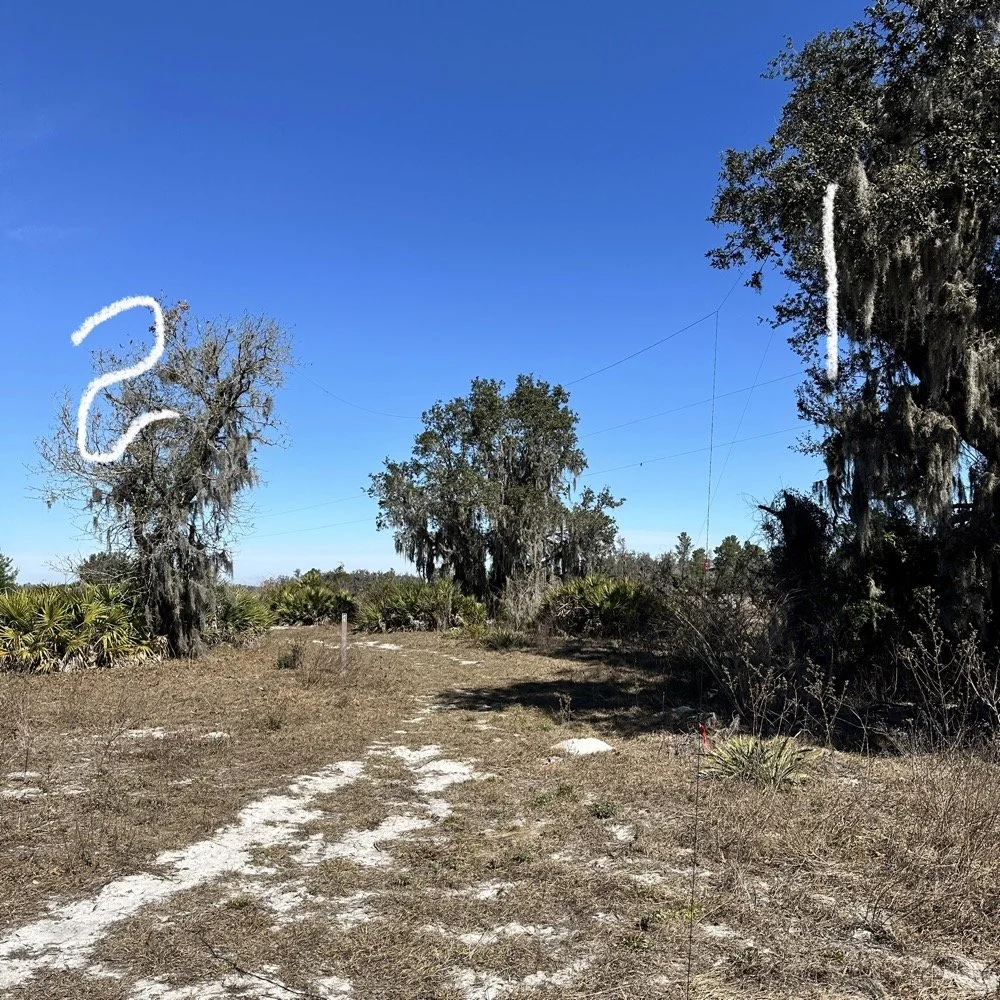
I strung the wire up like an inverted L type from tree 1 to tree 2 and tuned it for 40 meters to start with. Today I chose to start there as I was wanting to make contacts on all the bands I could with the Penntek TR-35 QRP radio. I also decided at the outset that I would work bands other than 20 meters today to see what I could come up with. I usually seem to have great luck with all the bands…other than 60 meters so far… haha. I also chose to run 10 watts or less all day too…well except for 40 meters, I ran 40 watts on 40 meters and still only made one FT8 contact there… lol. The band was just too noisy for me to hear anyone.
Equipment: QRP vs. Comfort
I only ran 10 watts or less the rest of the day because I didn’t have my large battery with me that I bring to power the sBitx at full power. I only had my 8 Ah battery and I didn’t want to deplete it early. I also had the 3Ah battery for the TR-35 and used it with that radio, but those were the power sources I was constrained to. This made me have to work a little harder for contacts, but it also made it a lot more fun to get DX stations in the log! I got at least 2 European stations in the log so I know it doesn’t take a ton of power to do it.
WK4DS (left) and NA2B (right) running simultaneous CW pileups on different bands at Moody Branch
Once setup I used two radios, the Penntek TR-35 QRP rig and the HF Signals sBitx V3. Both of these radios are cool in their own respect. I like the sBitx because I can run FT8 without needing to also connect a computer to the radio. The sBitx will internally log the contacts too so I could theoretically do an activation then when I get back home, down load the contact list and reformat it in ADIF and send it to the POTA site. That is kinda cool. The Penntek TR-35 is small, light weight and has a great receiver in it as well as awesome filtering. This little radio has everything you need and nothing you dont.
Above is me and Chas running pile ups on two different bands at once! We were both running CW today and at times I struggled to hear as my side tone and his were the same. I solved this by adjusting the side tone up a little so then mine and his were different ever so slightly and I could hear mine easily again. I think Chas stayed on 20 meters the whole time today. He racked up 61 contacts with the simple wire antenna. What a day in the field!
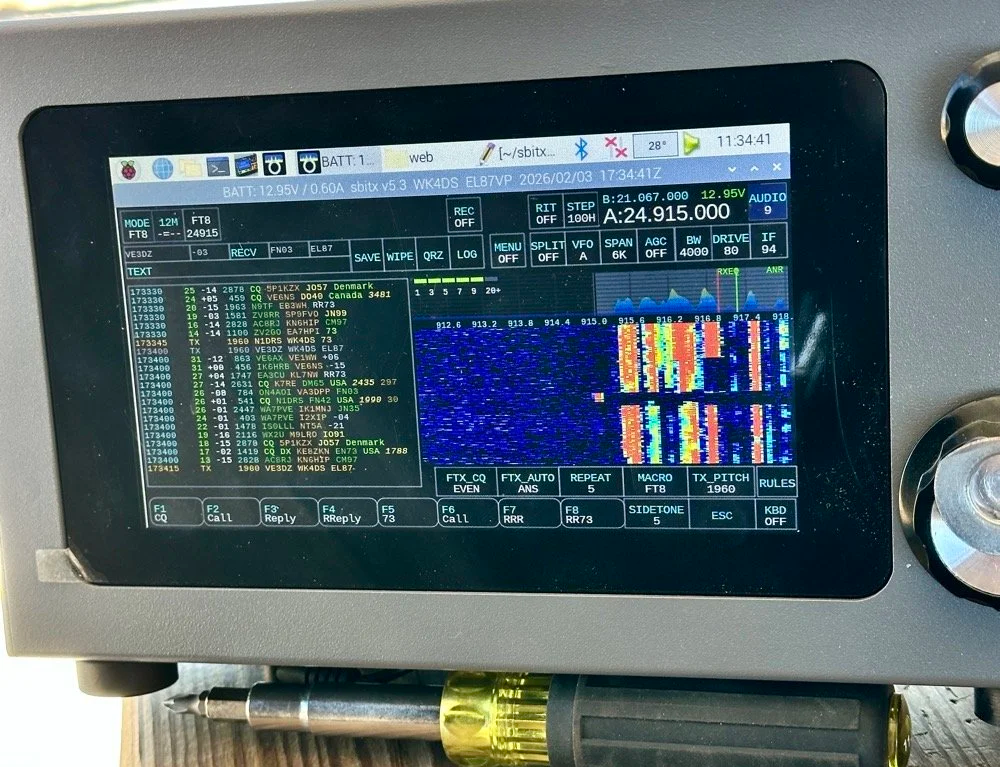
sBitx V3 running FT8 with new color-coded software from the open-source development team
This is what you see with the latest software release from the open source team on Github. This software has been made VERY good by this team of dedicated people and if you want to use this software yourself, just follow this link to JJ’s github page to learn more.
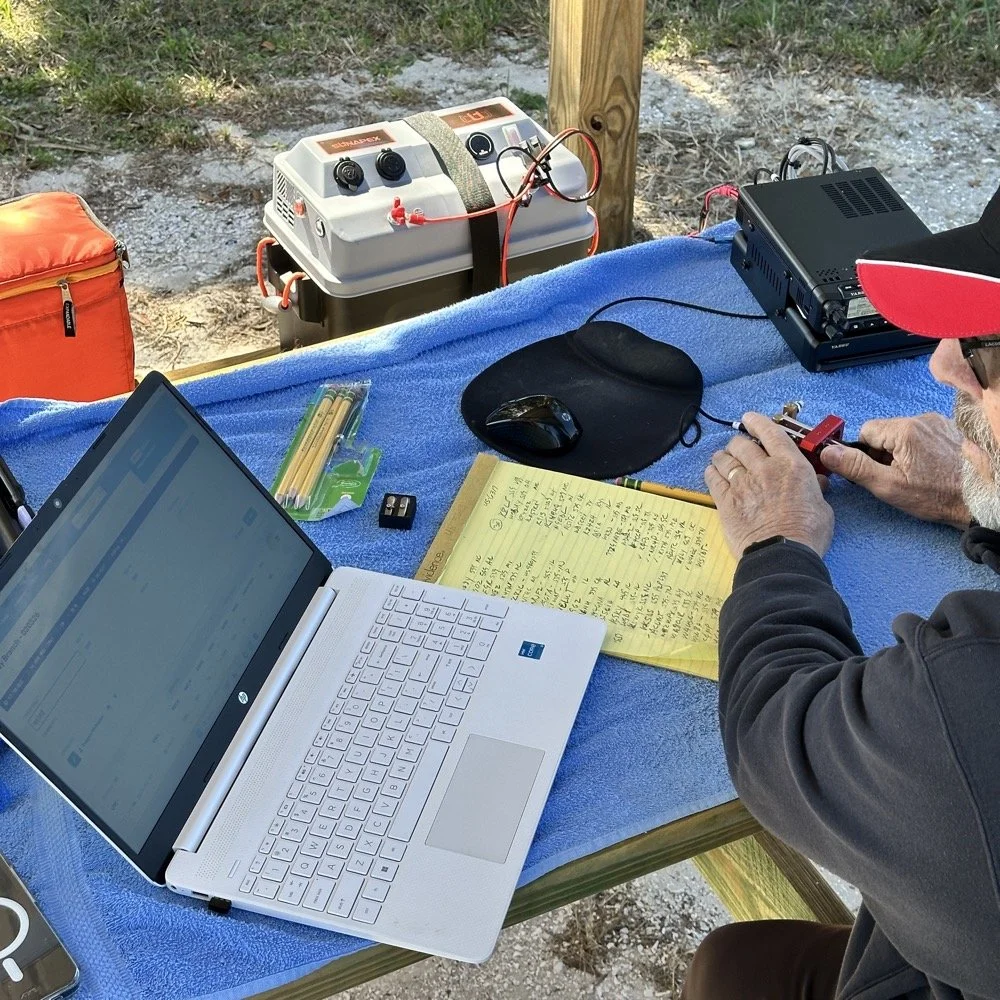
NA2B's minimalist CW station: paper logging, pencils, and a clean operating position
Chas had a really clean operating position today. He had plain pencils, which will ALWAYS work, a pencil sharpener and notebook for log data. He was in a blissful state. I also like the battery pack he has too. If I had brought my 36 Ah battery, I would have brought the Scout 555 out and ran it as well. Maybe forgetting it was a sign that I needed to let that radio rest a little…haha. His station looks so clean though, I was impressed.
My station on the other hand looked like I set off a “ham-grenade” lol… I had the logging computer, the foldable keyboard for the sBitx and the whole Penntek station was just piled in the orange storage case. Along with all that, I also had all sorts of other stuff that isn’t in this photo scattered around the table… It was kinda crazy how much crap I brought out.
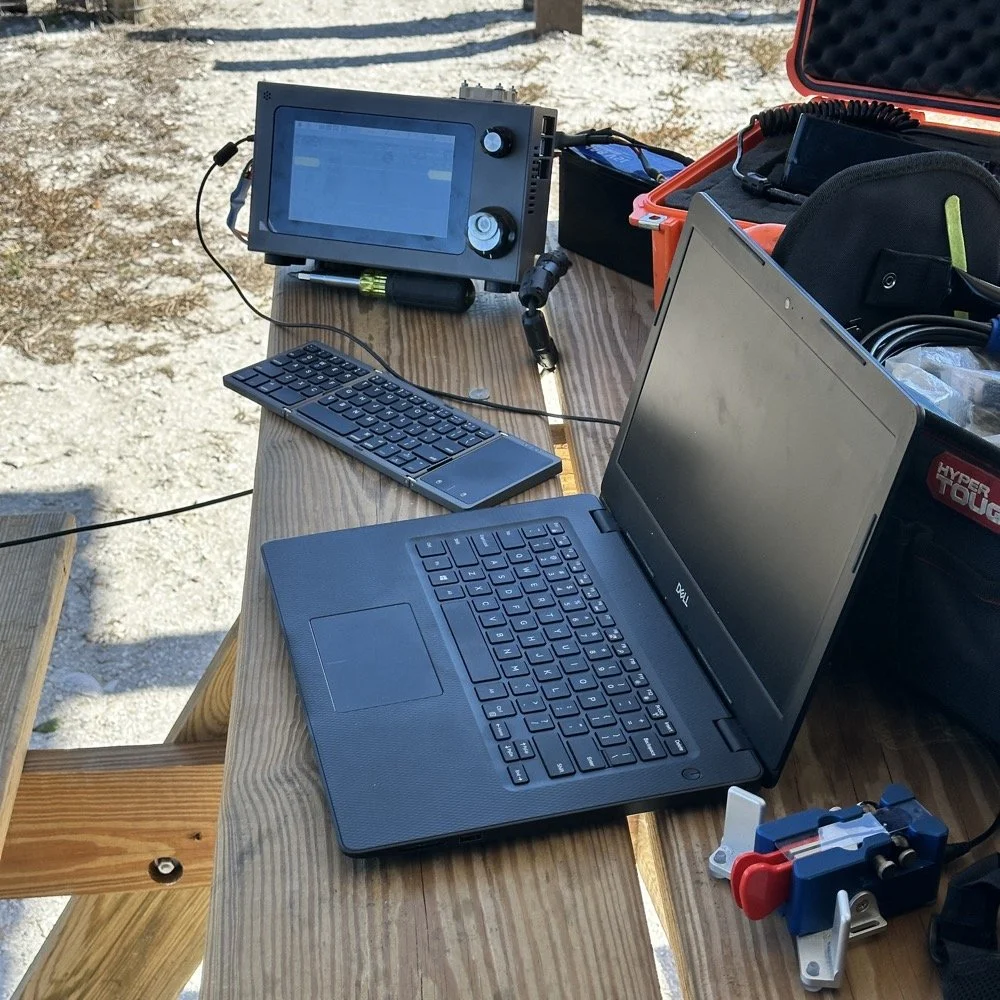
Operating Highlights
Chas setup his camera and grabbed this photo of us below for the blog. I like how his station has one box on the table and mine is covered in stuff! HAHA!
I will be honest, it was a lot of fun just hanging out while doing the activation. I do so many of these by myself that I forget that I can have someone with me while I do this.
We didn’t get in a hurry, we just took our time and whatever calls got in the log is what we got. There were a couple of time we both had decent pileups to work through, him more so than me as he had more power and 20 meters typically has more operators on the band. It wasn’t about QSO count…till it was… but all day we just made contacts and played radio.
Right before we finished for the day, I asked Chas how many contacts he had. Chas had 60 calls in the log and I had 38. I told him that we needed to have an even 100 calls between us before we stopped for the day. This total number of QSOs was completely arbitrary, but a cool little milestone none the less so we pushed on for a little longer. We finished the day with 104 total calls in the logs. Win! Chas had 61 as a final count and I ended up with 43! What a day!
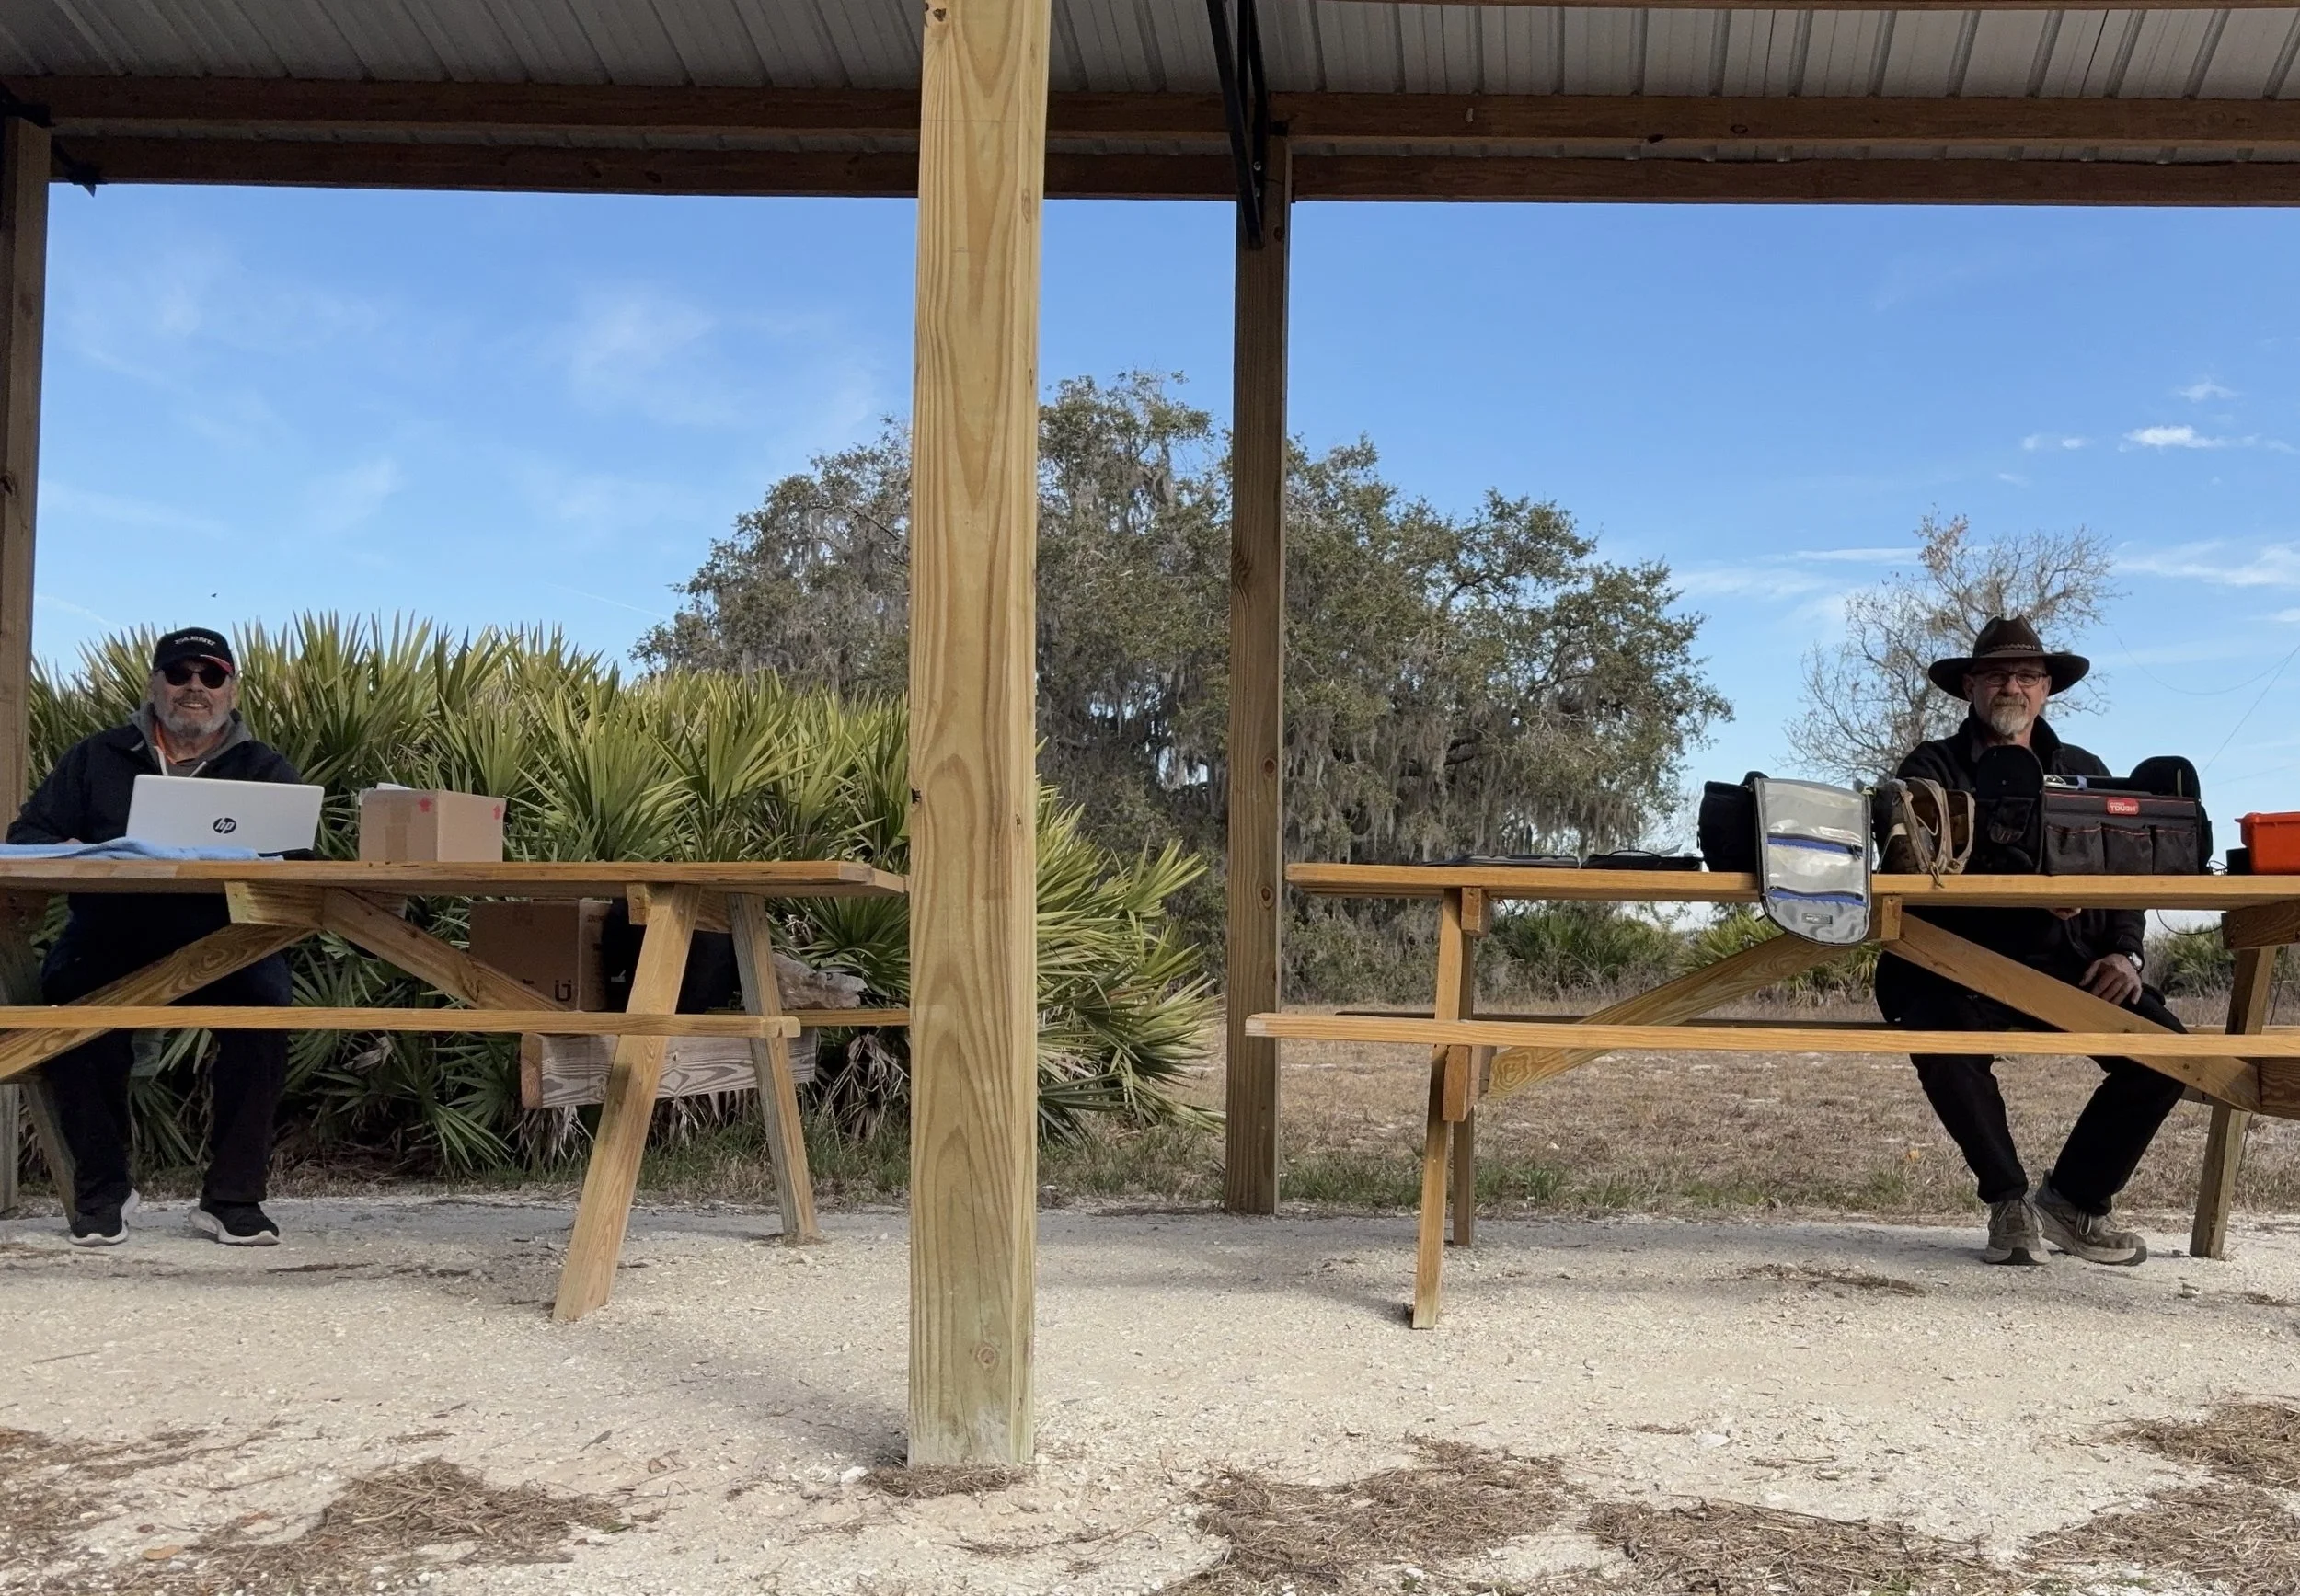
Multi-operator POTA setup at the pavilion - note the contrast in station complexity!
After about 4 or 5 hours of fun and games, we decided to break down and head back to our wives to get some lunch. It was a great day and I am glad I made a new friend as well.
Activation Summary:
- Park: Moody Branch WMA (US-6317)
- Operators: WK4DS & NA2B
- Total Contacts: 104 (43 WK4DS + 61 NA2B)
- Mode: Primarily CW, some FT8
- Bands: 40m, 30m, 20m, 17m, 15m
- Radios: Penntek TR-35 (QRP), HF Signals sBitx V3, Yeasu FT-891
- Power: 10 watts or less (QRP), 40w on 40m, 50 watts on 20m
- Antenna: Inverted L wire antenna with remote tuner, (Chas ran a random wire)
- Duration: 4-5 hours
You can help support this website by using these Amazon Affiliate Links:
QRP/Portable Radios:
Antennas & Tuning:
CW Equipment:
Power & Accessories:
Organization & Transport:
BONUS ITEMS
73
WK4DS - David

Ten-Tec Scout 555 60m Band Module: IF Filter Redesign & Final Testing [Part 4]
Today saw me finish the TenTec Scout 555 60 meter Band Module Project in the workshop, now it is on to phase 2, testing in the field… I had wanted to rework the filter in the IF stage as it was not great from before. I was able to get a signal out of the radio, but the filter shape left something to be desired…
This is the 4th episode in my Ten-Tec Scout 555 60-meter band module series:
- Part 1: Initial Conversion and Filter Design
- Part 2: Crystal Selection and Mixer Circuits
Today saw me finish the TenTec Scout 555 60 meter Band Module Project in the workshop, now it is on to phase 2, testing in the field… I had wanted to rework the filter in the IF stage as it was not great from before. I was able to get a signal out of the radio, but the filter shape left something to be desired…
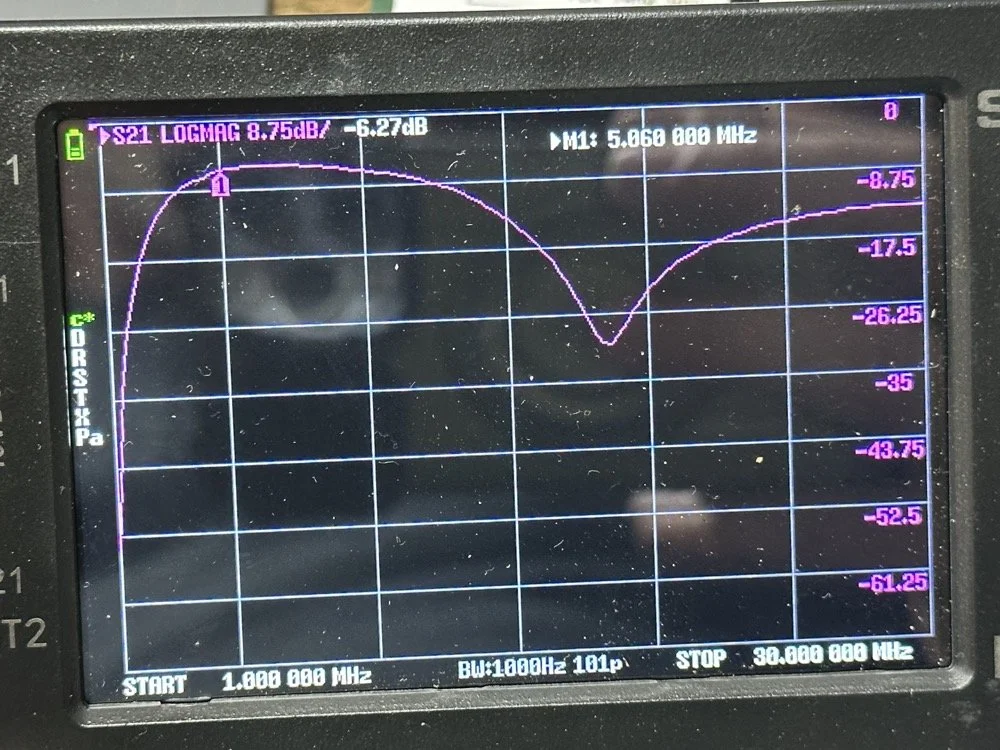
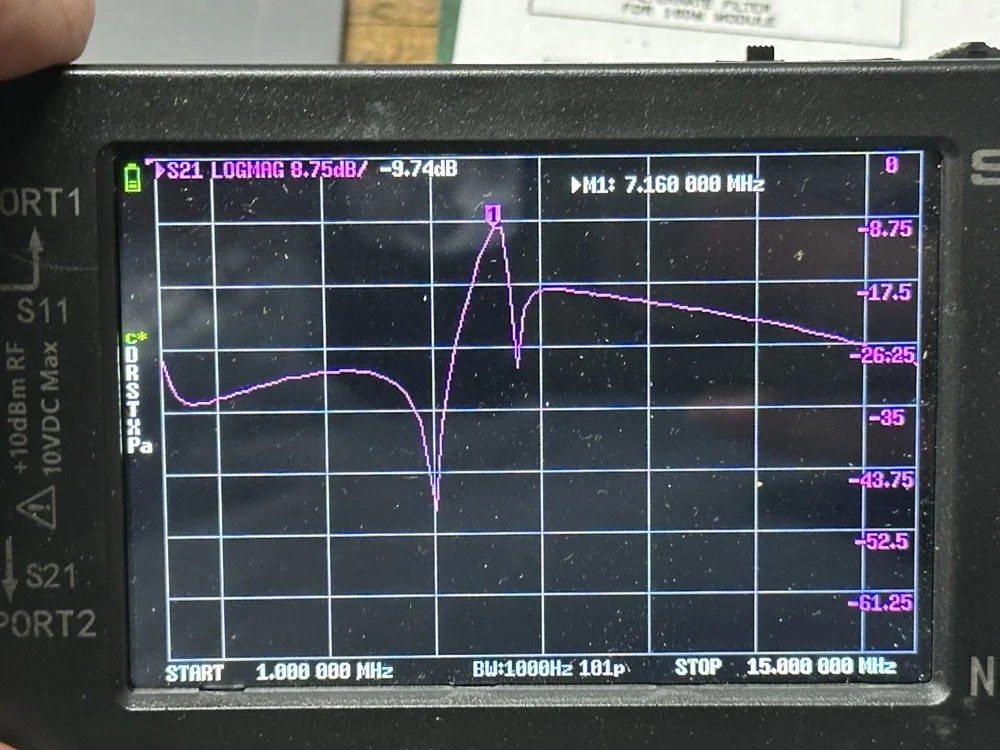
The first chart image is of my filter after I got the radio to work. This is not what a bandpass filter should look like. The lower photo is of a factory TenTec VERY narrow bandwidth 40 meter bandpass filter. Turns out, this is almost impossible to replicate with discrete components that are not adjustable…as you will see. They used two tunable inductors to achieve this filter shape. I almost went to the trouble of adding some trimmer capacitors to mine, but as you will soon see, I felt it wasn’t needed. I soon learned what a filter Q is and why it matters when your trying to build a filter. I used some online calculators to get the component sizes for the filters and after messing around with a couple, I found one of the calculators had came up with numbers that were actually able to be made in my shop.
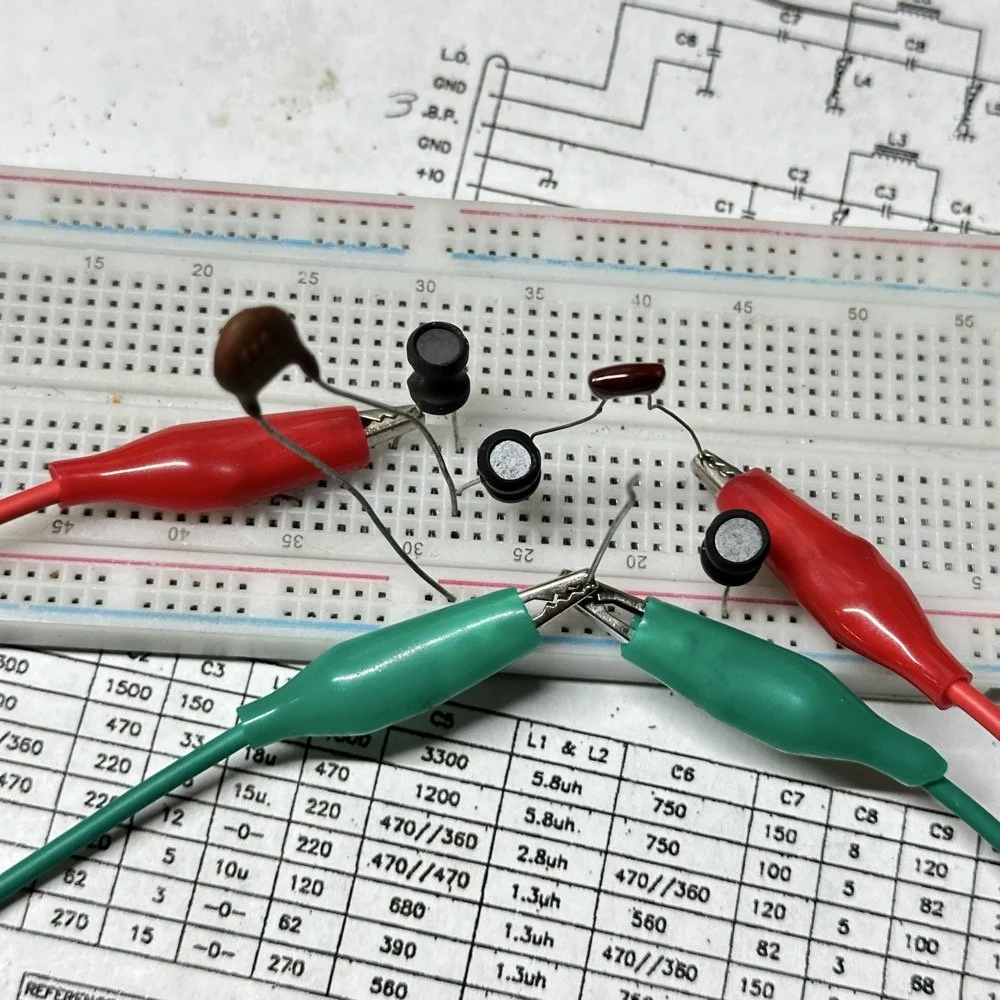
Armed with this information I decide to breadboard this filter first so I could tinker with it before soldering it to the band module circuit board. This, as it turns out, is a terrible idea if you plan to simply transfer the parts to the board and solder it all together. There is SO much stray capacitance and inductance at RF frequencies with a breadboard that you can build up a circuit, but when it comes to making the final item on perf board or Manhattan style, that you WILL use different values.
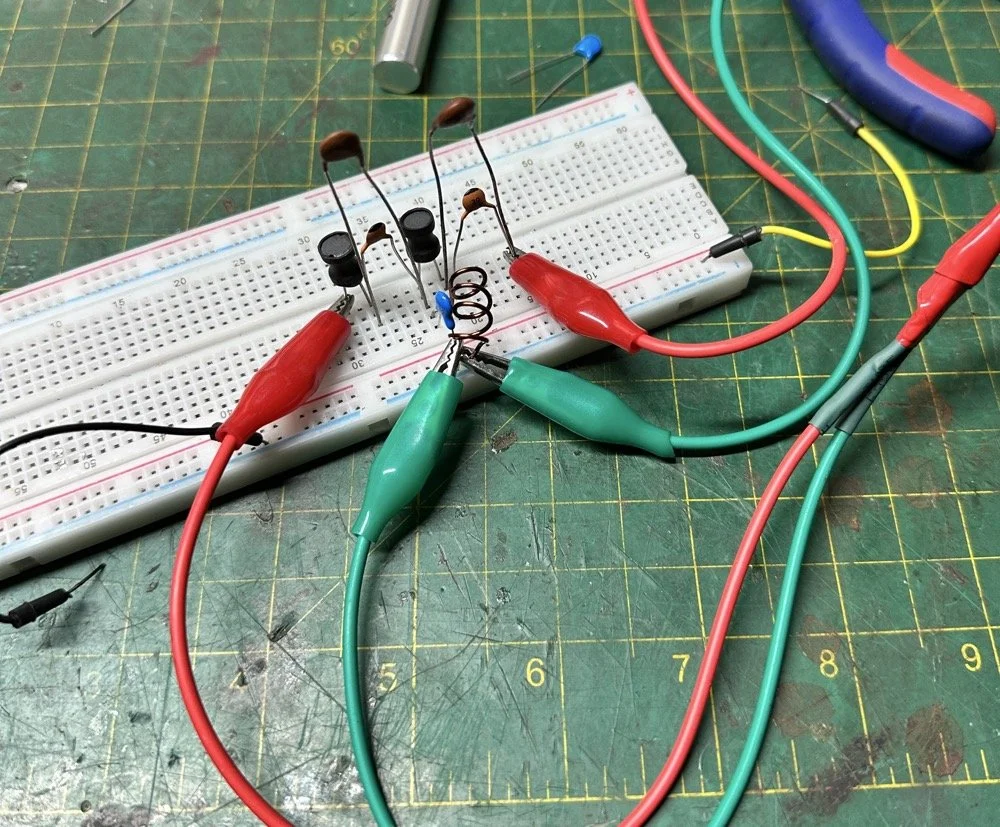
Looks good doesn’t it? Well look at the plot below! It actually looked great! It did have some insertion loss that I was not super happy about, but that plot looks great! Yes, the one inductor is hand made, I didn’t have one small enough in my little kits to work here I so wound one for the job. Notice how long the leads are on those components, that will come into play very soon…
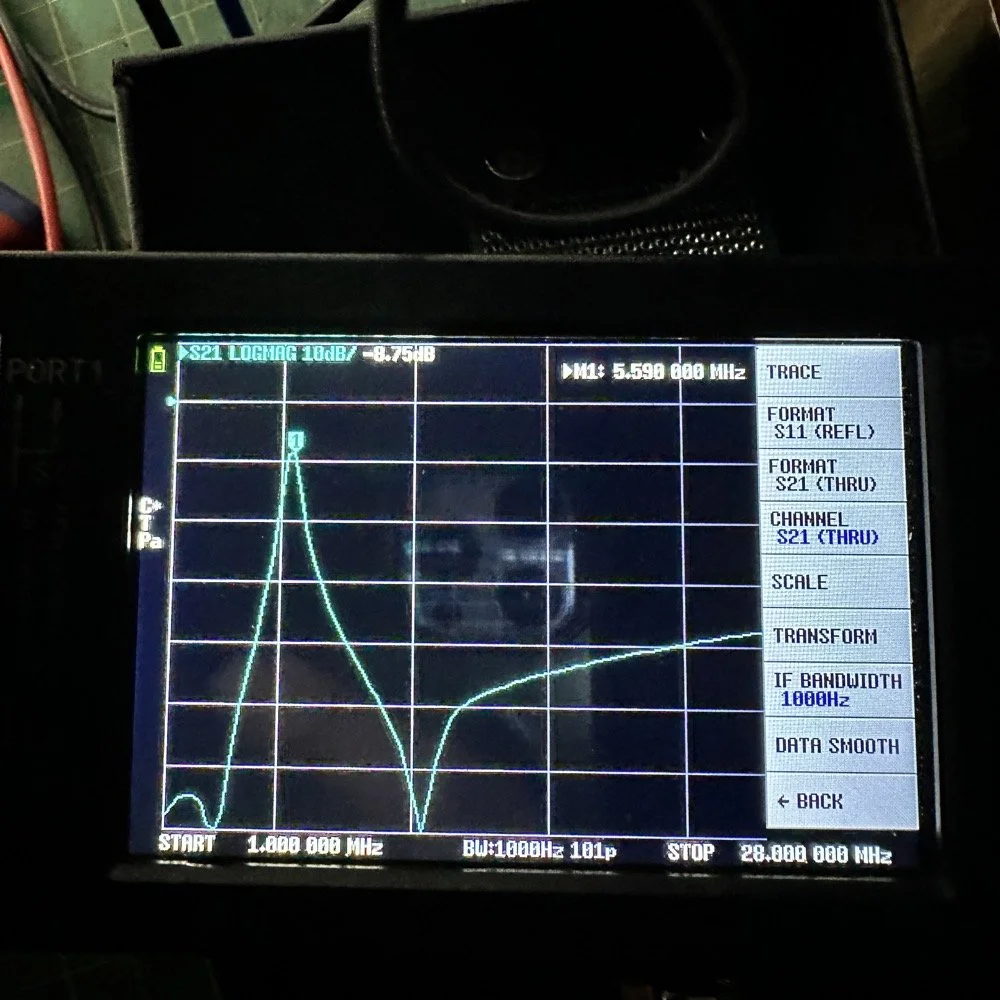
I may have gotten a little aggressive with the passband width… I think it was set to 200khz or maybe 500khz, but it was not much. I think the values I put into the online calculator were 5.4mhz center frequency, 500khz bandwidth and 3 LC stages in a “T” configuration. The bottom line on the chart is -70dB which is unbelievable! This thing was incredible! So I get the 60 meter module out and take it apart and strip out the old filter I had previously built wholesale leaving a clean slate for the new filter…
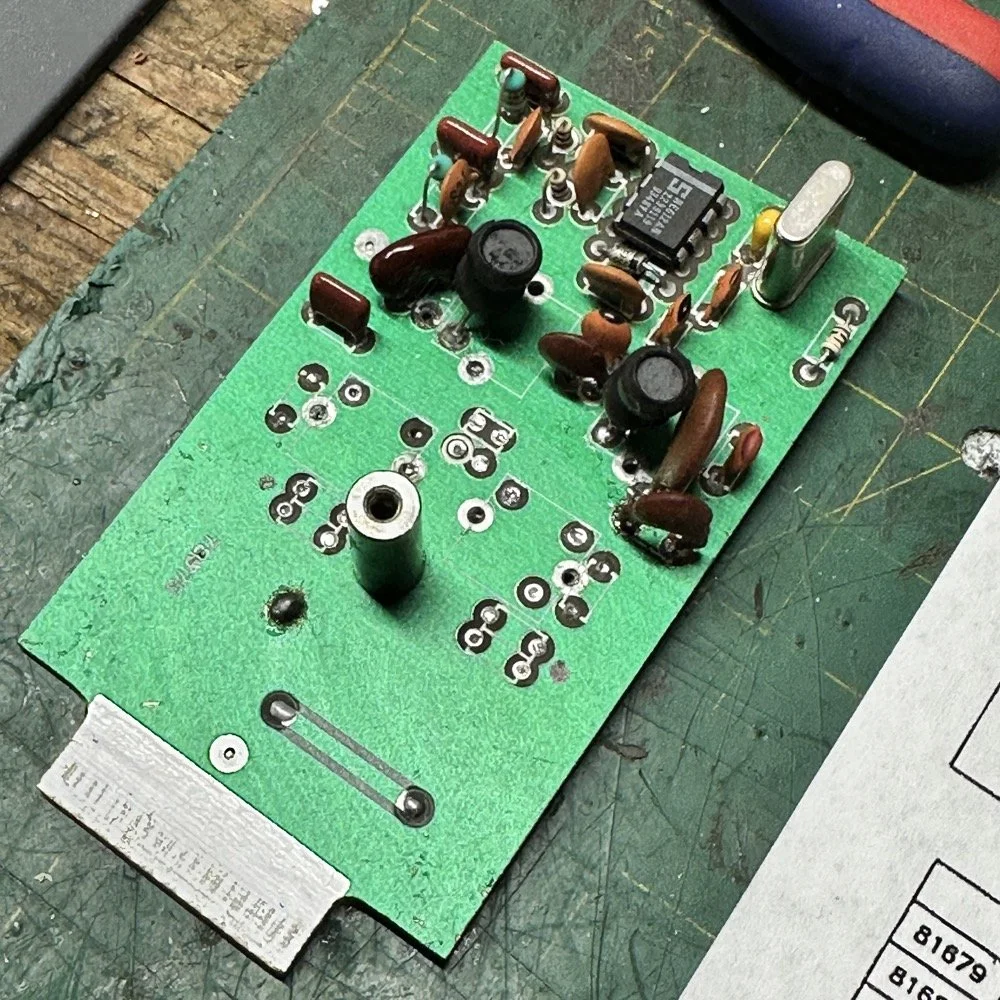
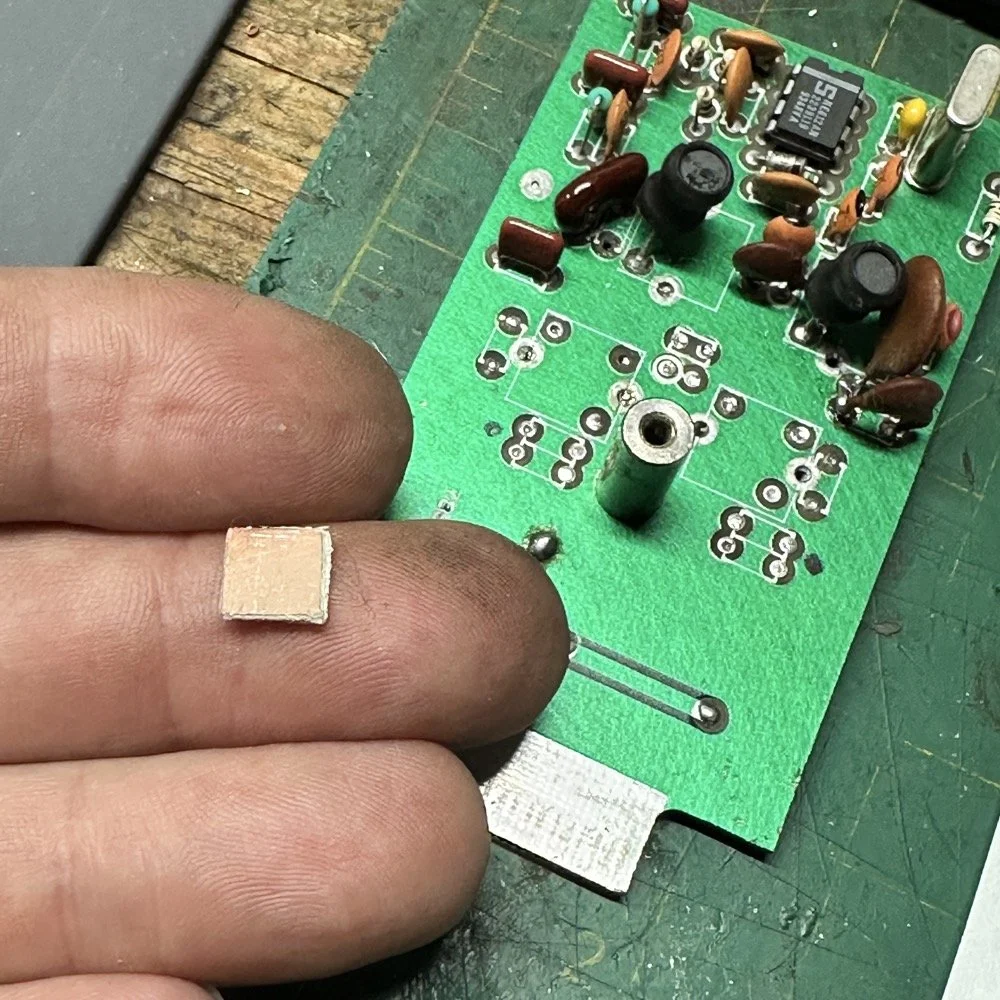
After I had the old filter gone and cleaned up a little, I cut me a pad as the new filter layout and the TenTec layout are different so I wanted to not have to permanently alter the circuit board other then removing the old components. This pad became the central connection point for the three stages. A little hot glue and I was in business! I simply tinned the whole top of the pad so I could land part leads where ever I wanted on it. This worked really well…much better than the filter I am about to build as it would turn out.
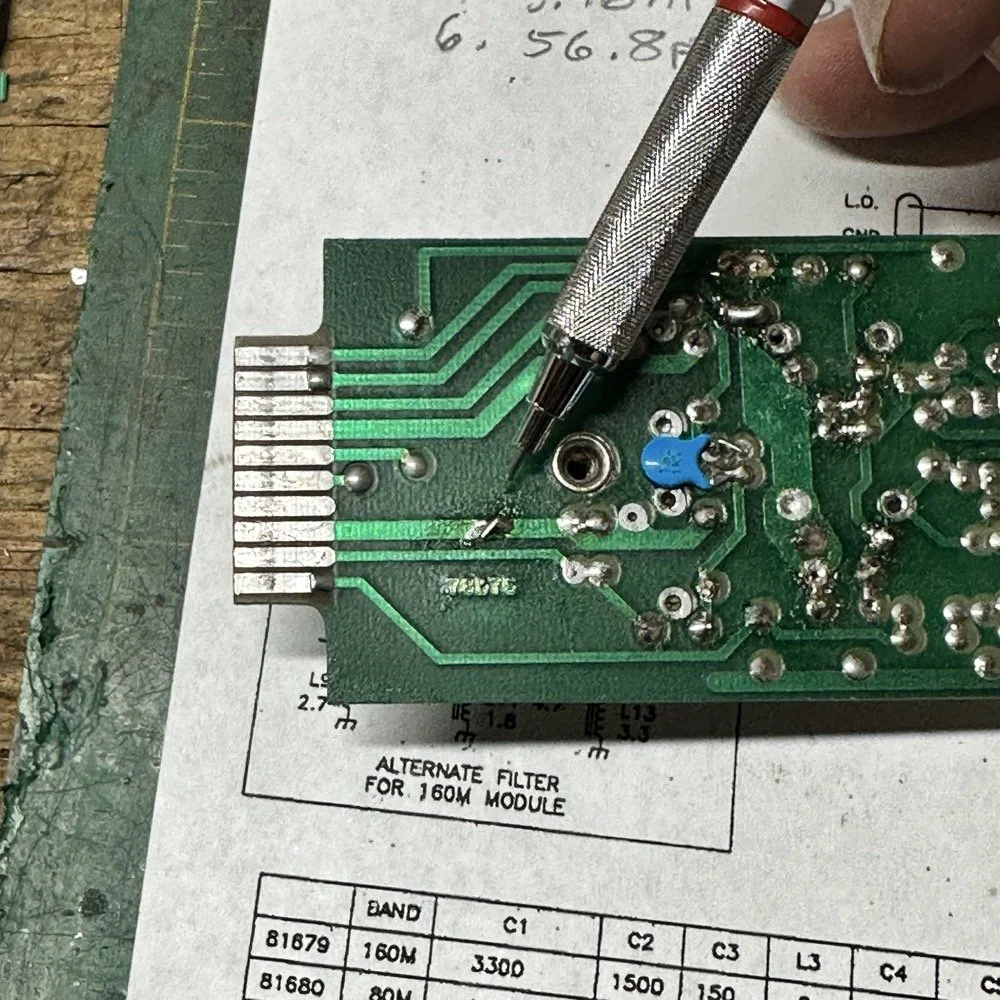
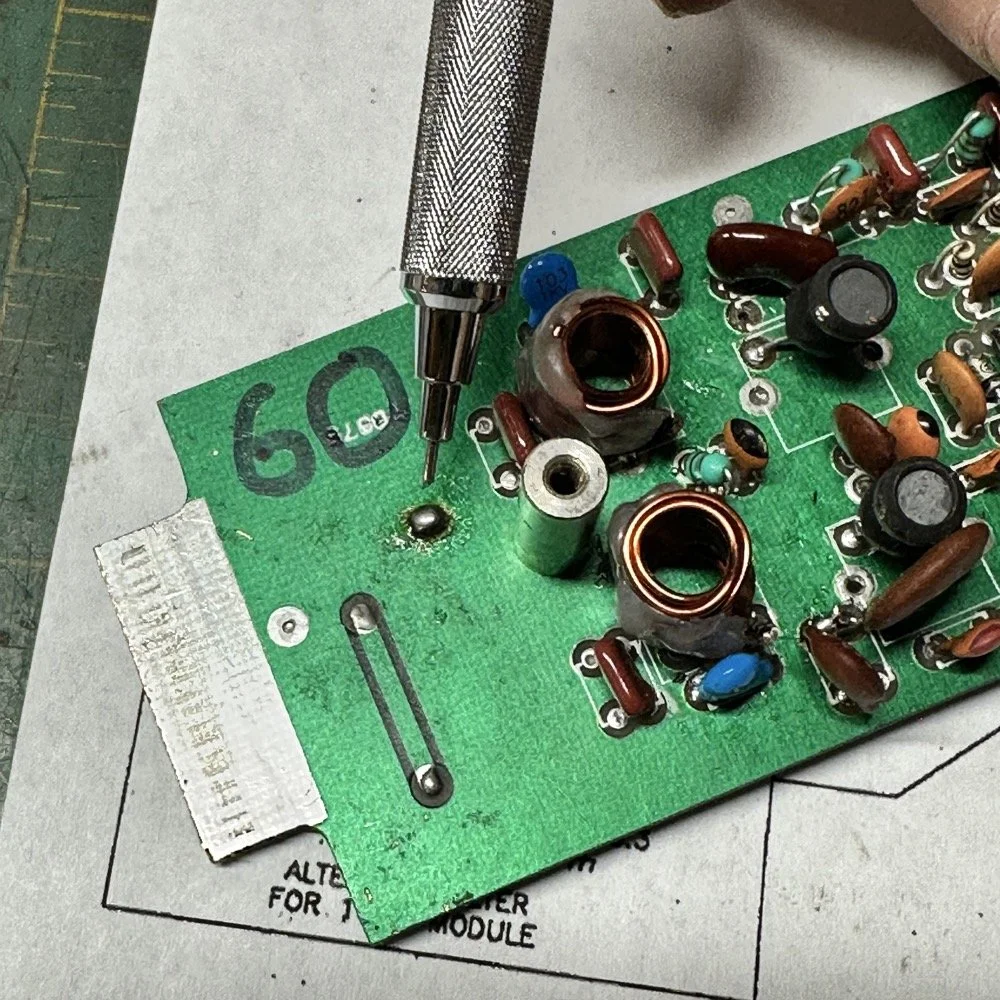
SIDE NOTE ABOUT MODIFYING SCOUT BAND MODULES:
What I am pointing out in these two photos is a home made Via that I added. You see, when you remove the canned tunable inductors from the board, turns out you break the grounds. TenTec decided that since these things were going to be here anyway, might as well use them for something. So they apparently decided to make them connect one ground plane to another in a couple of places on the board. Once you remove the cans, you lose a critical ground path…or two. I took a finger drill and a very small drill bit and drilled a hole from one trace to the ground plane on the opposite side(I am confident these are only two layer boards), then I soldered a bonding jumper wire in the hole so both planes would once again be connected again and all the stuff would continue to work properly. You also get to see the old homebrew filter in the below photo as a bonus.
Below is the result of me simply attempting to move the parts over to the circuit board and soldering them in place… What a mess. I started with the exact parts you saw on the breadboard, but when I connected the nanoVNA to the filter I found the center frequency had moved up 500khz! It was now pushing my desired frequency out of the passband!!! I was seeing something like 16dB of loss at the desired frequency.
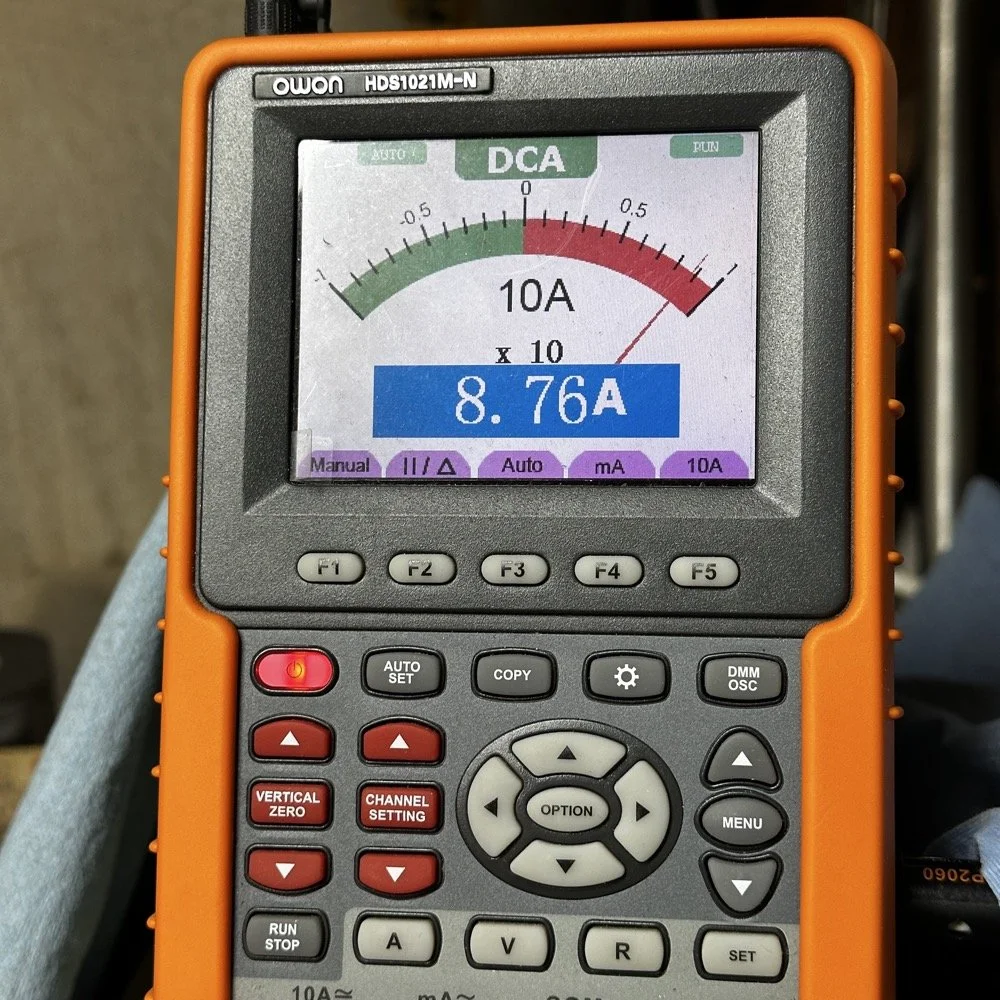
This is the world of ultra high Q passband filters made with inductors and capacitors I guess. Once I removed all the stray capacitance from the breadboarded system, all the capacitor values went down enough to make the filter not usable. That is why you see the mess below, I didn’t have room for the trimmer caps I have on hand so it was good ole trial and error method instead to get the passband in the right spot. To be fair, this mess actually worked, it just had something like 12 or 13dB of insertion loss in the filter which made the output power go way down. I used the amp meter to check it and the current draw on transmit with this filter was 1.8 amps and the current draw with the factory 40 meter band module was 9.3 amps. So I took a break and grabbed some food and went back to the drawing board…
I am going to admit something here that might make some people unhappy with me…I decided to use Claude AI to see what it would come up with for a filter design. I gave it all the parameters I had used earlier and (since it is a chatbot after all) had a conversation about what my goal was. I decided to move the bandwidth out to 1mhz giving me a decent shot at making a working filter without adjustable parts and using only what I had available on site.
This AI model came up with a “T” filter but instead of the center 2 LC components being in parallel, they were in series and so I built it. It tested really bad as far as rejection goes as it only attenuated about 8 or 10dB across the whole band and looked more like a poorly designed high pass filter instead. This did give me some inspiration though. So I went back to the online calculators that are there to figure part values for you and changed my approach. I went to this website and just made a low pass filter and then a high pass filter and coupled them together with an inductor. Why did I choose an inductor? Because all the capacitors I tried kept increasing the losses in the filter output is why. As it turns out, if you attenuate the IF signal in the radio the output power get lowered and the radio goes “deaf”…
Below is what I came away with finally. Yes, only 3 inductors and two capacitors.
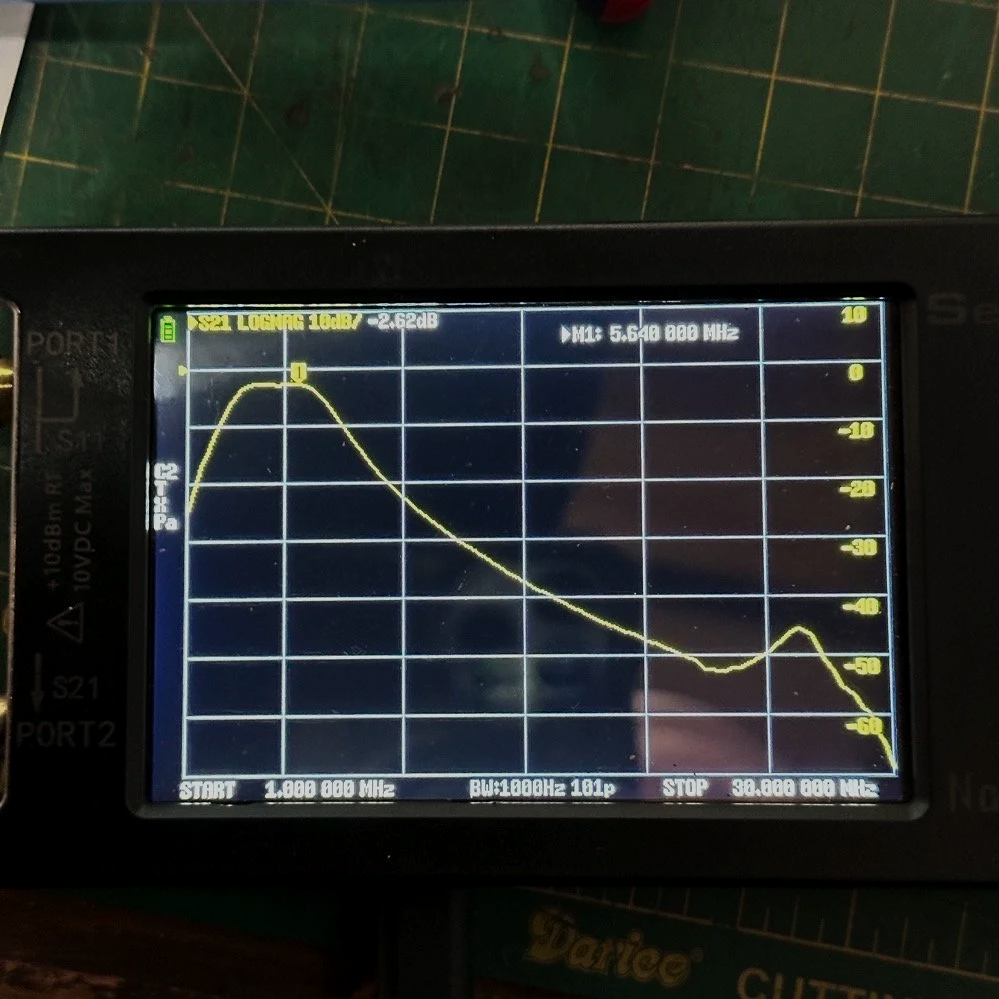
Below is the filter shape for this simple filter design too. It is a lot better than what I started with and I was able to build it with parts that I had available to me at the time. Could the passband be narrower? Yeah, it could, but I am not going to throw too much shade at this filter. This is what ham radio is all about in my book, experimentation. The marker is at 5.64mhz which is 250khz above the highest place I can transmit so I know this filter wont attenuate my signal and the radio will work as it should.
The original values for the filter ended up being wrong, but I simply did what I did in the previous filter build and just used it as a jumping off point and started switching out parts one at a time with different values. This tactic coupled with looking at the nanoVNA to see what the new part did to the filter shape gave me the results you see. At first I didn’t write down what I had done, but it quickly became apparent I needed to note what I had done and so things progressed much more quickly once I did.
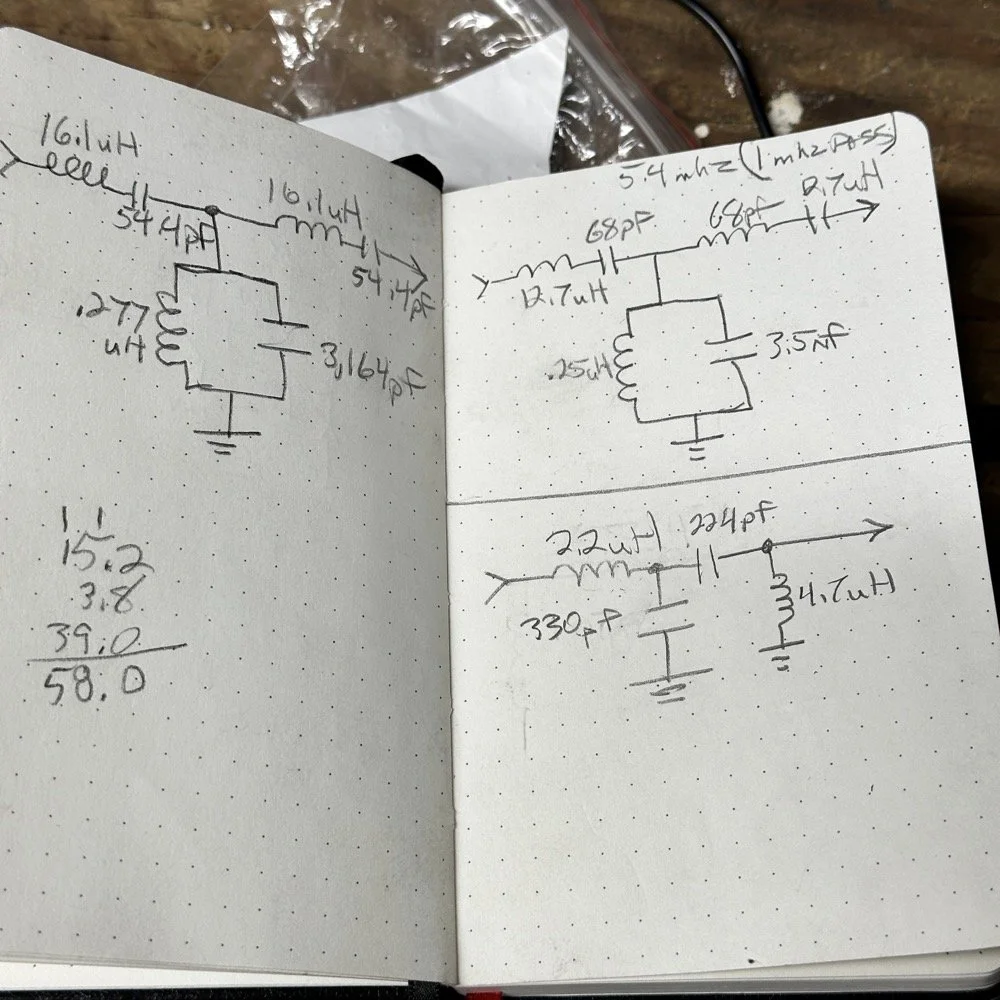
The above photo ( bottom of the second page ) is what I started with on this part and the lower photo is what I ultimately ended up with for the actual parts I used to build the filter. You can see where I was trying all sorts of stuff to get a working filter, these are not the only sketches either…
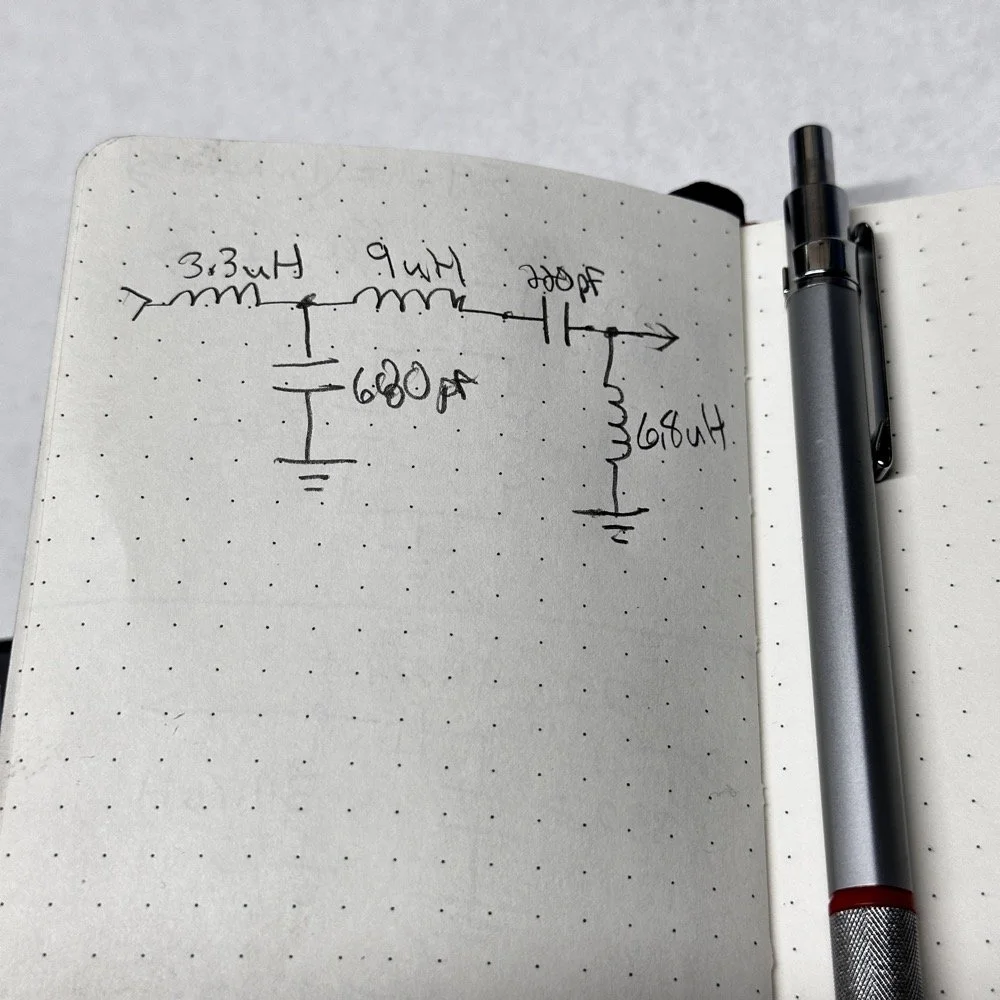
This is what I ended up with ultimately to get the filter shape above. The impedances are wrong, I am sure as I didn’t take them into consideration at all, but the radio is working correctly now (from what I can tell) and transmits almost at full power. Shoot, they could be right and I just got them right by accident, I really don’t know to be honest.
This is the output power draw now for the 60 meter module on the same radio as the 40 meter module previously compared. I can live with that! I checked it when I got into the shack at the house and it is a little over 35 watts into a 1.3:1 SWR load. That will work just fine for me. (Note: The current reading was into a 50 ohm dummy load at the workbench so I don’t know the exact current draw in the shack.) This radio will produce more output power too, I have it dialed back on purpose to about 40 watts for the 20 meter band module that I use with this radio.
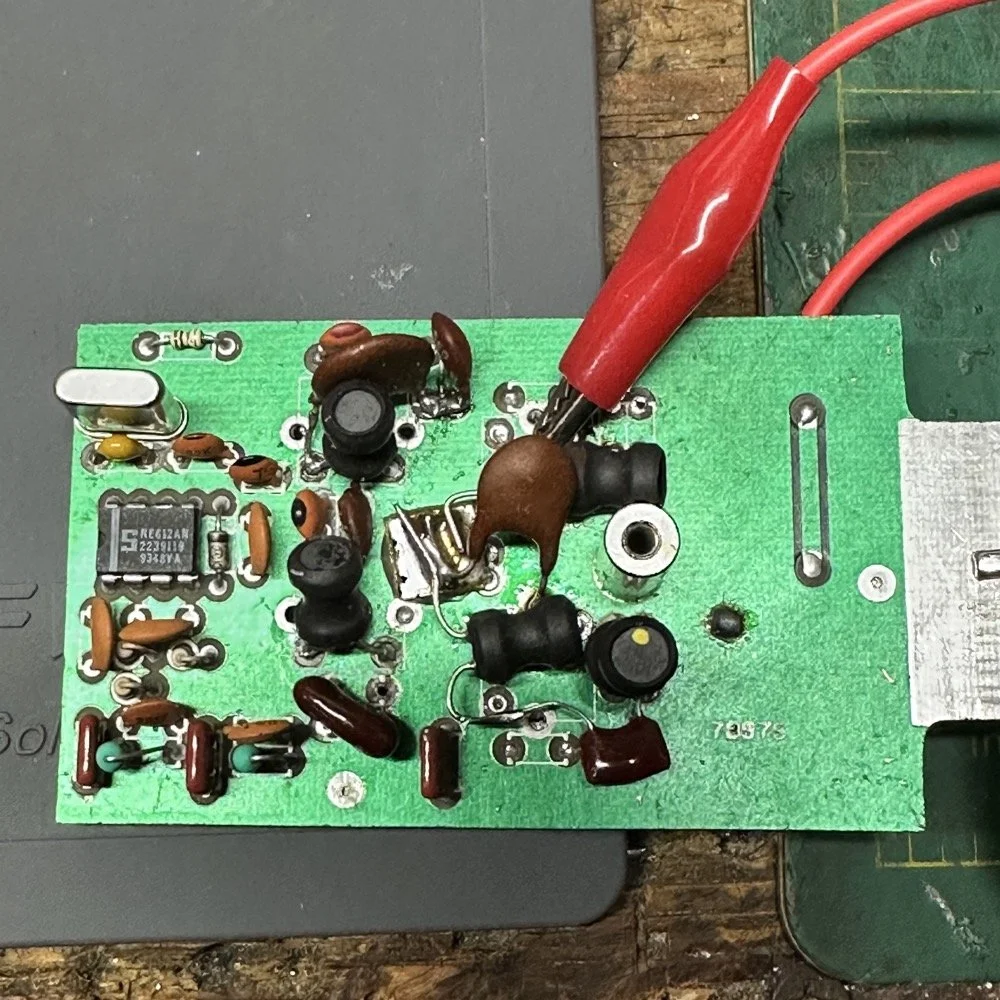
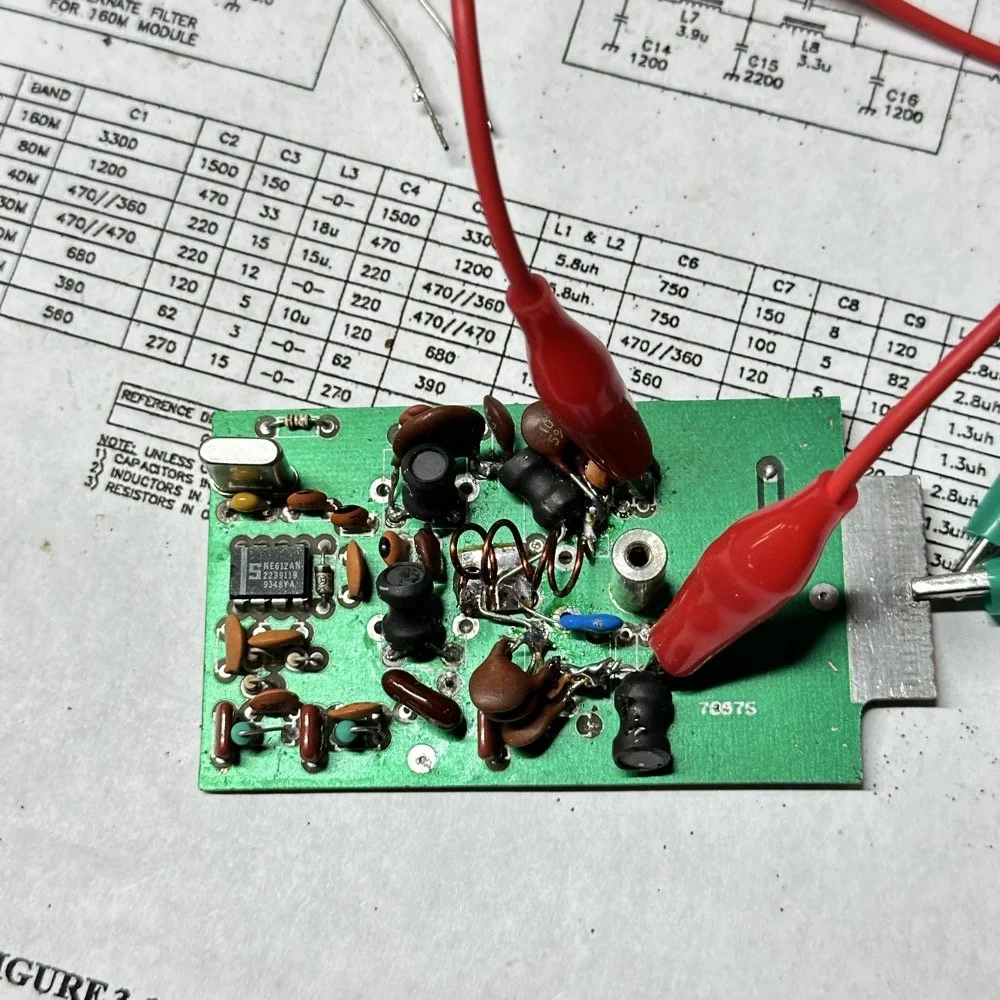
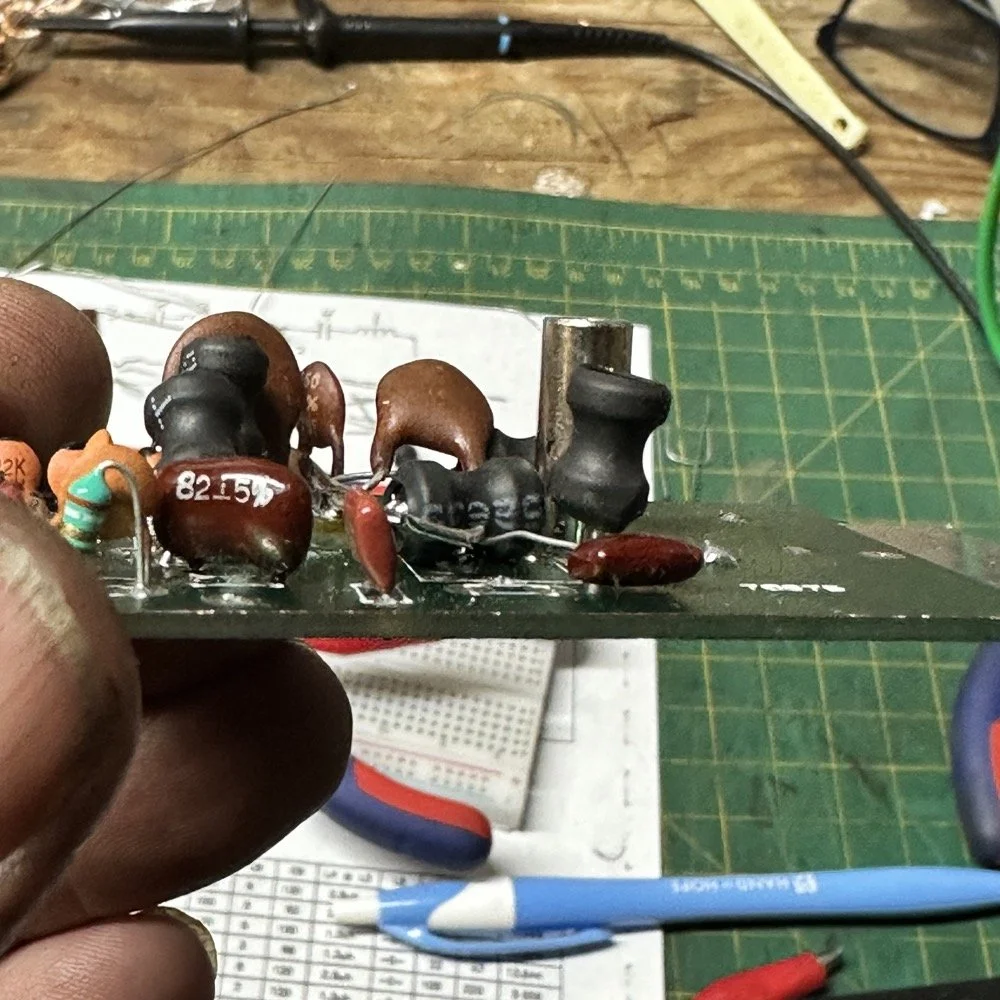
This is what the final filter looked like when I was finished building it. This looks a lot better than that mess I started out with above. Not overly complicated and generates a respectable filter shape. The radio sounds good too. So I am happy with this.
Side note about the above photo, I had noticed in my original filter design that the orientation of the inductors made a difference in the filter profile on the nanoVNA so I started marking them with a paint pen to remember the orientation. This filter didn’t seem to care too much about that for some reason but the original cared ALOT.
The side view photo shows something else the I have not mentioned in these write-ups. The filter has space constraints. The filter can not be taller than that metal post or the other circuit board with hit the parts and the parts can not go past the post either as that is the space for the output low pass filter from the other board. So parts count matters…
It feels oddly satisfying to see the finished module and to use it in the shack. All I did last night was listen to some stations having a QSO and how well it could hear them. I also dialed up the webSDR again and listened to myself calling CQ for a bit with no takers on a different channel. I know the radio is working as the listening station in Utah could hear me…
Tonight I hope to find a chance to jump into a QSO with someone and see how it sounds to them.
I hope this has inspired you to do something with your gear whether it be build a kit or modify a device to do something new or different or even to repair something you have that is not working now…shoot maybe you will learn something you didn’t know before! That is what has happened to me on this journey, I have learned a lot about how filters work and what affects them in use. I am starting to understand impedance matching the stages as well as insertion loss. A lot of things I never understood before are now becoming more clear. I also have a much clearer understanding about how the TenTec Scout 555 radio works as well…
Thanks for following along on this 4-part journey! If you build your own 60-meter module for the Scout 555, I'd love to hear about it. 73!
You can help support this website by using these Amazon Affiliate Links:
QRP/Portable Radios:
Antennas & Tuning:
CW Equipment:
Power & Accessories:
Organization & Transport:
BONUS ITEMS
WK4DS - David

Ten-Tec Scout 555 60m Band Module Build: Final Filter Tuning & Field Testing [Part 3]
Today I took the newly minted 60 meter band module for the Ten Tec Scout 555 out on it’s maiden voyage to a POTA activation. I made a contact in the shack with it before leaving on my short trip to Florida so I felt confident it was ready to use. Today we are discussing what happened and what is going on from there with the 60 meter band module project. (Spoiler Alert: It kinda wasn’t really ready yet…)
Today I took the newly minted 60 meter band module for the Ten Tec Scout 555 out on it’s maiden voyage to a POTA activation. I made a contact in the shack with it before leaving on my short trip to Florida so I felt confident it was ready to use. Today we are discussing what happened and what is going on from there with the 60 meter band module project. (Spoiler Alert: It kinda wasn’t really ready yet…)
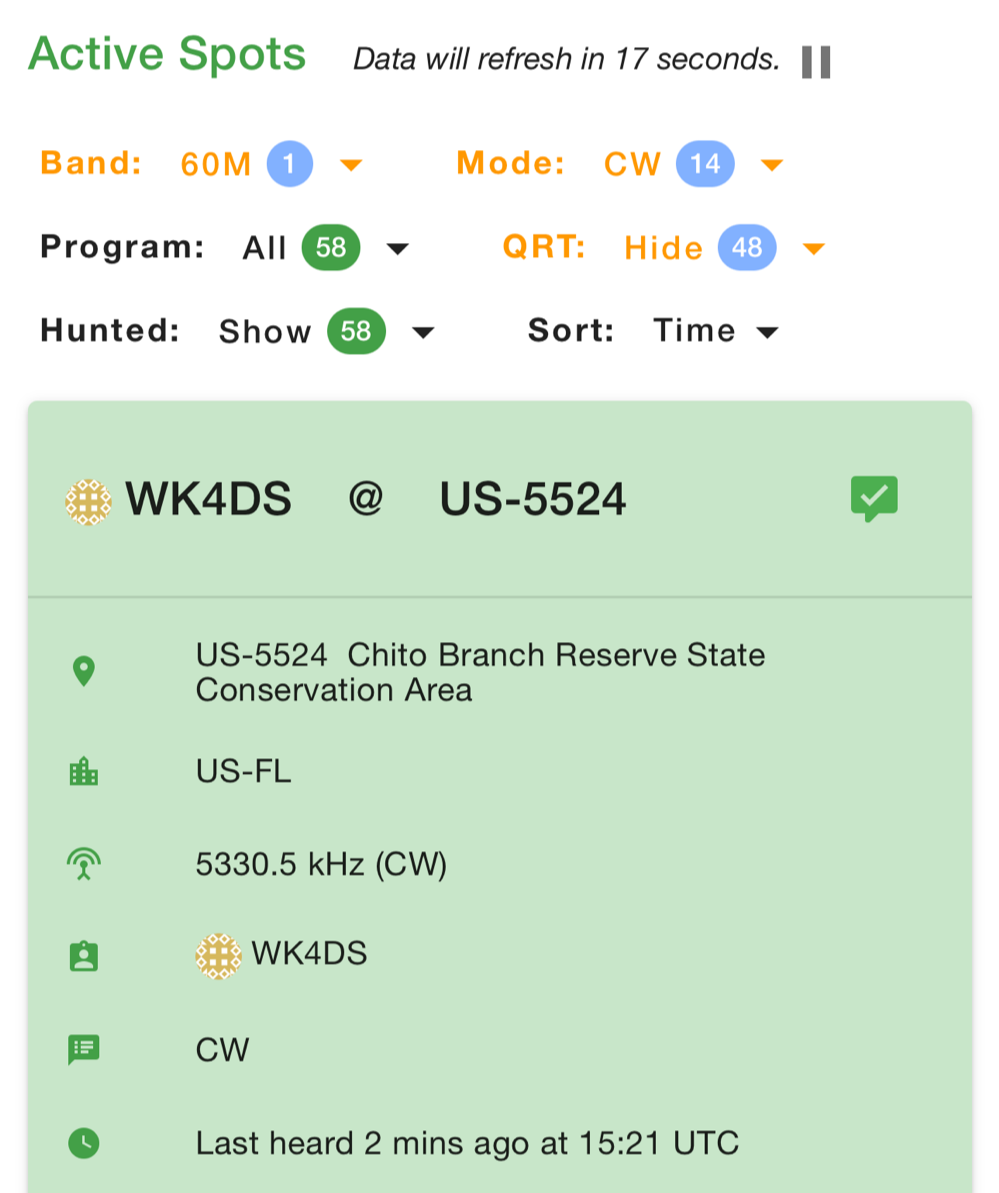
As you can see from the spot page report below, I was the only one on 60 meters this morning and it was roughly 9:45 (might have been 10 to be honest, I cant remember) local time before I got everything setup and running. This made 60 meters not a great choice to be honest for a daytime band. The 60 meter band is a great evening and really early morning band, but once the sun comes up these low bands tend to get really noisy. The band noise was quite low to my surprise today. I usually get a good bit of man made noise in this spot so I was pleasantly surprised when the noise floor was really low…or the band was closed. Who knows at this point?… I am starting to lean towards the band being closed as I couldn’t hear the FT8 crowd either, and those guys are ALWAYS on the band if it is open at all.
Undaunted by this and the lack of any kind of signal on the band, I setup and started calling CQ…and called …and called… then I finally got a station in North Carolina ( WA4CHJ - thanks for answering me, I really appreciate it. ) and with that I had a call in the log on 60 meters with a Ten Tec Scout 555!!! I can’t be certain this has been done by someone else, but as far as I know, I am the first to make that happen! After calling CQ for about 7 more minutes with no answers, I noticed that the ALC light was not coming on when I would key the radio and it was showing about 20 watts forward power on the built in meter. I checked the SWR and it was fine so it had to be in the module. I tried calling for a little longer and started getting an odd kind of “hashy” crackle on the CW sidetone and when it would make this sound the power would go up to the normal level and the ALC would come on…Upon this realization, I decided it would be better to sideline the module till I got back to the work bench next week instead of risk damage to the module or the rest of the radio. It also occurred to me that the RBN never heard me, not one time, while calling on this day so the band must have been closed…
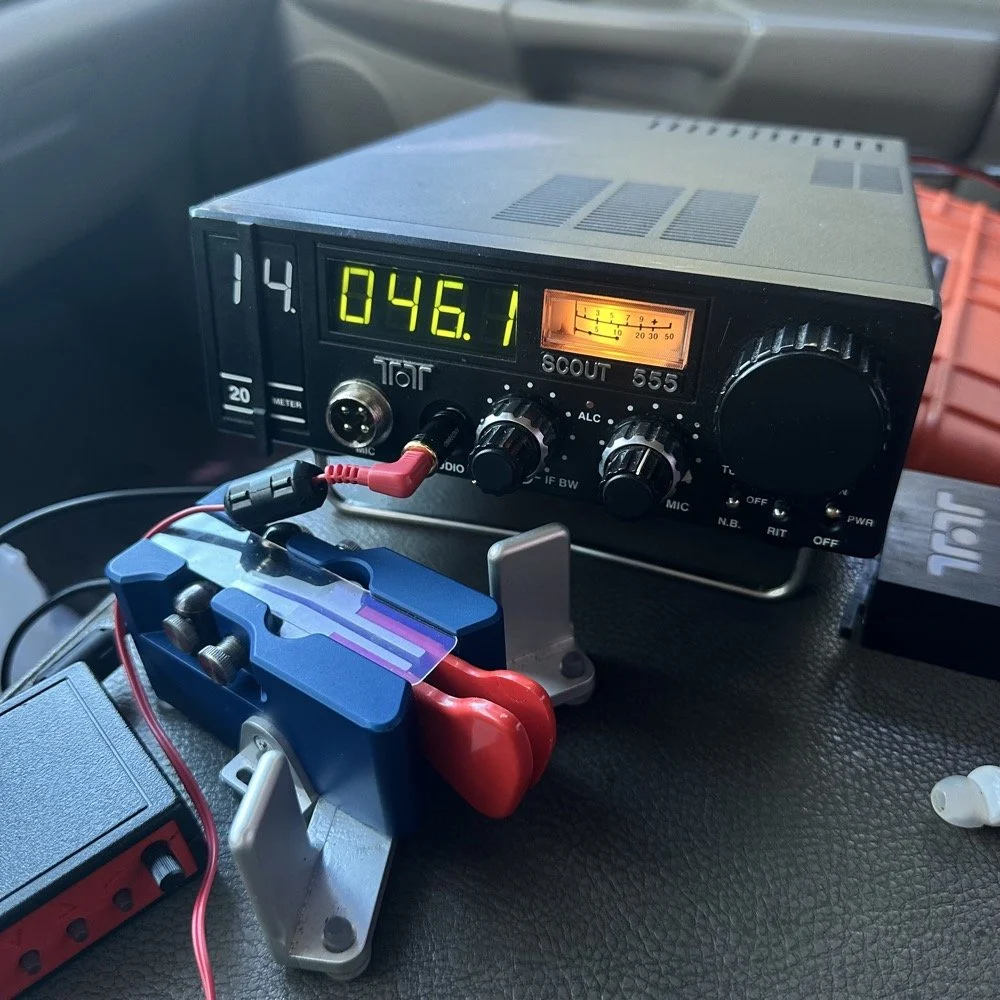
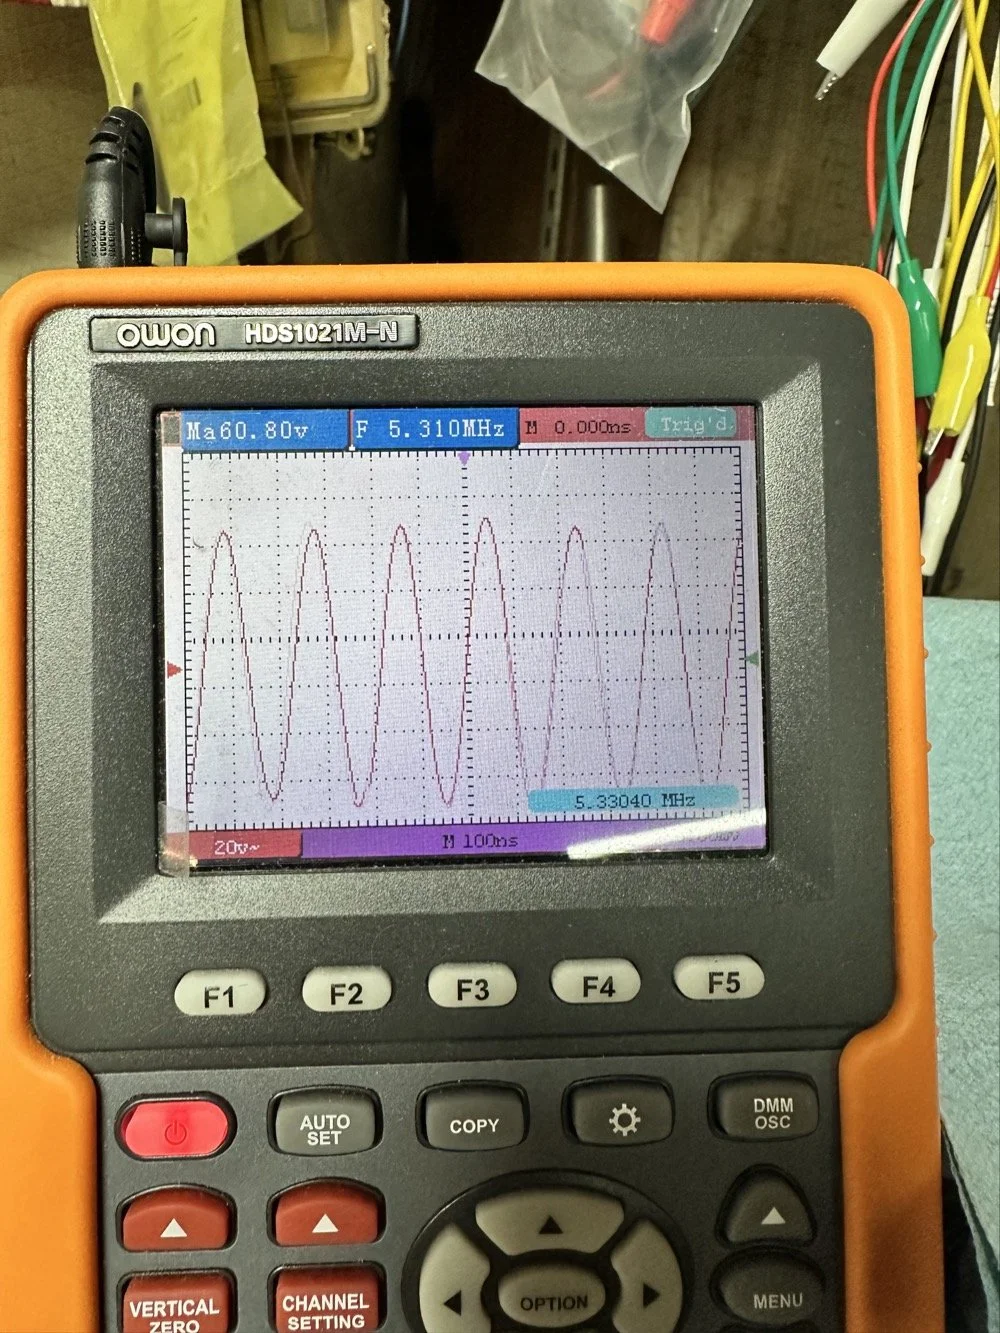
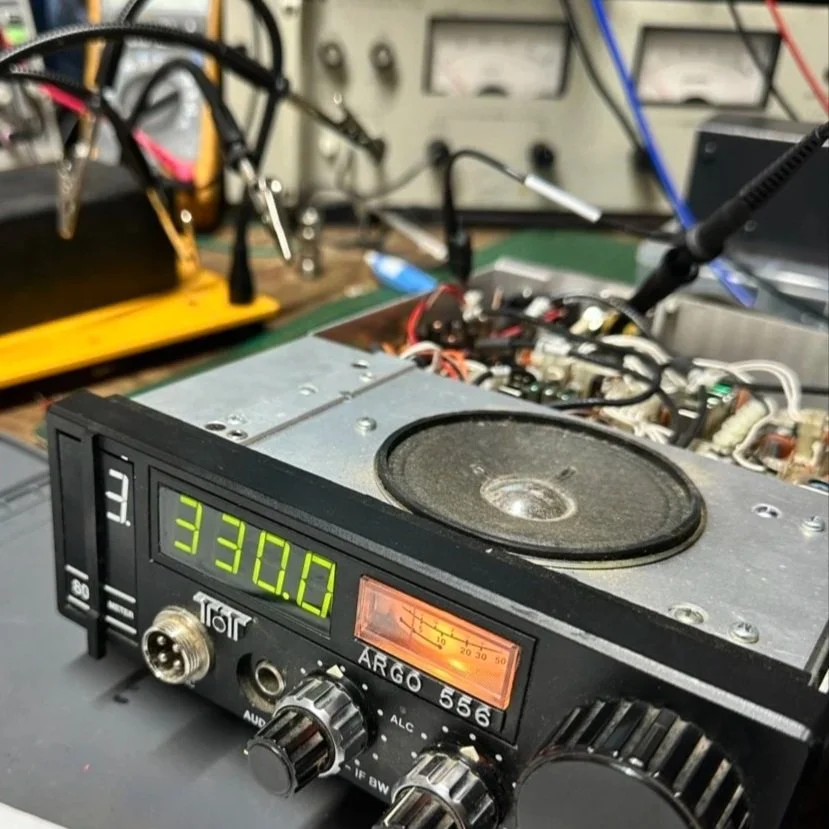
You gotta admit though, that setup below is kinda sweet… Also the frequency is tuned off by the side tone (this is normal for the Scout 555) so it is actually on 5.3305 mhz in this photo. (I checked it with my Omni-VII before leaving home so I knew it was on frequency)
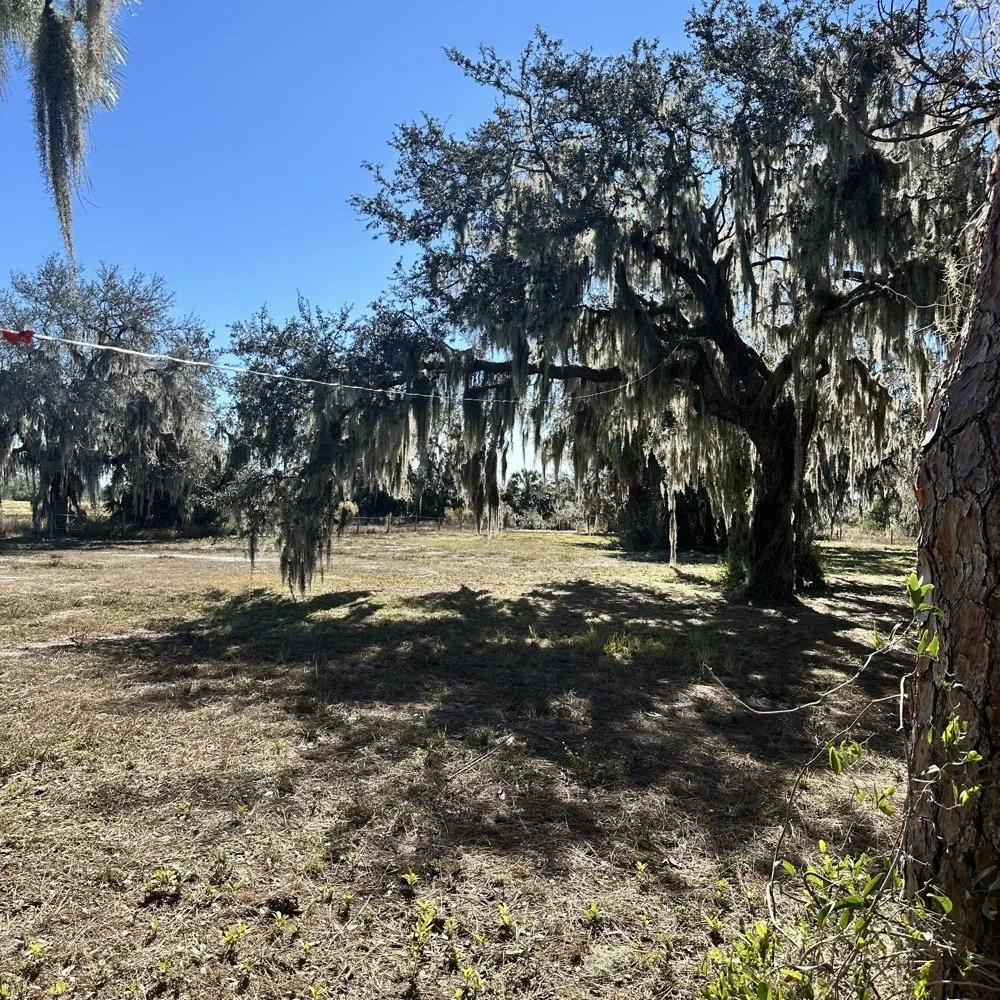
I setup a long wire today since my vertical will only tune to 40 meters with the home-brew load coil and I was a little strapped for time and just used an MFJ manual tuner instead. This allowed me to get a 65’ wire up in the air and a couple of radials and run with it. I was able to tune it well into the 60 meter band with the null covering the entirety of the band space so no tuner changes were needed as I moved around in the band.
SIDE QUEST:
This little segment will be about the rest of the activation for my readers that follow those as well.
Today was a great day…once I moved to 20 meters! Turns out 20 meters was alive and well today with only about 6 CW activators on the band. This gave me plenty of room to find a nice quiet frequency as well as lots of hunters were out today as well. I tuned up on 14.047 mhz and started calling CQ, I think it took two calls max to call in a extraordinary pile up for me! The stations were deep and strong! I swept aside my normal pleasantries for the most part and compacted the closing to what I felt was a minimum and the calls just kept coming in! I worked 49 calls in 41 minutes! That is a record for me! At this point I literally called CQ one last time to make sure there was no one else waiting and got no replies so I immediately called QRT and shut down the radio. I was actually out of time and had to get the rig packed up since I needed to pick up the wife from class. This had to be the fastest 49 calls in the history of WK4DS amateur radio in my totality of radio… haha.
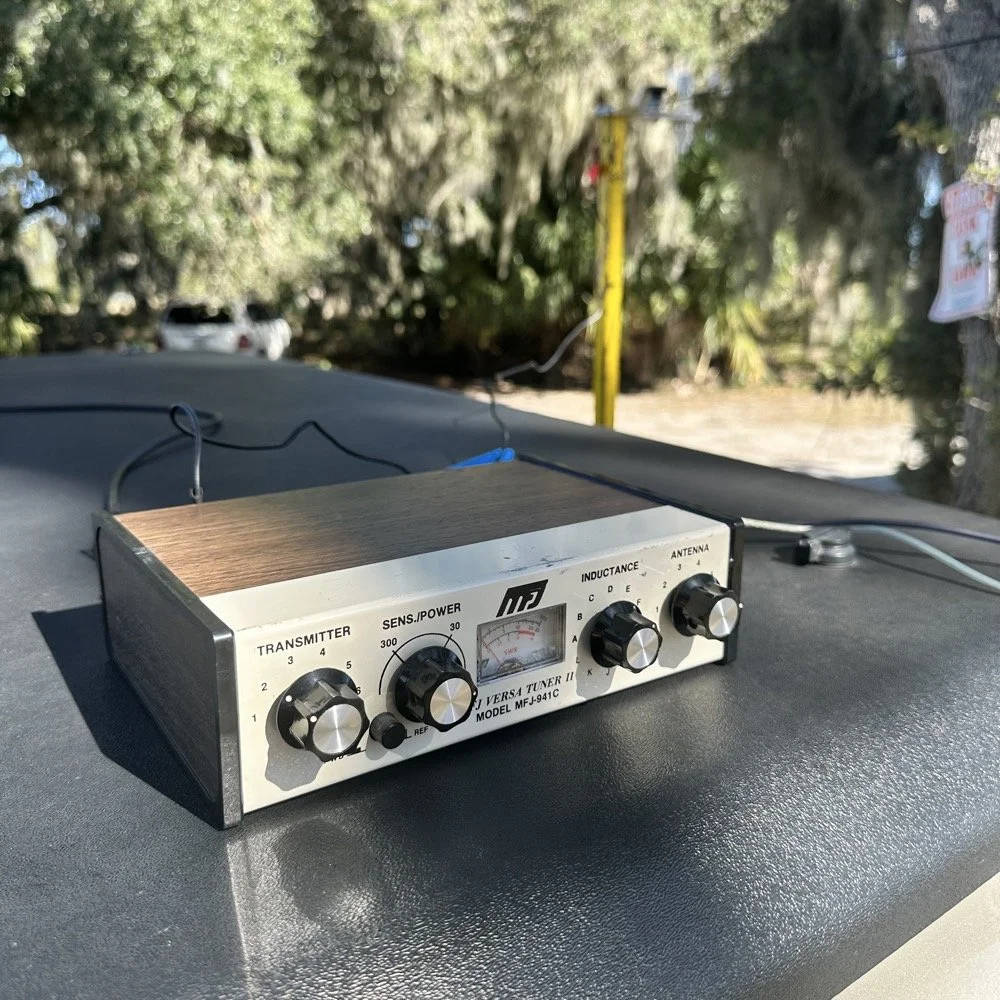
MFJ was a company that some complained about (Surely you have heard them called More Fine Junk) but to be honest, everything I have ever bought that they made has worked exactly as described and was pretty reasonable in price too. I hope someone fills these shoes for the future hams coming into the hobby, this little tuner is amazing for what is in that tiny little housing. It tuned this long wire just fine and didn’t need huge capacitors or inductors to do it. Not to mention it was really economical too. Good kit is hard to find so if you plan to do POTA in the field, I recommend one of these in the box of stuff, it WILL bail you out one day. This tuner has bailed me out a couple of times now…
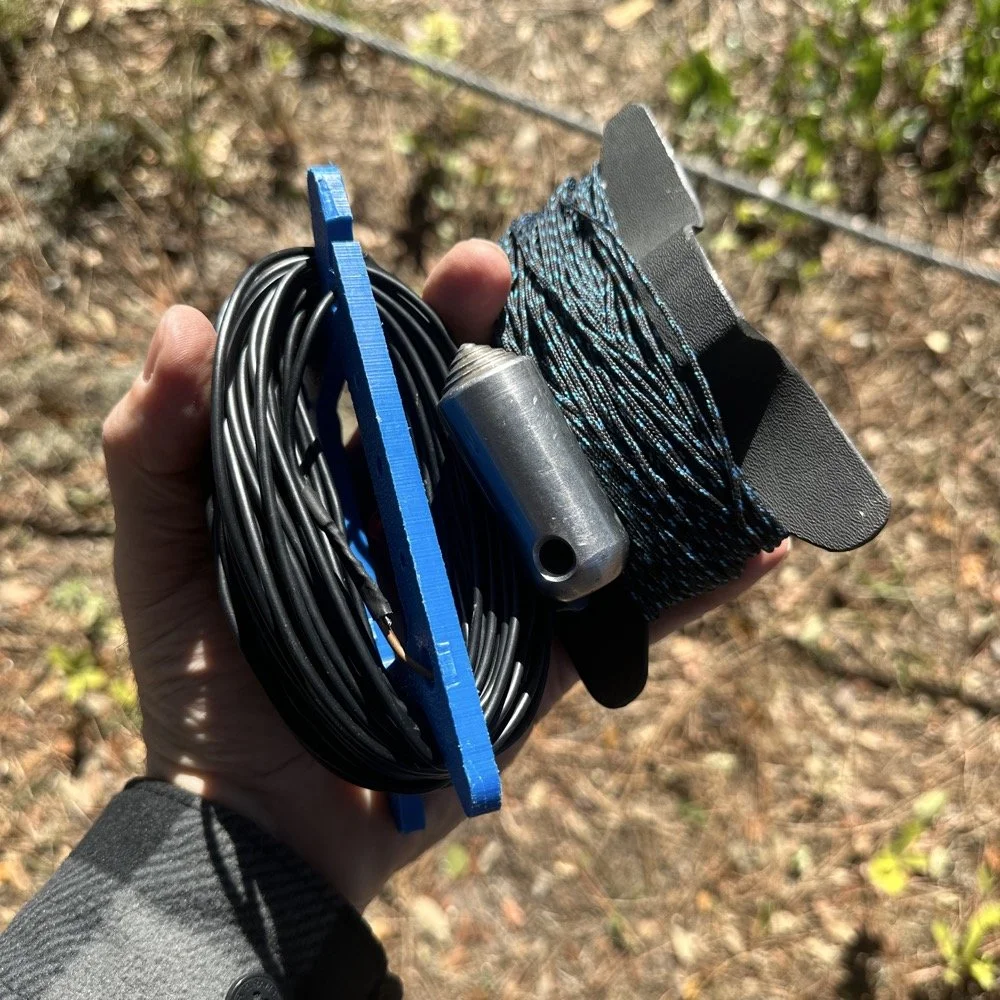
A throw line, a weight (that I made in the machine shop out of scrap stainless steel) and 65’ of wire made for a lot of fun today.
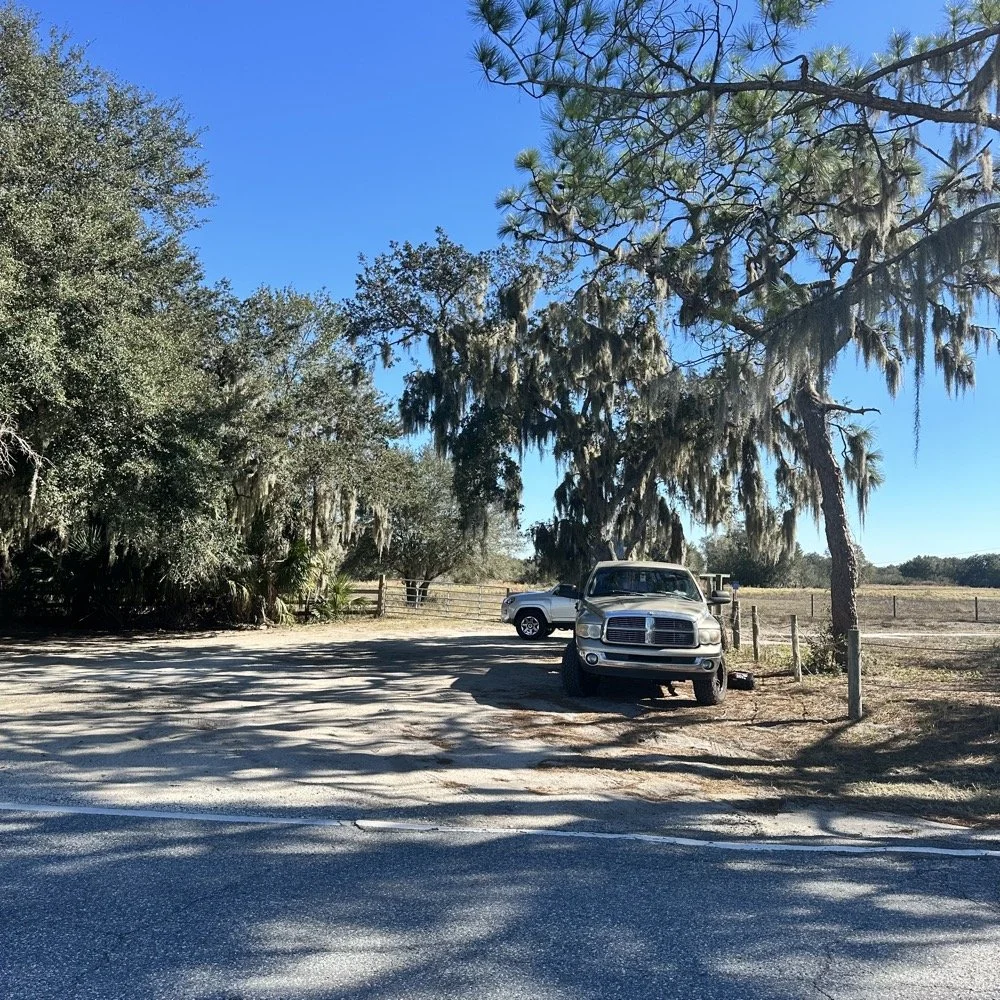
You can’t really tell it in the photos, but I did use my vertical antenna truck mount. I used it as the truck side anchor for the long wire and strung it up into the tree you saw earlier. This turned out to be really convenient I must say.
SIDE QUEST ENDED:
Back to the project at hand…
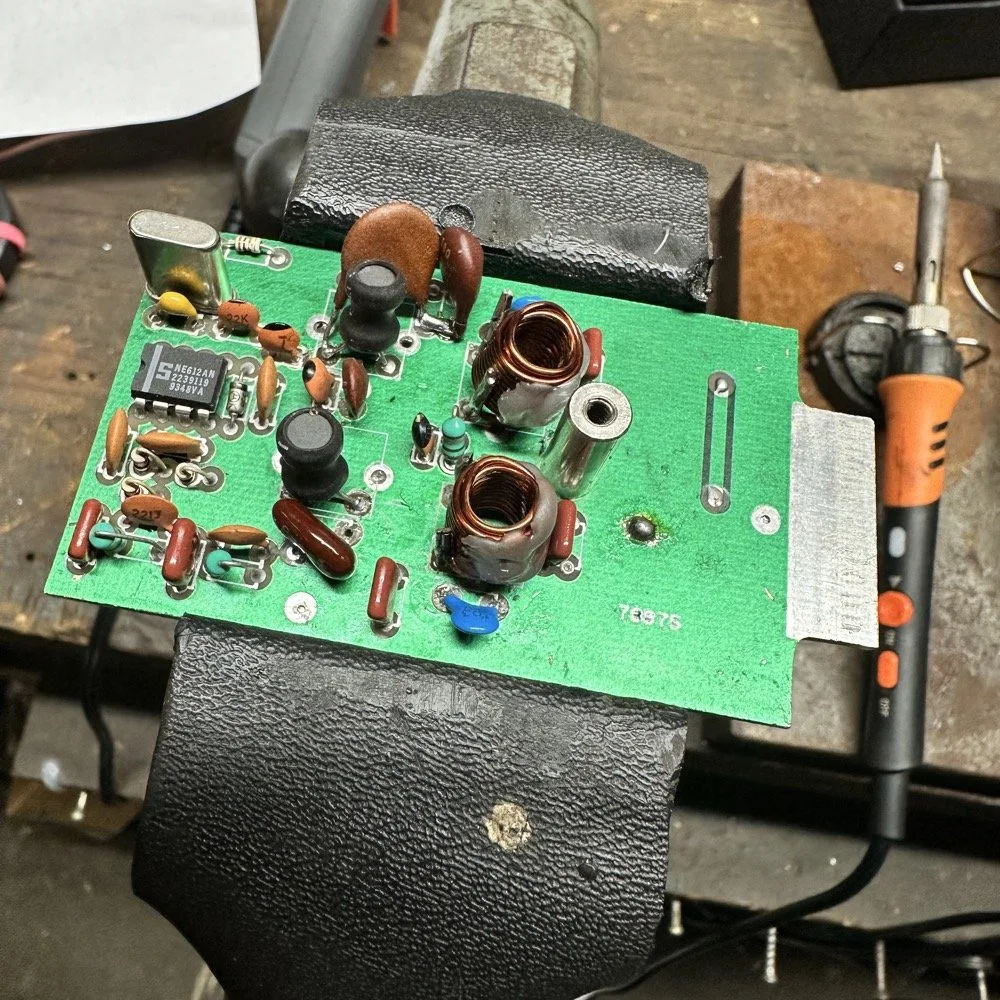
A week later and back in the shop at home with the band module on the work bench again and a Scout 555 in the shop now instead of the ARGO 556 to give me full power (40 watts) into the module (I pull the output power back to 40 watts to help protect the radio).
Now I can sort out the last of the details with the filters under full load. I am starting to think that the LO BP filter still needs some work as well as the signal level on the mixer output filter is REALLY high. I don’t remember the exact number but think of something like 700 or 800mV level instead of the 50mV that is supposed to be coming out. I tackle this problem first by building up the board like I had before so I could see the level coming out of the mixer filter. I had removed one of the impedance matching capacitors completely (750pf) without understanding what I had done and this was a big part of the problem with the level being so high. I did some simple math and came up with about 600pF instead of the 750pF that was supposed to be in the board since it was now tuned for 5.35 mhz instead of 3.55 mhz. I ended up using a 560pF cap and the level looked like the photo below on the base of Q16 in the radio. Remember this data is at this link if you need it as NA5N made these wonderful signal flow graphics.
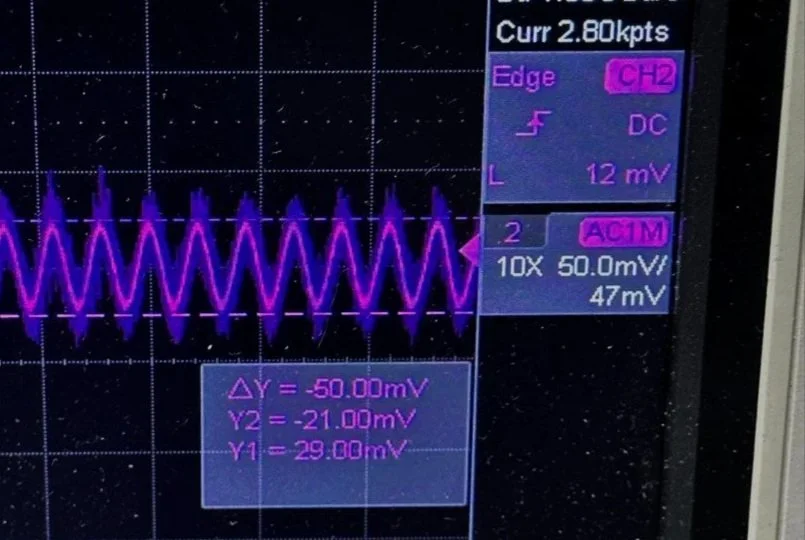
Right on the money at 50mv! I will take that everyday! All the noise you see on the signal is generated in the radio as far as I could tell, all the band modules I tried today looked like this on the base of Q16…or I was picking up the noise from somewhere else, I really am not sure to be honest with you. The output from the collector looked fine though so I don’t know what is happening here. I know this is good now as the frequency in the radio is stable and doesn’t drift. Those NPO capacitors paid off! (NPO means “Negative-Positive 0 ppm/°C” or more plainly, these capacitors are stabilized so they don’t drift in value with a change in temperature) My circuit doesn’t look exactly like the original Ten Tec filter but it does work.
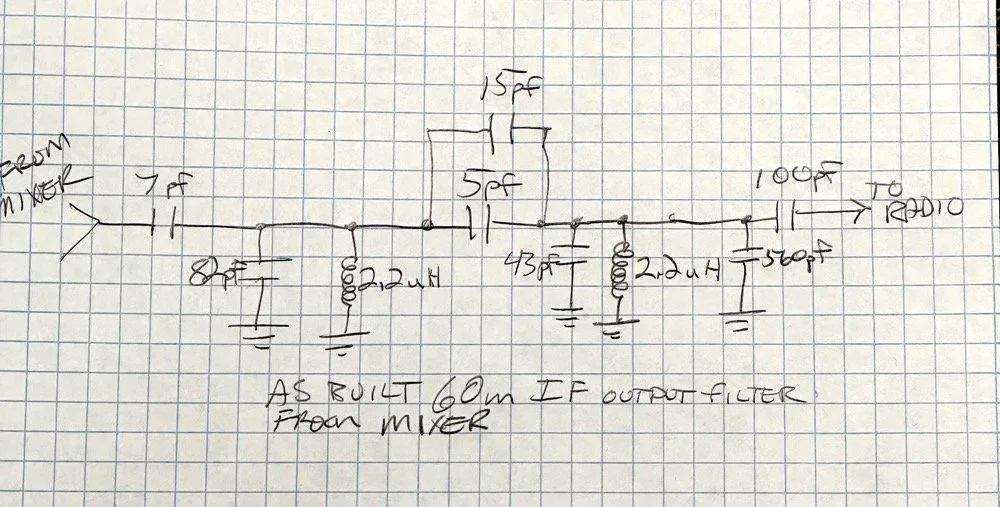
Below is what I ended up with for the filter circuit. I added the one capacitor that was not in the original design (the 43pf cap) and this did seem to help with the shape of the filter so I left it. I drew my filter flow direction backwards from the Ten Tec drawing but you can see the differences from the 80m filter I started with below. Also a couple points of interest here. In my 60m module (formerly an 80 meter band module), the output from the mixer chip is pin 5 on my board and not pin 4 that feeds into the filter network. If you look at the spec sheet, this is fine as both pins are output pins, but it was a curious mistake in the schematic I found while troubleshooting my module. Another curiosity to me is that the schematic shows L6 in parallel with C8 (5pf) in the center of the filter. Not one single band module uses L6… at all. The chart underneath the schematic shows a -0- symbol on each one of the modules for L6, to confirm this, I looked in three different modules and none of them have this inductor in them. It isn’t present on the 10 or 12 meter modules either as they have a different layout for their filters. This was a provision that later was deleted I suppose. Kinda neat to find things like this while doing a project. Makes you wonder why they provisioned for the inductor but never used it. The board has two through holes for the inductor as this is where I placed my 15pf cap (which made adding it really convenient.) So it was obviously designed into the system to start with… Maybe someone who was an engineer at Ten Tec back then will comment.
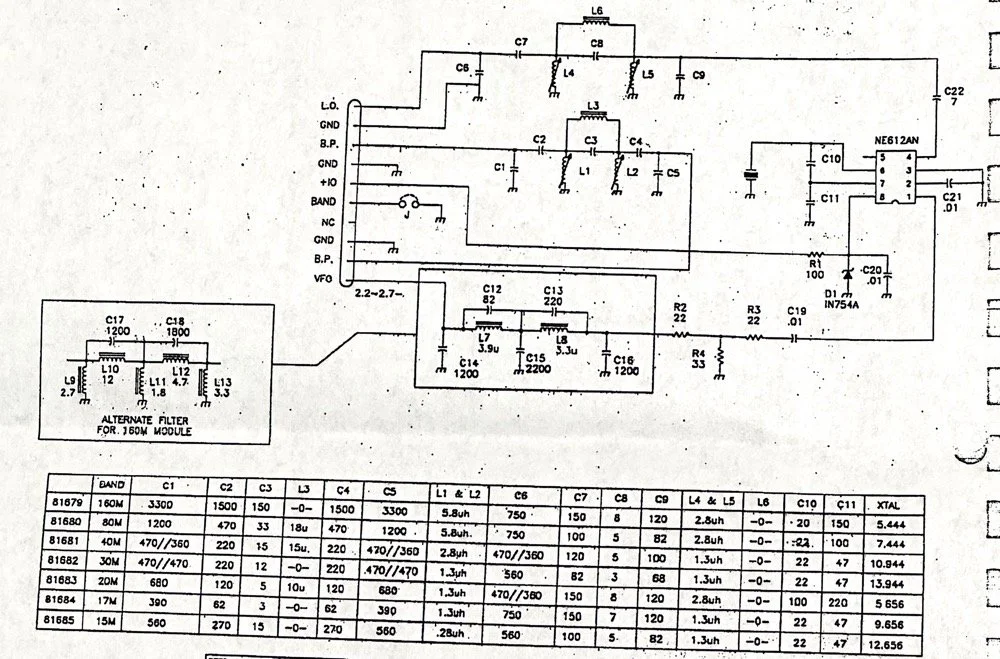
Excerpt from original Scout 555 owner’s manual.
With that out of the way I moved on to the output LP (Low Pass) filter that the 50 watt power amp flows through to get to the antenna.
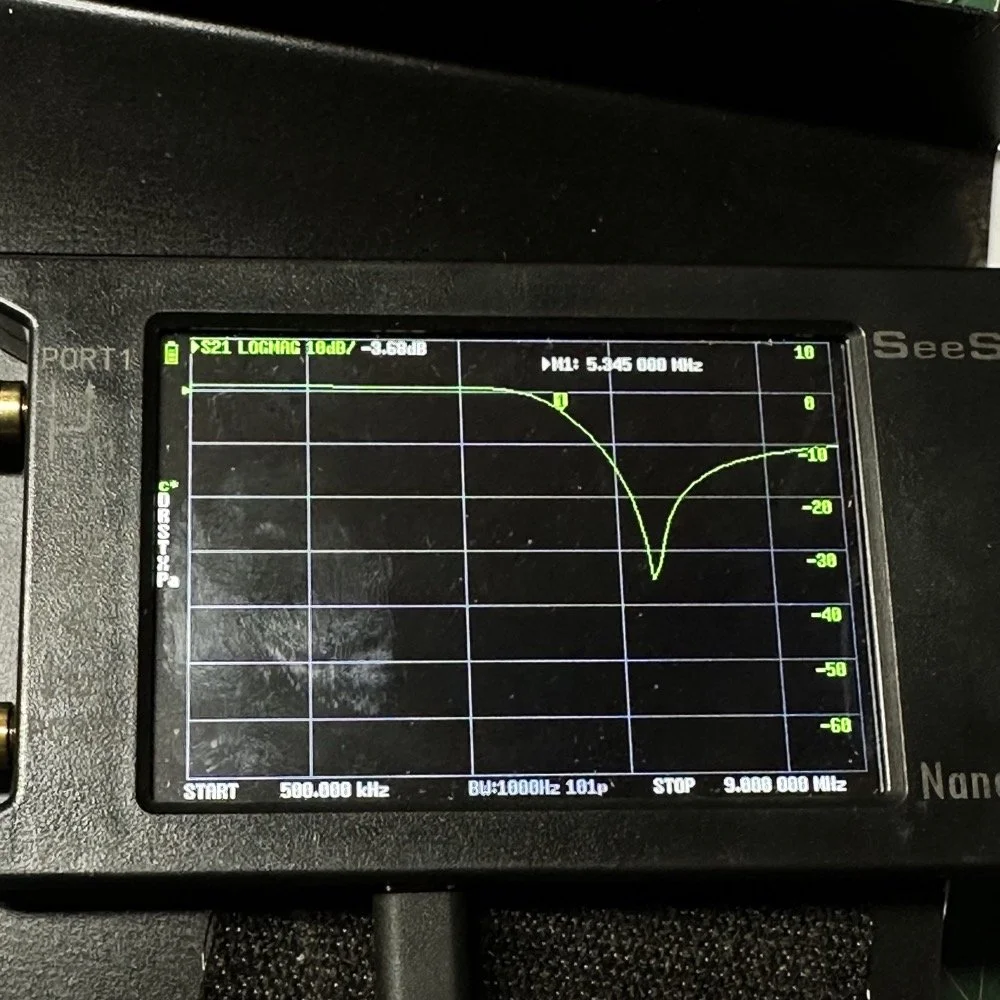
The above photo is of a LP filter out of an unmodified 80 meter band module I used for comparison. If you will notice the roll-off is right smack dab in the middle of the 60 meter band on this particular module.
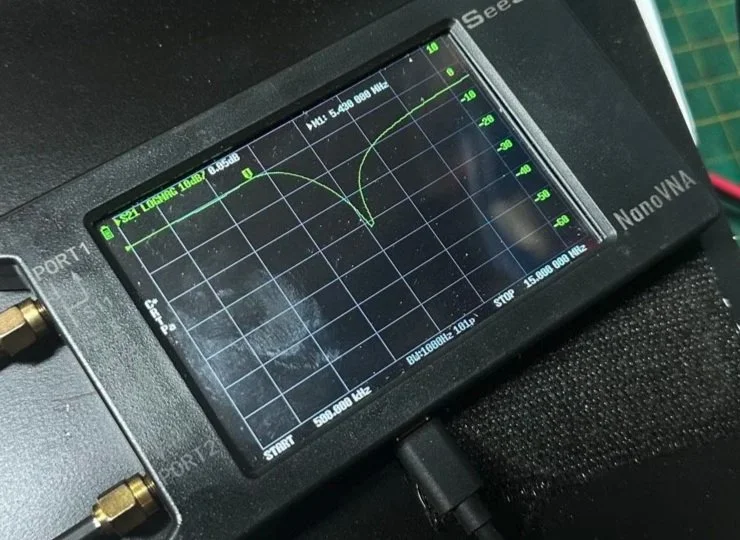
The photo below is of the 60 meter band module sweep that I am building out of an old 80 meter band module. If you will notice I have the nanoVNA set to 5.430 mhz on the marker, and it is hard to see, but the signal is at 0.05dB which is basically zero losses at the highest band position possible. This would imply that the filter would allow the 60 meter band through just fine, but it would not…
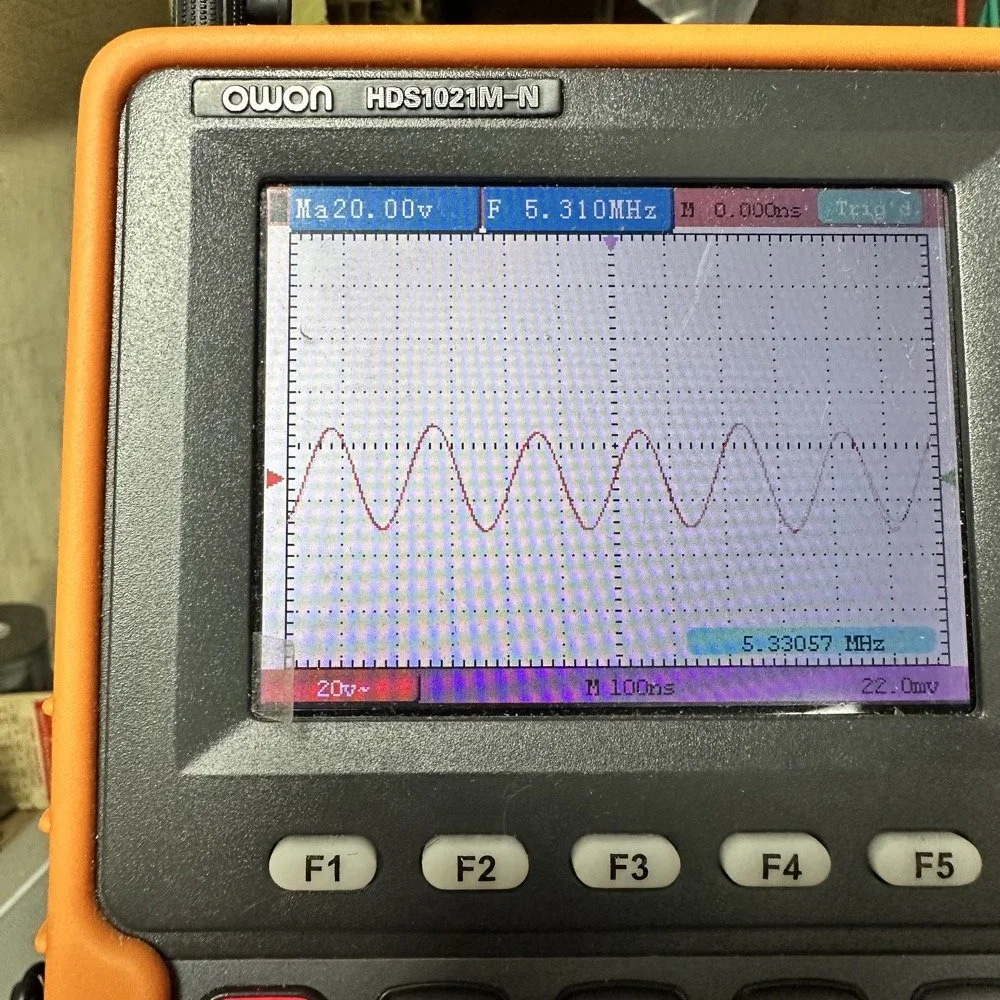
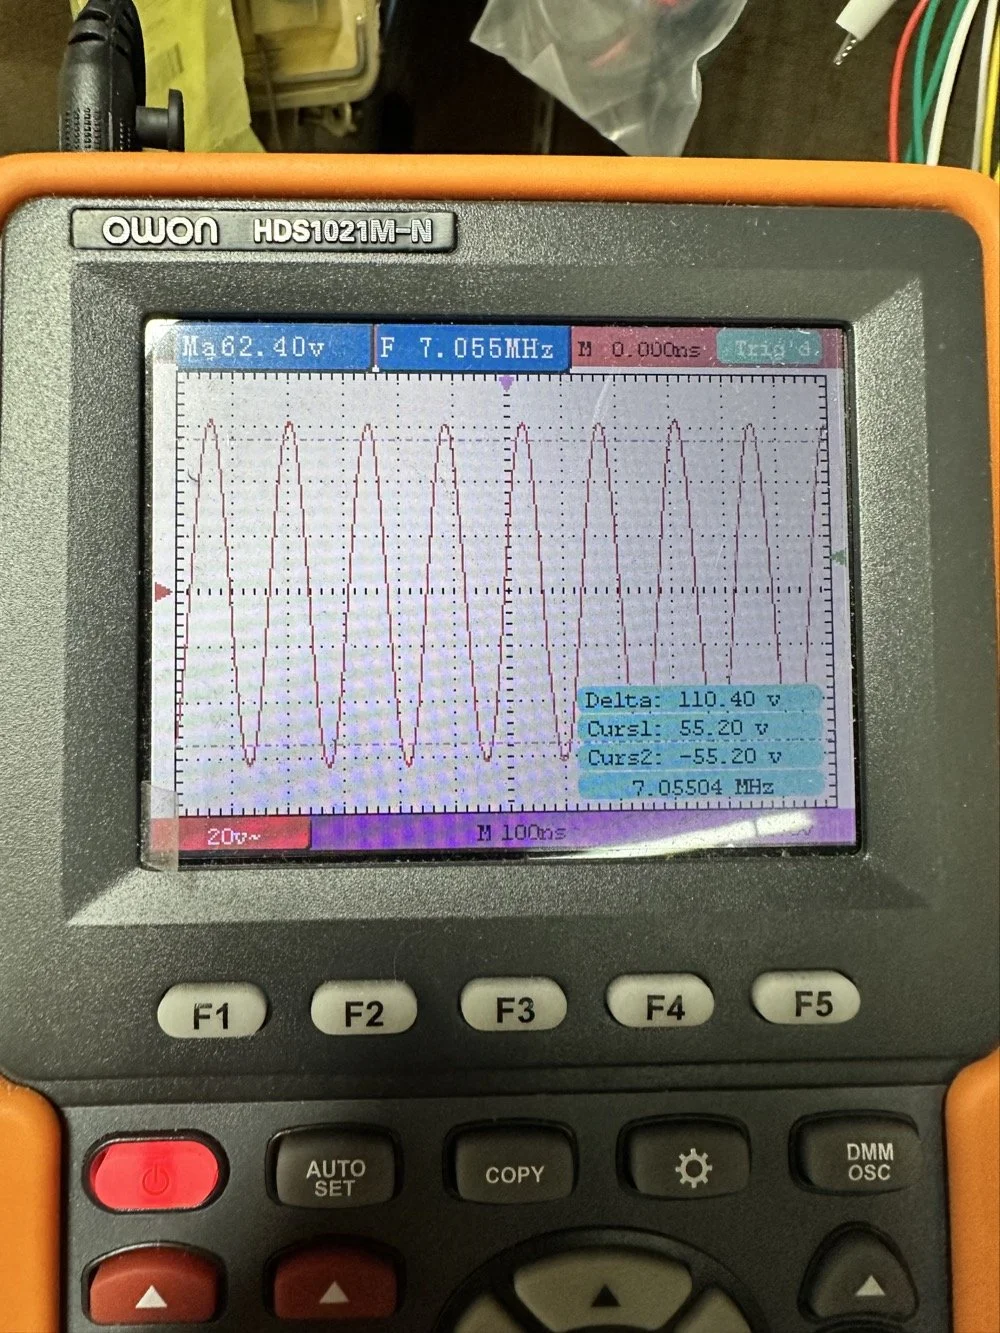
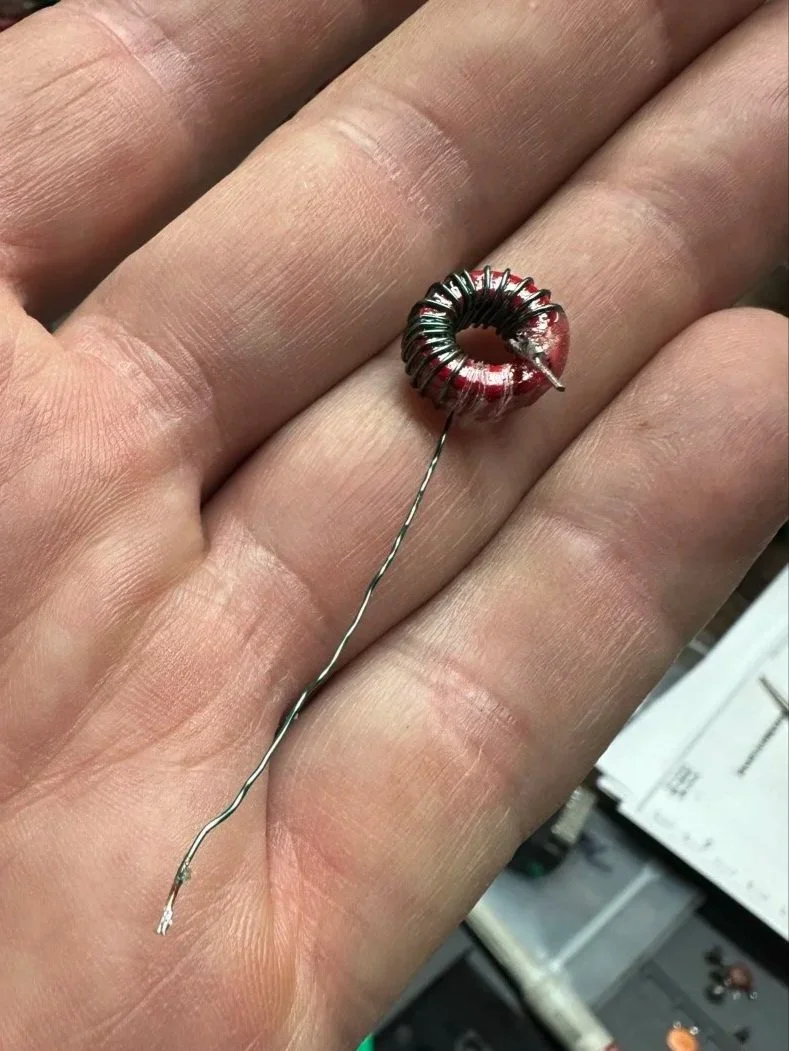
This is what the radio was sending to the dummy load after it passed through the LP filter module (above photo)… So to test this theory, I installed a different module (40 meters) and got what you see below… That is a little over 120 volts peak to peak on 40 meters. Yeah, you don’t change the output power of a Scout without a screw driver so the fact that the 60 meter band module I made is only letting a little over 30 volts peak to peak through it AND knowing that the 40 meter band module is passing over 120 volts peak to peak, tells me the 60 meter filter is choking off the energy and it is probably heating up the toroid inductors pretty good at the same time. I suspect that is what I was hearing the other day at the park when it was crackling after a while. I just hoped that I had not burned the wire on the inductors with this energy… If so I would have to rewind the inductors completely from scratch. Fortunately, I do have a roll of magnet wire I could do it with…
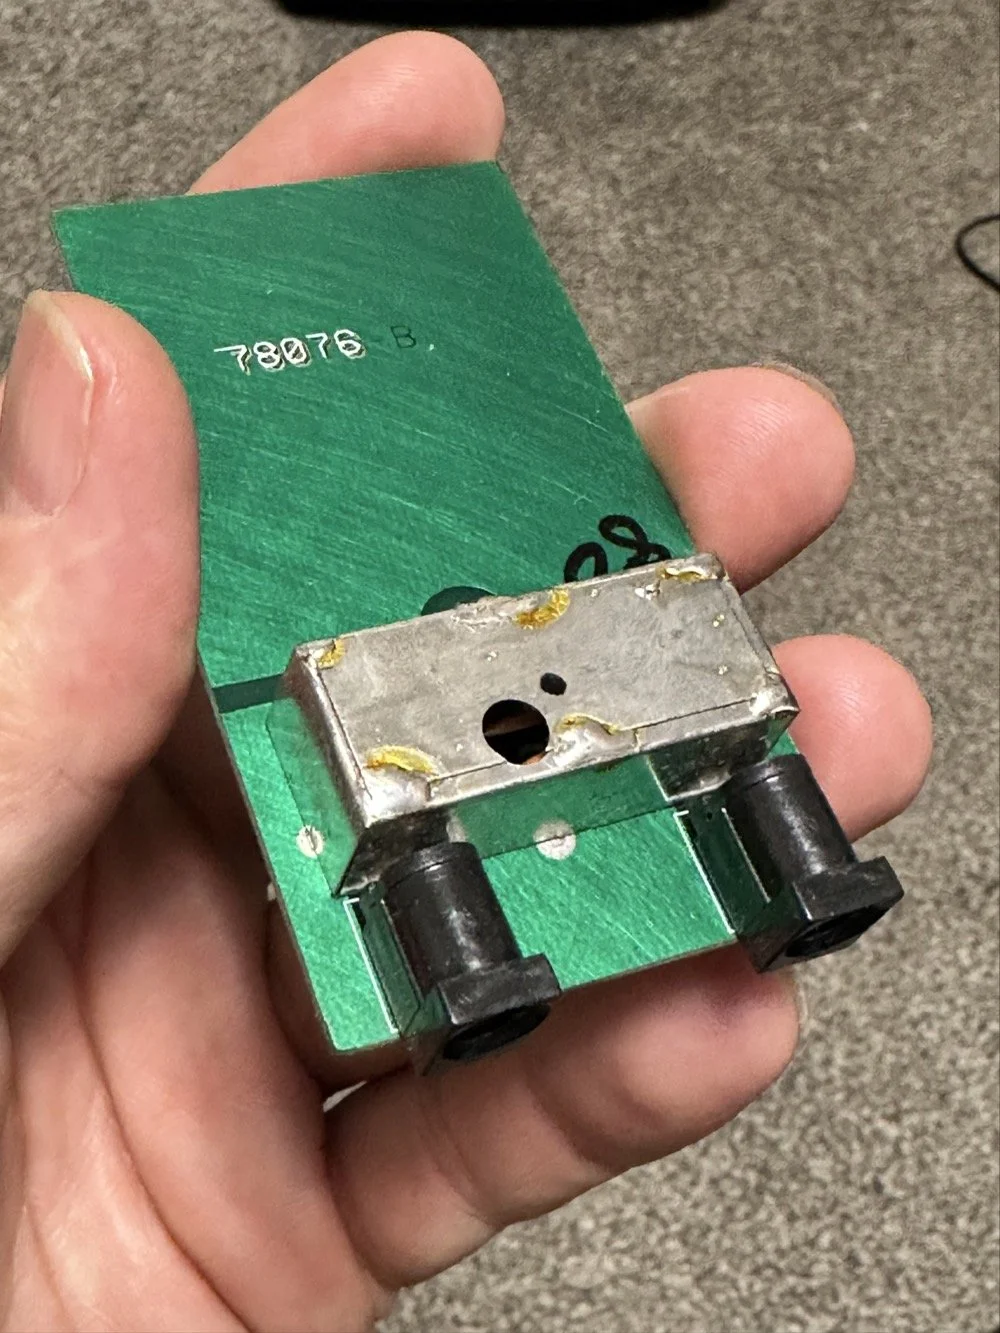
Into the final output LP filter I went (the one in the can) to see what I could do with it. The first photo shows the “can” the filter is shielded inside of to keep stray RF at bay.
The second photo shows what is inside of this can. This is also a photo of my completed filter with modifications to make it work on 60 meters. I found that this module had been tampered with once inside. Now to be fair, I did work on this module at one point to repair a broken inductor lead, but that was all. Now, I am getting much more serious while inside of the can…
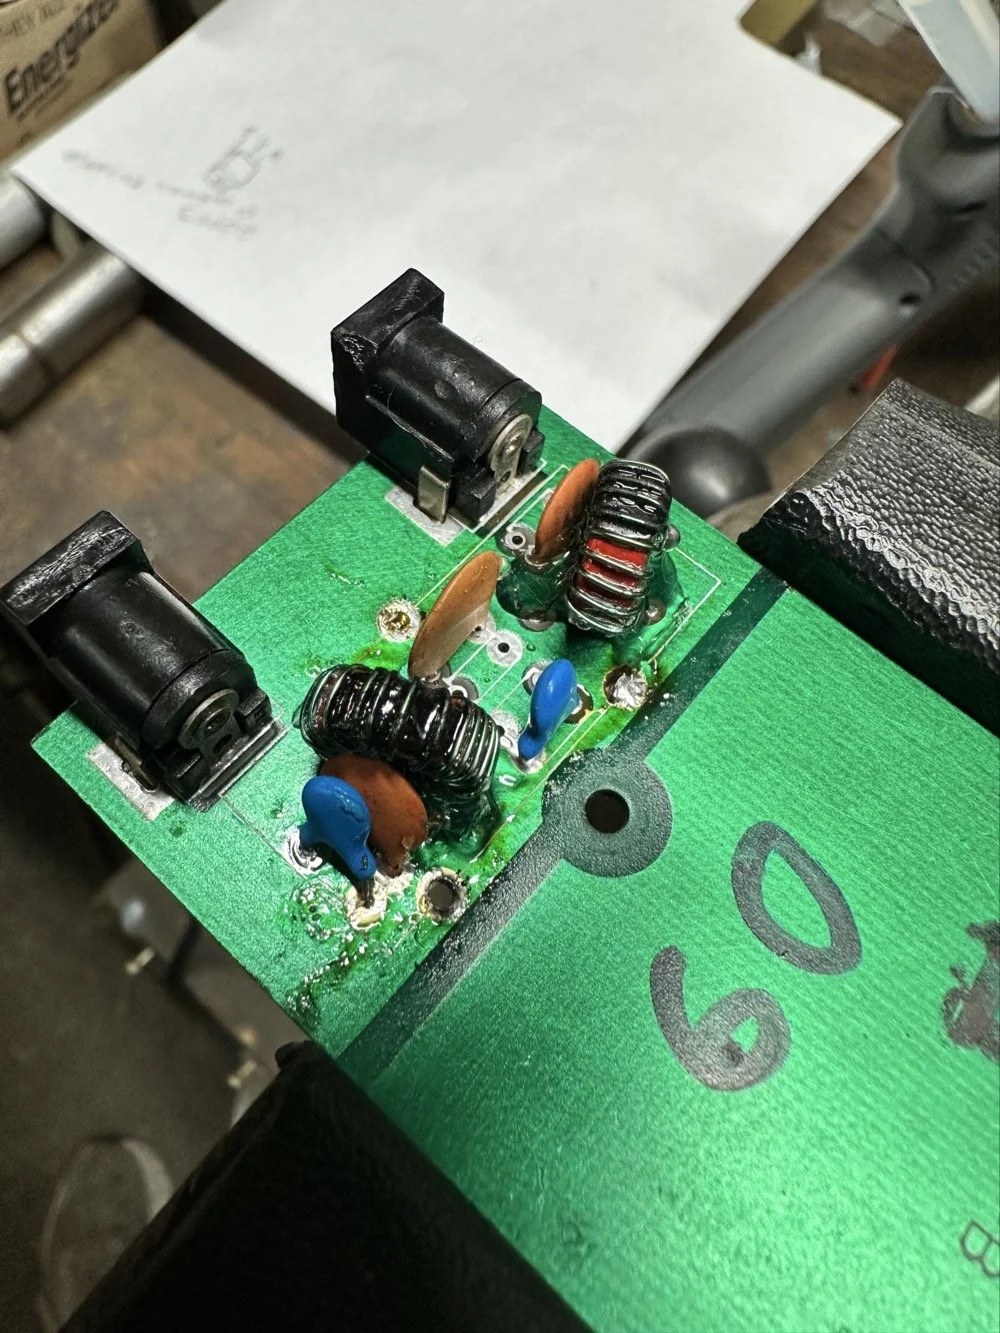
I took another measurement with the nanoVNA and decided to remove the inductors and measure them with the LCR meter to see what it said they were. Turns out they were right on spec from the owners manual chart of 2.5uH each. At least that is what it looked like I read on the meter…haha. So I decide to remove an arbitrary number of wraps from each core (3 wraps to be more precise) and take another measurement to see what I had then. The meter showed them at 1.8 to maybe 1.9uH after pulling three wraps off. This put me right in the middle of 80 meters (2.5uH) and 40 meters (1.4uH) about perfectly. So I trimmed off the excess wire, scraped off the enamel so the solder would adhere to the copper and soldered them into the board.
Back to the nanoVNA for another round of measurements to find it still wasn’t where I wanted it to be. The frequency was still pretty low at the roll-off point. I then decided to look at the capacitors to see what they looked like. This is when I noticed that the band module had already been modified somewhat as the center cap was sitting at about 850pf already and not the 1500pf it was supposed to be. I also found that the two shunt capacitors on the ends were also different from the 80 meter module for some reason. I pulled these back to 470pf each and checked it again and now the band pass was in the 6 mhz area, this should be far enough away from the operational band to keep me from having problems so I put it all back together and then checked it into the dummy load.
Success! I am seeing over 120 volts peak to peak coming out of the radio! Woohoo! I couldn’t believe it! I had full power coming out on 60 meters finally! This was a real special moment for me to be honest with you. After this, I reassembled the shielding on the filter network and cleaned up the solder flux and put the module back together.
With all that done, all that is left is to set it up with an antenna and make some contacts with it…
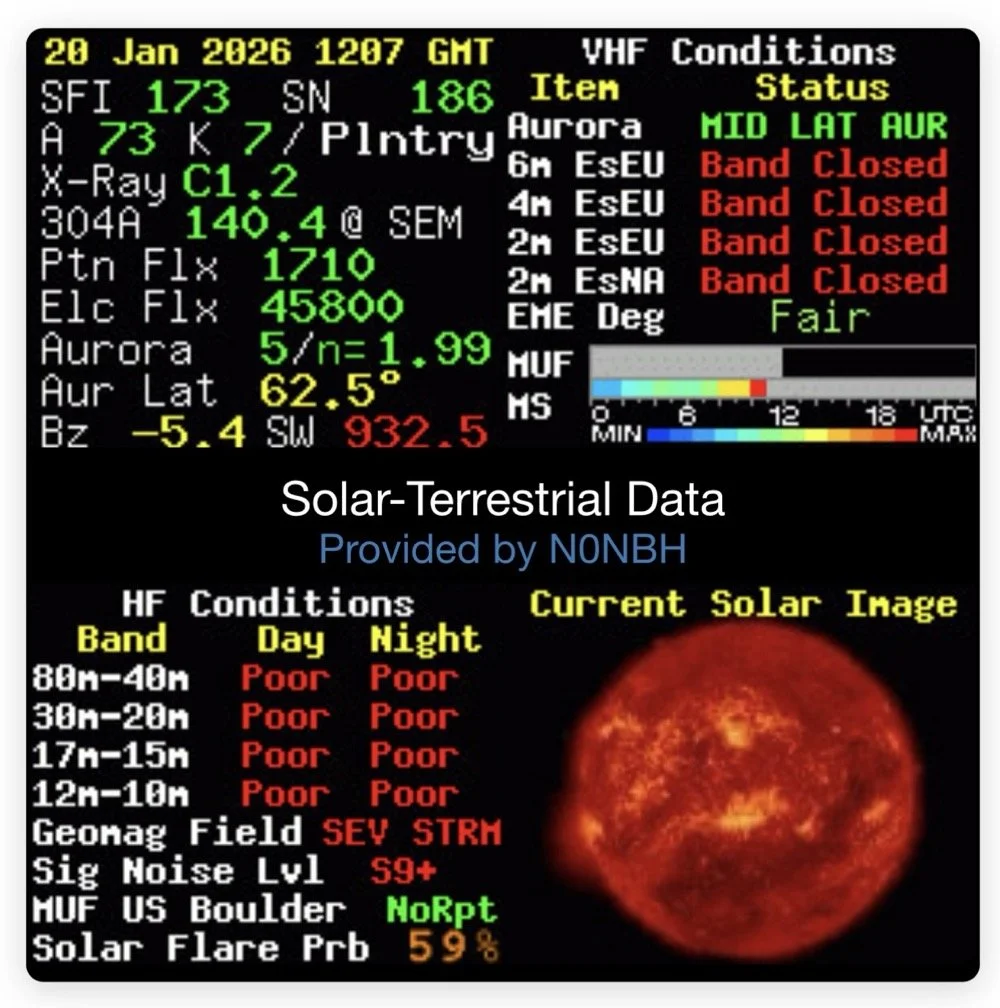
Yeah…about that… There seems to be a major solar storm coming in and has been since the previous day. This is a big deal as you can see from the report. It has shut down radio for most operations. I did call CQ for a while and at one point I heard WY7EE calling CQ but he couldn't hear me. Figures. I did turn up on the RBN so the signal was getting out to some degree in the evening. That was kinda awesome to see as well. I know I have signal going out too as the wattmeter is showing 40 watts forward power. (Remember I de-tune my Scouts to pull some load off the finals since they are getting old and I don’t relish the though of having to replace them for a 10 watt boost in power output) 40 watts will do just as well as 50 from what I have seen in the past… anyway.
The next day we had the storm to start fading out a little and I loaded up the webSDR on my computer and listened for my radio on the Northern Utah listening post. Once the time was late enough, I started hearing my signal on the webSDR! I recorded it and posted it to my YouTube channel as a short if you want to go listen to what I could hear. This is the link.
Link to video about 60 meter signal
Like I said, I am going to revisit the band pass filter for the IF again when I get back into town. I think that can be improved a lot. (my current design is too broad banded in the pass band to make me happy, I want to clean that up some more.) I will write that up when I get the chance to work on it—read Part 4 for the IF filter redesign. Thanks for following along on this little adventure and I hope to hear you on the air at some point. Maybe you will work me on 60 meters with my Scout…maybe…
73 and get out there!
All four parts are here:
- Part 1: Initial Conversion and Filter Design
- Part 2: Crystal Selection and Mixer Circuits
- Part 3: Field Testing and Troubleshooting
- Part 4: IF Filter Redesign (this post)
You can help support this website by using these Amazon Affiliate Links:
QRP/Portable Radios:
Antennas & Tuning:
CW Equipment:
Power & Accessories:
Organization & Transport:
BONUS ITEMS
WK4DS
David

Smith Chart Exploration for Ham Radio: Building Impedance Matching Networks with DIY Inductors
Today finds the unsuspecting ham radio op perusing YouTube for something new to learn as it is really cold outside. He stumbles across a video about using a Smith Chart to match impedance and is intrigued…
What happens next is kinda terrifying…lol
Well to be honest, it is really kinda boring till you see how a smith chart sort of works and you start to learn how to use it to some degree. I have known about them for years, but have never understood how they work or even how to read them.
Today finds the unsuspecting ham radio op perusing YouTube for something new to learn as it is really cold outside. He stumbles across a video about using a Smith Chart to match impedance and is intrigued…
What happens next is kinda terrifying…lol
Well to be honest, it is really kinda boring till you see how a smith chart sort of works and you start to learn how to use it to some degree. I have known about them for years, but have never understood how they work or even how to read them. The other day though I landed on a video. This one shown below to be exact and I was hooked.
As you can see, if you watch this video, (maybe a couple of times), he explains it in simple enough terms that I actually understood what was going on finally! I did come into it with the understanding that the upper half was inductive and the lower half was capacitive from tuning my antennas with the nanoVNA. I would leave the smith chart on out of laziness and simply used the SWR graph to move the null to the operating frequency. But during this time, I started looking at the information presented on the display and noticed at times it would show capacitance and sometimes it would be inductance and also where the marker was sitting. This gave me the clue about what it was sharing with me. That was the extent of my smith chart knowledge though. At least it made sense to me. So the next logical thing to do was to order some smith chart notebooks from Amazon and a drawing compass so I could use said charts. While I was anxiously awaiting the new goodies to arrive, I started binge watching videos on smith chart use and taking away what I could from each video to add to what I already knew. By the time the paper arrived (I know I could have printed them off the web but the notebook format is really nice to be honest) {sarcasm}I was already a “master” at these “simple” charts… haha. {/sarcasm}
I will be honest with you. There is so much about these charts that I still don’t understand that it boggles the mind, but I have figured out how to use them for impedance matching and it is kinda awesome. I actually made the last few pages in my new notebook a cheat sheet based on the above video so I could reference it easily without having to watch the video over and over. I am absolutely going to build one of these fixtures when I get back home too. I would already have done it but I am not able to access my bench to put it together… So what follows is what you do when you don’t have that gear handy.
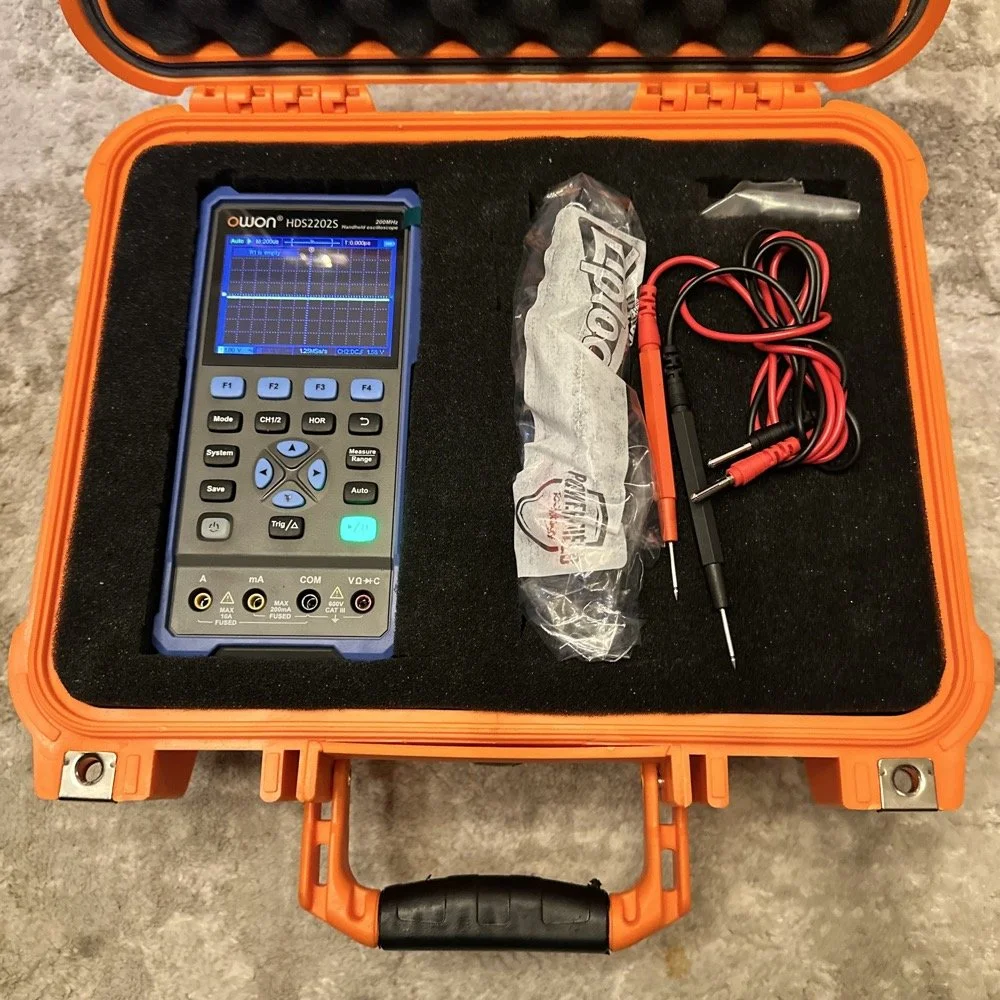
First things first, I bought a new toy. This is a 200 mhz “scope meter” but this one has another trick it can exploit. This is a actual dual channel oscilloscope AND it also has a arbitrary waveform generator as well! On top of the usual multi-meter functions as well. This thing has a lot to offer…till it doesn’t. It didn’t take long to figure out that the waveform generator doesn’t have the sweep function in it, this would have been nice to play with things. I can’t find FFT modes anywhere in it either so it can’t be a “poor man’s spectrum analyzer”. The little meter does have enough options to be really useful for what I was doing anyway so let’s get started… oh, it doesn’t come in this nice hardshell case. This is an Apache case from Harbor Freight. It is the perfect storage container in my opinion and I am happy to have it trimmed out like this. It didn’t take too long to figure out how to use the oscilloscope and I made a cheat sheet for it too so I can access useful features more easily in the future since a lot of it is hidden in menus due to the diminutive size.
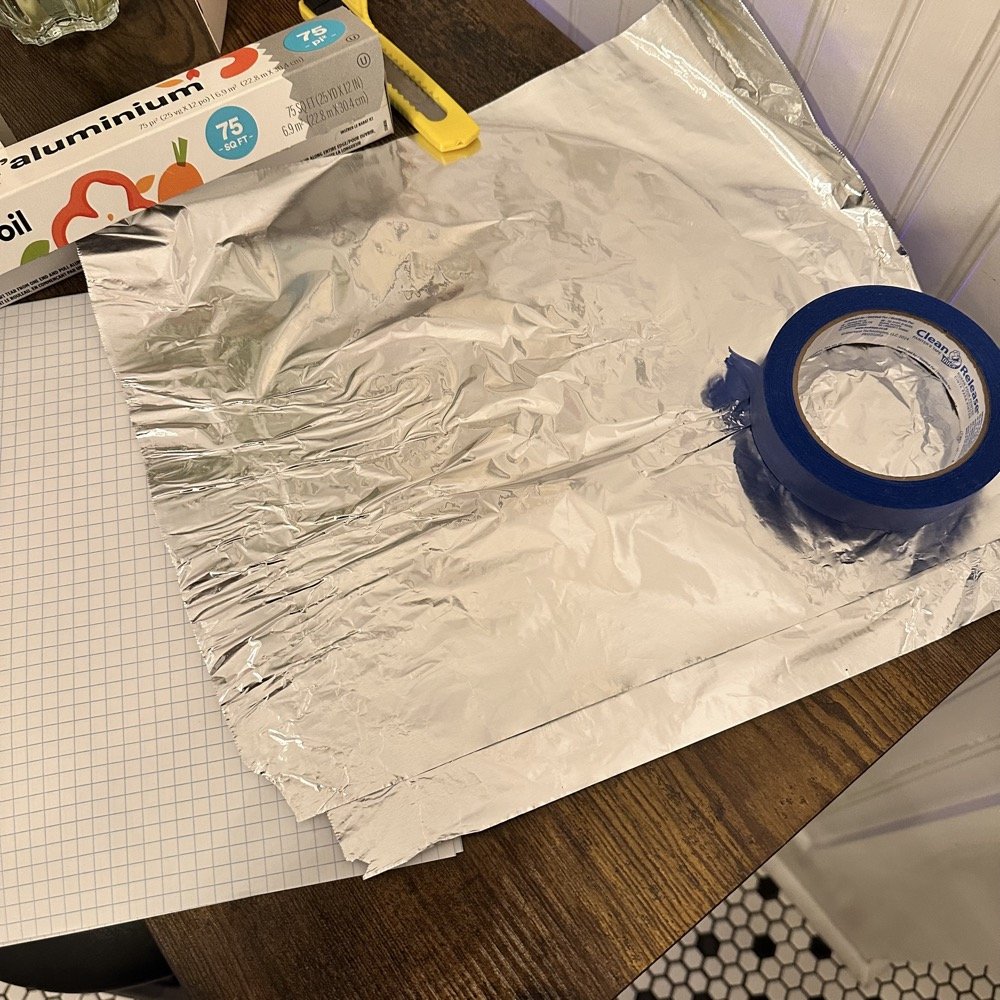
What you see here is pure desperation to see if I can make this smith chart stuff work for me. I am literally about to start making capacitors out of aluminum foil, a sheet of notebook paper and painters tape… Spoiler alert, it worked… You see, in another video I found on YouTube, there was this idea that you don’t need a LCR meter to measure your components as long as you have a known value device, a battery and some ingenuity. I also had a lot of time to play with this concept so here we are… I started by making a really big capacitor to start with to do a proof of concept and to see if there was enough capacitance to make this project work. Turns out there was way more than needed with the initial design, WAY more. So with the proof of concept made from three full size sheets of paper laminated with aluminum foil on one side of each one and then stacked so that the center sheet was one plate and the top and bottom were the opposite plate, I found I had made a .0034uF capacitor! This was more than enough to play with HF radio RF frequencies!!! Woohoo! Now this is all based on me being able to believe my new meter and later I find out that there is 17pf of stray capacitance in my meter and leads. Once I figure this out, and factor it into my math, it is all good but for now with this thing being 3408pf, I don’t think it is really a problem. The cigar box is there to use gravity to apply an even pressure to the “plates” and hold them at a consistent spacing as at this point, these were just three sheets stacked up. The top and bottom are connected to the black lead and the middle one is connected to the red lead. Also tested it with just on plate on the black lead and yep… capacitance went WAY down, so this style of capacitor worked pretty well to be honest. I could make it go up a good bit more by pressing on the cigar box too, I saw 5.0nF at one point while playing with it, that is crazy to me…
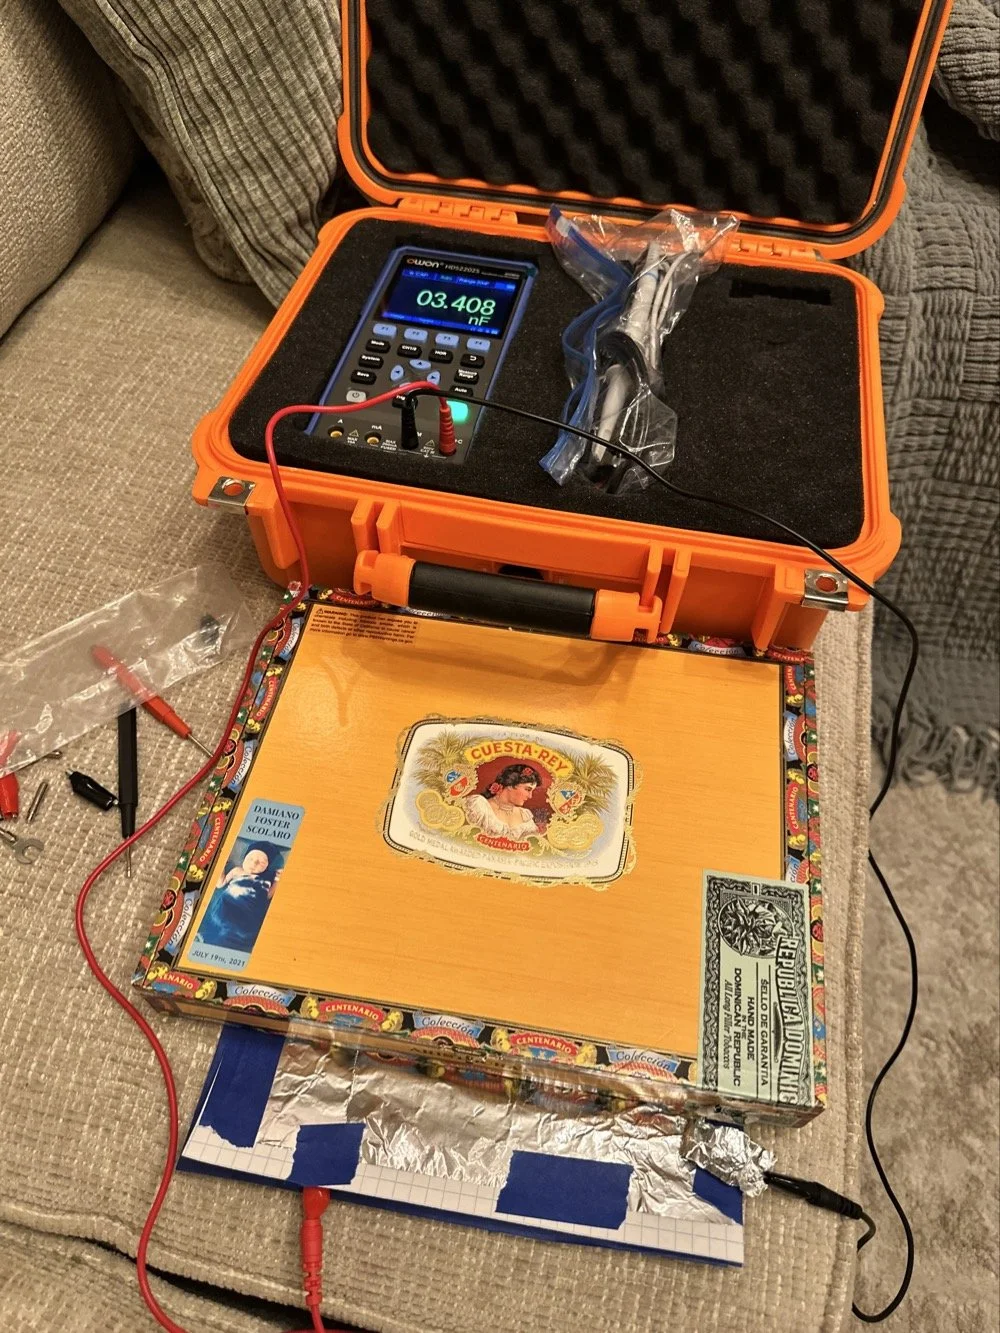
I had read somewhere about this idea to be honest. Well a cruder version of it actually. They made an impromptu antenna L network with two sheets of aluminum foil and a sheet of news paper or something like that. That made the capacitor and the inductor was wound on something found commonly in the house in the 1960s or 70s as well. They just used regular old romex house wire to make the inductor and it also worked just fine. Sometimes you just really need to have some “want to” and it can be done. I was a little more superfluous with my build as I didn’t need it to get on the air but rather as an experiment to see what I could learn.I honestly was really surprised to see how much capacitance I could get out of notebook paper and aluminum foil from the grocery store. This tells me that literally anyone that needs an antenna tuner, has one if they want it bad enough. You don’t have to have a Ten Tec 238 to be able to tune that random wire, you just need to gather some stuff you probably already have in the house…
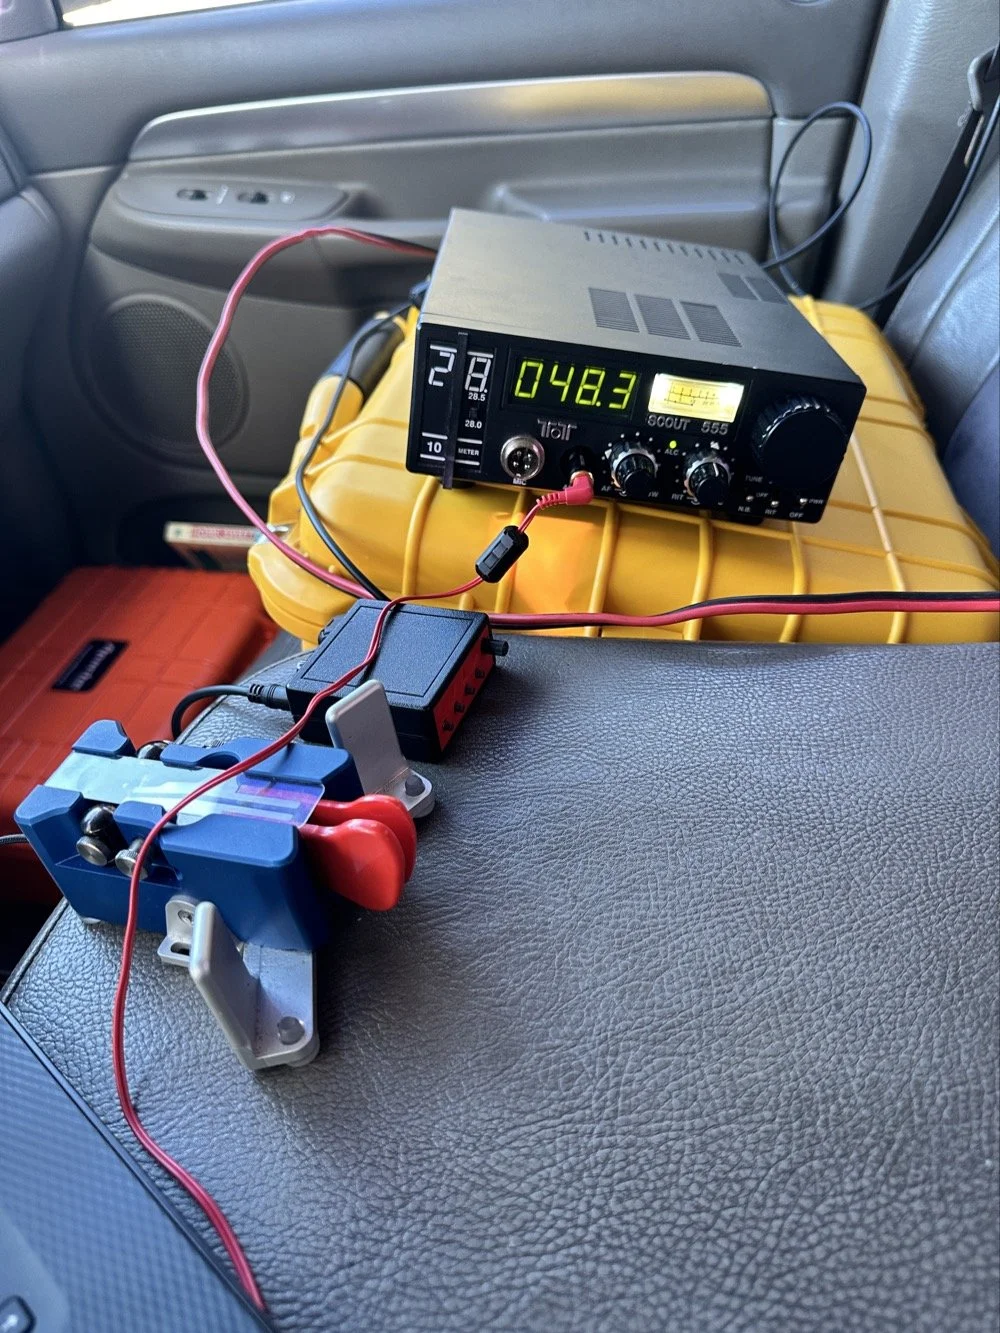
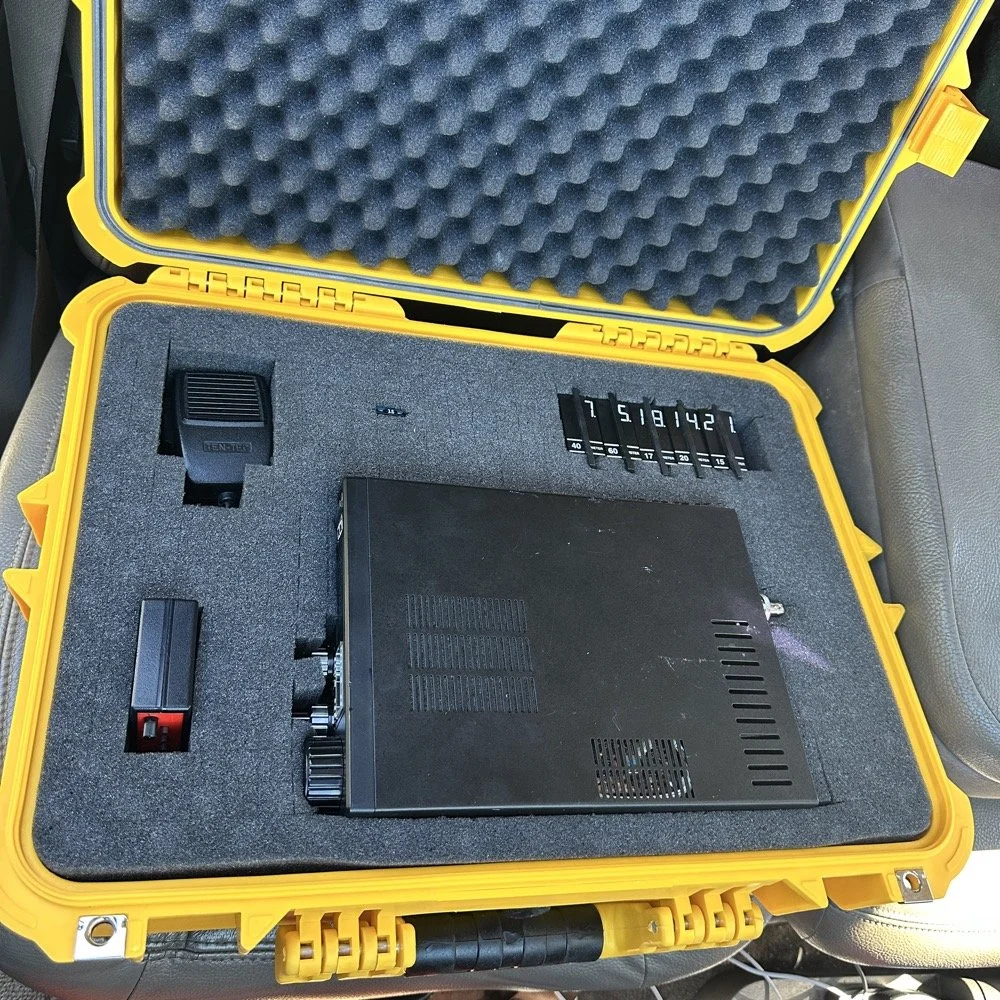
Side note, I also finally acquired a new case for my POTA Scout 555 radio. I still need to finish the pockets for the band modules when I get home, but I now have it in a proper case and not just sitting in a cardboard box in the back of the truck! Also, I made another 60 meter contact today… to the same exact person that I made the first one with a couple weeks back! HAHA! I think we are the only two people on 60 meters CW in the mornings ever…
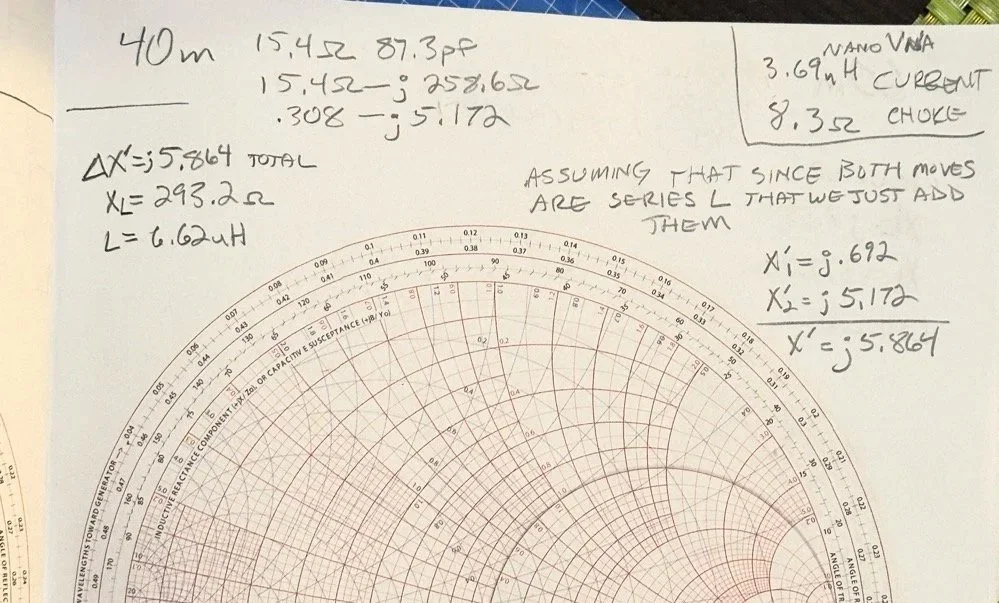
Here we see what I measured the other day while at a POTA park. What these numbers show is the antenna measurements for the band at the base of the antenna. I literally took the nanoVNA and adapted it to the antenna socket directly to eliminate the 50 ohm feedline from interacting with the measurement. As we will learn soon enough that you can use a piece of feedline (coax in particular) to move the base value around the smith chart should you need the starting point to be somewhere else. But I also learned something else about these starting point numbers below that I will share with you in a little bit.
At the top of the page, right next to the “40m” is what the nanoVNA reported that day at the park. (15.4 ohms and 87.3pf) you have to have two coordinates to plot anything on a chart so these are the two numbers you need to plot your starting point. Ignore the other notes as I am probably wrong on some of it and it actually makes more sense later. But the first thing I had to do was to turn these numbers into the proper numbers that the smith chart uses. This is called normalizing them. You see the chart is relative, you can assign whatever value you want to the center point on the chart and the rest of the chart is “relative” to this value. So if you were to work with 75 ohm coax and wanted to make an impedance matching network to work with it and having minimal losses, then you would assign 75 ohms to the center point. Since we use 50 ohms in almost all amateur radio (if not all) then our value is 50 ohms at the center point.
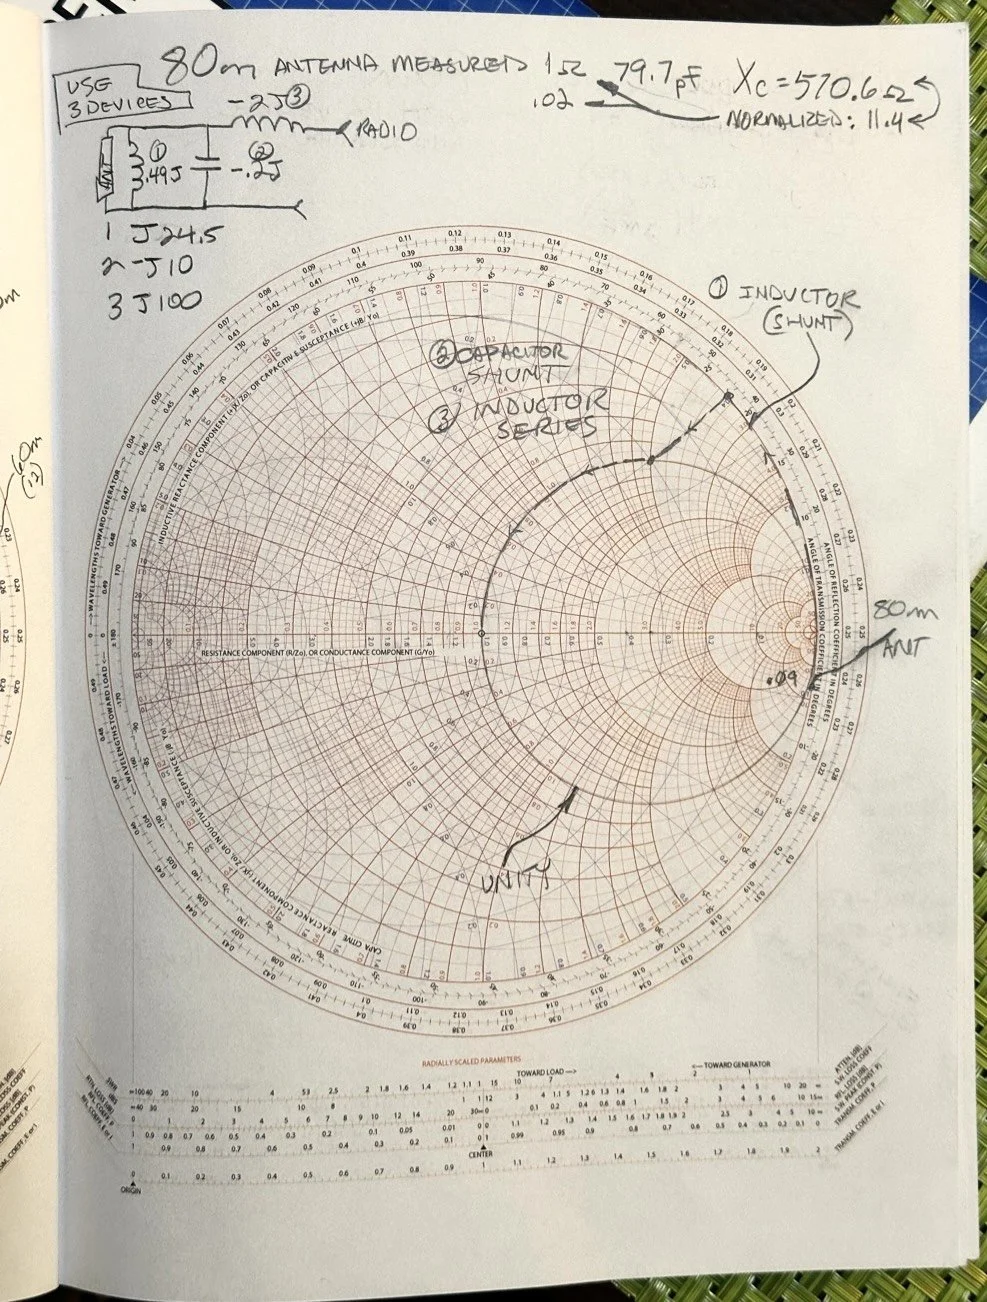
So here is my 80 meter plot (below) to get to a 50 ohm impedance from where it started at… yes… 1 ohm and 79.7pf capacitive! You see I am designing a matching network to couple my 50 ohm coax to a 18.4 feet tall telescoping vertical with a couple of radials thrown out on the ground. This is not even close to a matching antenna for the 80 meter band at all. Hence the terrible numbers to start with. Well, this was like those jokes you here from high school where you get something simple in the lecture in class about a subject then in the book it might show it with one more complication but the exam shows the Drake equation for the problem on the test! Well this is what happened to me as in the video above, the number in the video was closer to the middle of the lower half of the chart making for a more straight forward solution to the problem. I also did my admittance math wrong too if I am right…lol… since it is all inverted, but this doesn’t matter at this time. What you need to know at this point is that my problem lies outside the unity circle (that is the one I drew on the chart) and I need my “arc of movement” to cross this circle… it does but nearly at the infinity point (on the right side of the chart) which makes the math almost worthless… The reason the math gets pretty inaccurate is the numbers on the chart start getting logarithmic is value and so a small movement on the chart in this area makes huge changes in the values. You want your plot point anywhere else but here, yet this is where I am at in this blog post… haha
Knowing all this, I start this complicated, 3 position move to get me to the center of the chart. Mind you, I think this would actually work, but I am not sure if the math is mathing right at this time. (I am thinking the first move is a piece of transmission line to move the start point around the circle instead of an inductor and the second movement is also not a capacitor either so basically this whole thing is drawn wrong…lol) You will see why in a minute too as to why I dont know. The schematic for this movement is scrawled in the upper left hand corner of the notebook page if you wondered what it would look like to make this circuit. Two inductors and a capacitor to get to 50 ohms… how many antenna tuners have TWO inductors in them? I will help you out here… not many, if any. The number of inductors alone would make this a no go design for the most part unless is was going to be a one band wonder. Just remember I am pretty sure the math on this is wrong, the plot directions are correct, but I am thinking that the suseptance values are needing to be inverted to calculate the impedance for the two movements on the blue lines. Anyway, the point of this blog post is to show what is possible if you want to learn something new and it is not about the math around a smith chart…yet…lol I am diving back into the tutorials to figure out the blue part of the chart next.
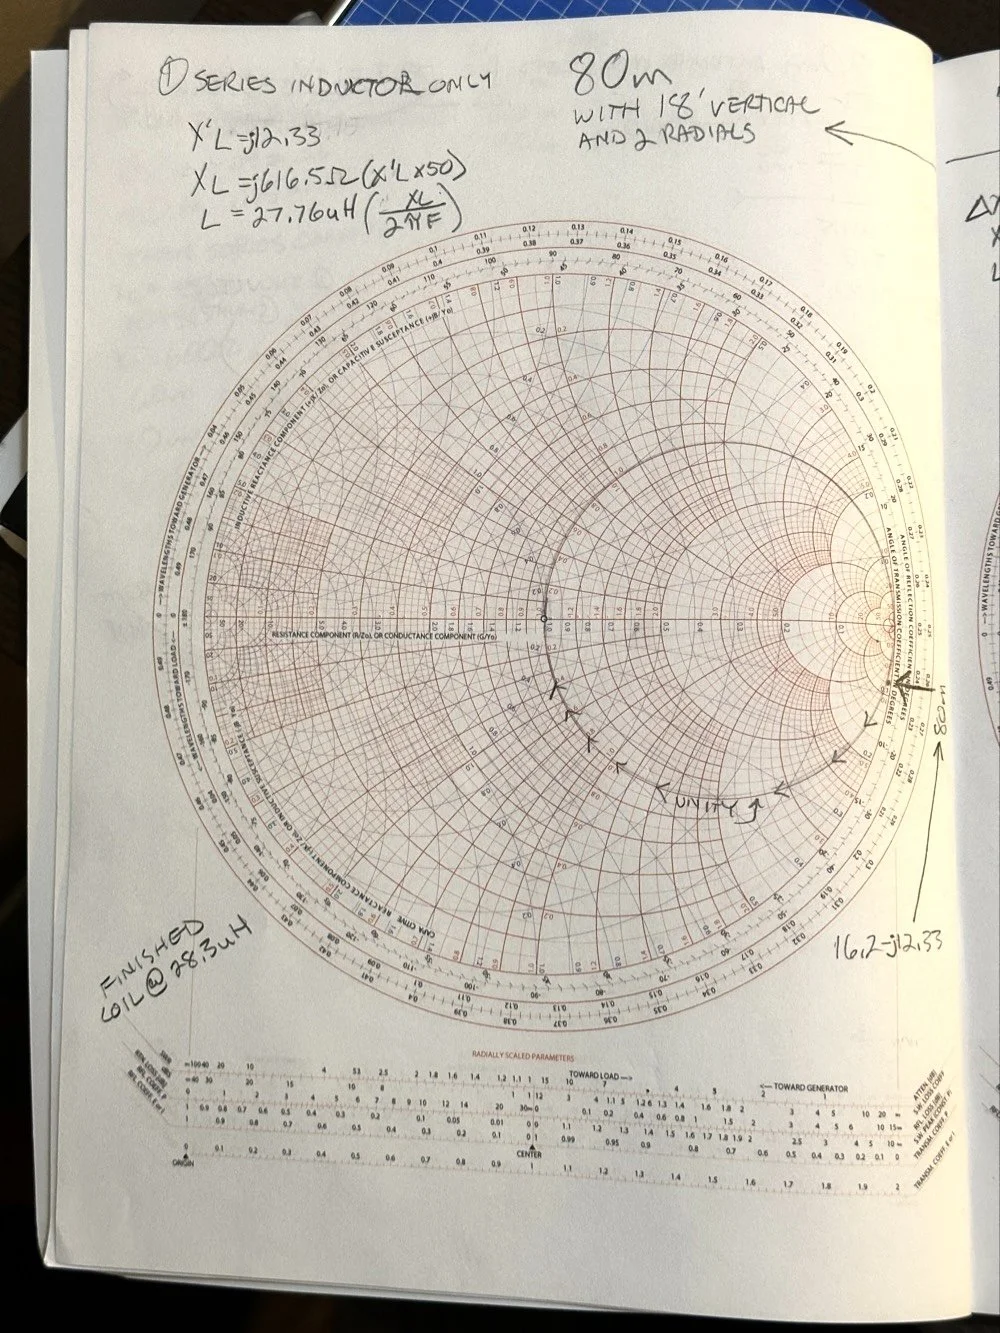
After I pulled my hair out for a while…wait, that don’t apply to me…I’m bald already… After getting over the frustration of trying to solve this problem, I redrew it on a fresh page and looked hard at it for a minute and had an epiphany… The plot point is not INSIDE the circle, or even anywhere closer to the middle of the chart at all, which would have been ideal, BUT it is really close to the unity line already. I mean REALLY close, so close in fact, I bet you could simply run around the unity line clockwise to the center point and just “eat” the misalignment on the horizontal resistance line of such a tiny amount and no one would even notice in the real world. You know what this matching network now looks like? A huge by large inductor is what, just a plain ole gigantic coil… Moving clockwise around the impedance lines (the red ones) indicates adding inductance to solve the problem. This is what all the antenna companies use when you buy a mobile 80 meter whip antenna if you think about it, just a huge load coil and nothing more. If you were to zoom in on this, I am guessing the resistive value when you get to the end of the arc, at the horizontal center line (which is the pure resistance line) would be something like 49.2 ohms or something close to that, literally less than 1.1 : 1 SWR maybe less to be honest.
Armed with this knowledge, I wanted to test this theory. So I now needed a way to make a coil to insert between the feedline and the base of the vertical to see if I had learned anything. Well I had this new scope / meter / signal generator widget and I had a way to make a capacitor, I then remembered a video where I guy showed how to measure inductors and capacitors with only a oscilloscope if you have one known device. Well, I have a capacitor that I made and I can measure it with the new meter, so that will give me the “known”.
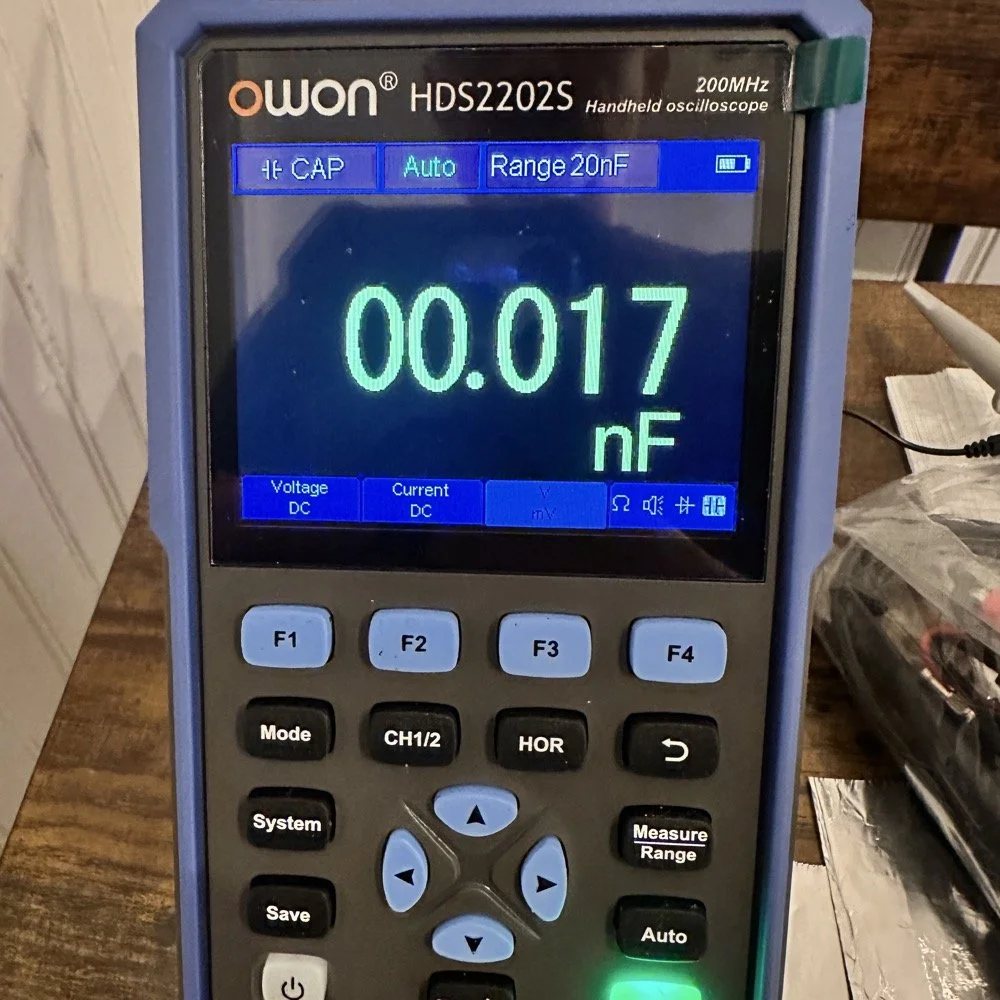
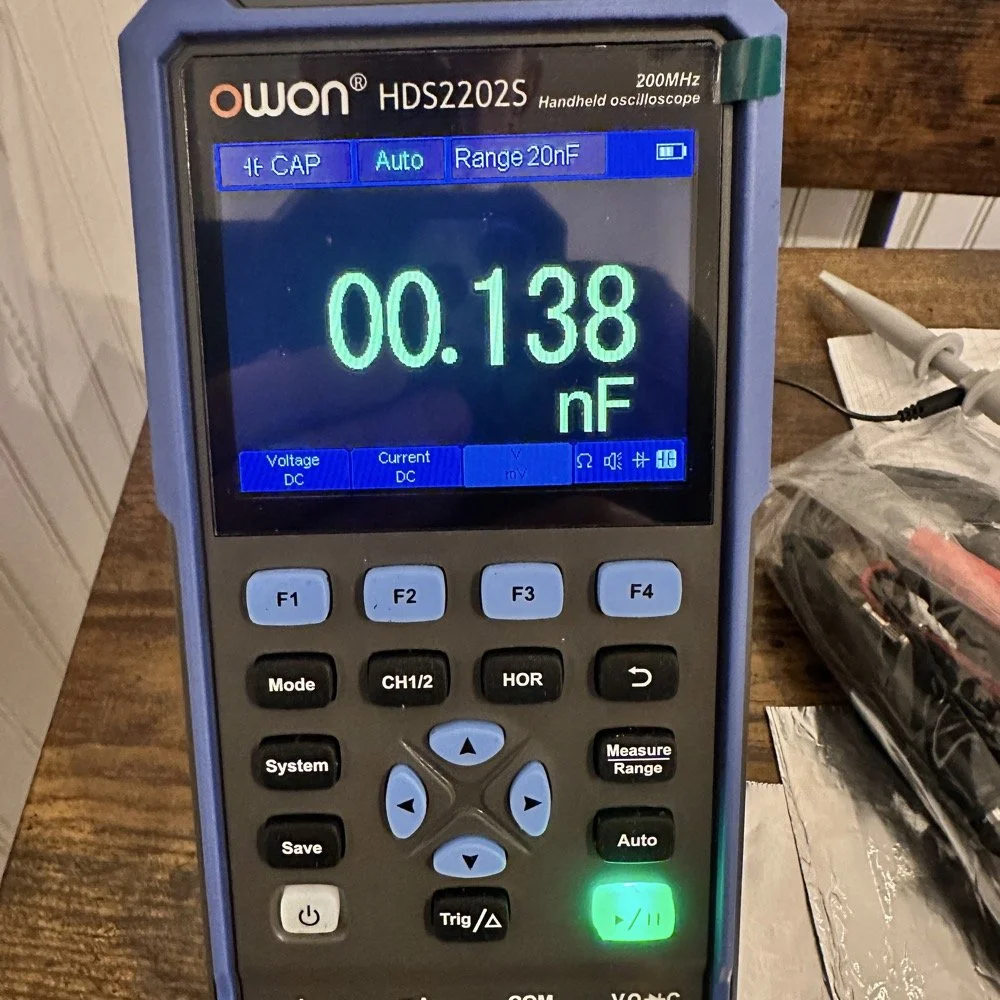
So I fire up the new meter and plug in the leads and find this. There is no way to “tare” out this number either so you simply have to subtract it from what ever you measure. I figured this would be pretty easy so I just went with it. Below is a photo while I was trimming the capacitor to a size I wanted. I was looking for 100pf and as you can see below on the meter, I was getting close. This is measuring right at 121pf in the photo. I would trim off the edge of the sheet and then check it again, rinse and repeat till it was close to what I wanted.
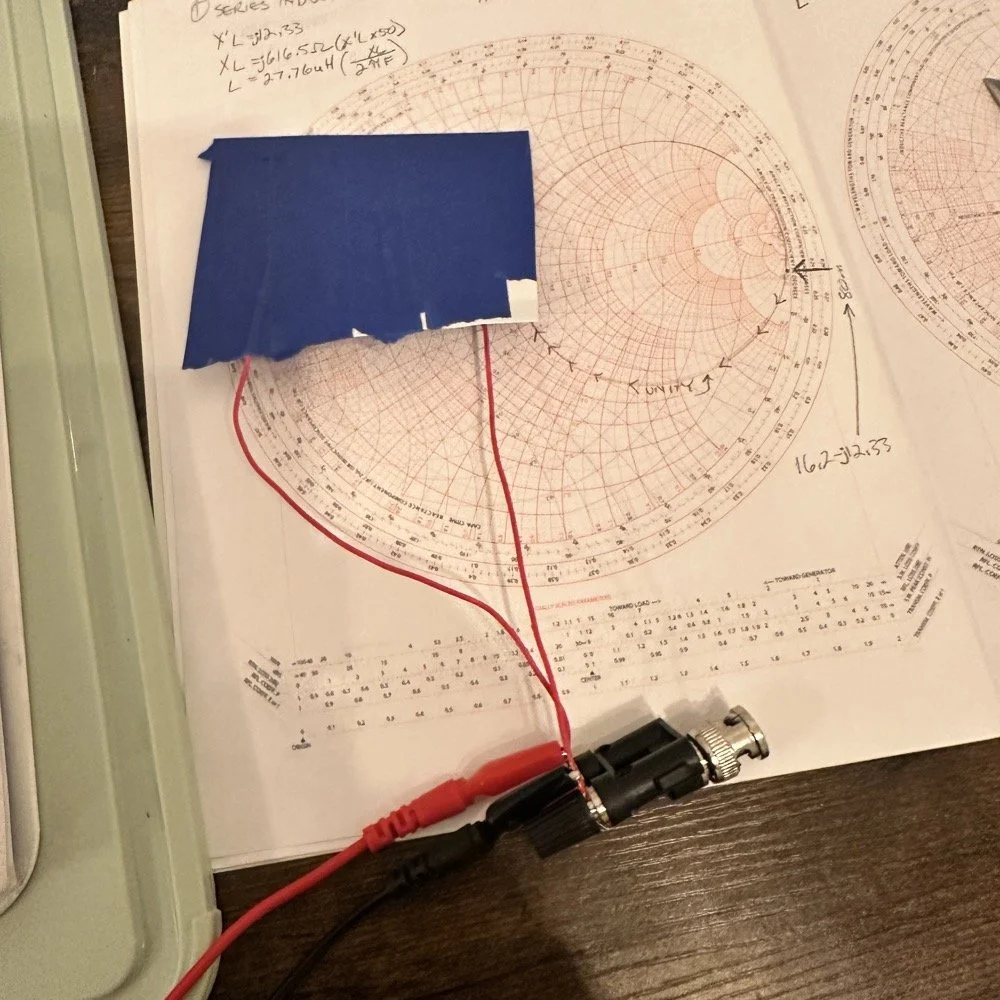
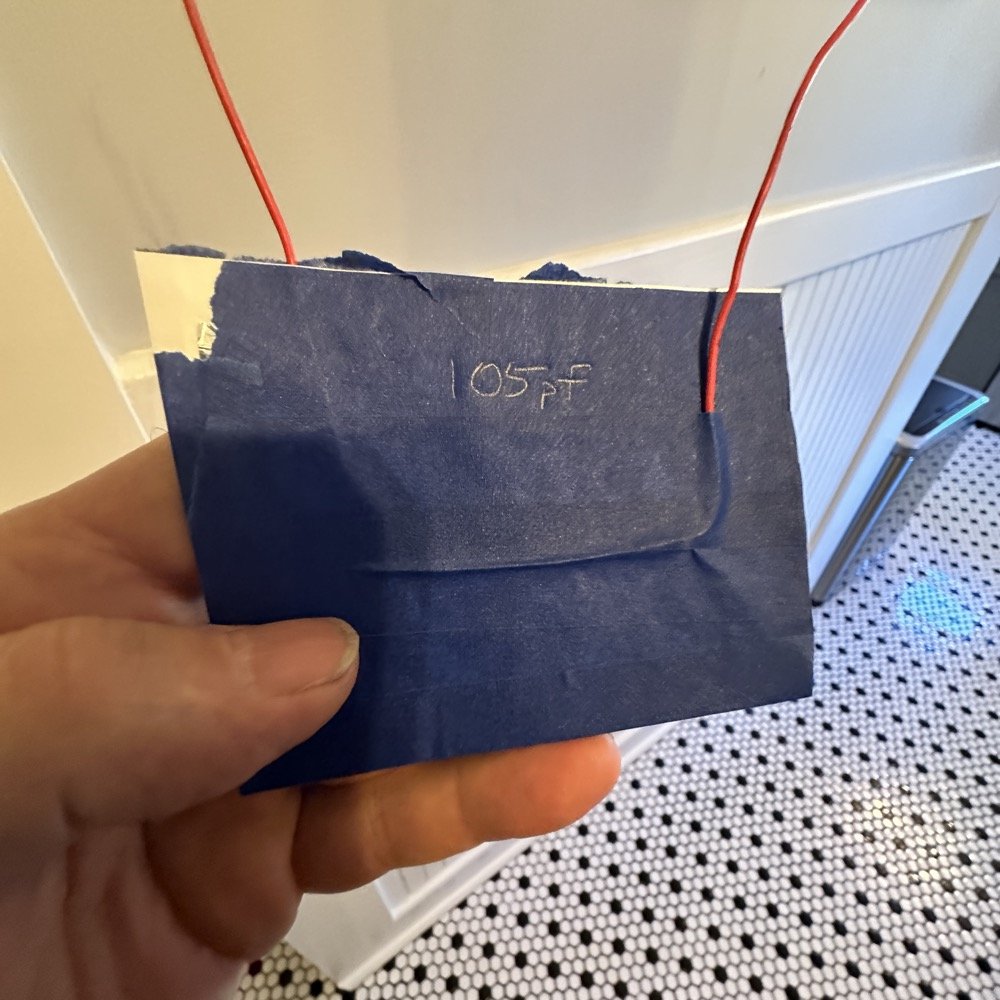
Once I had my brand spanking new capacitor made and trimmed to size (105pf), I setup a test fixture to do my test with. The test fixture is also expedient since it is all that I had was one of those “BNC to binding post” adapters and just used it as a sort of bread board to attach all the parts to the system. It worked, it was pretty janky, but it worked. All that we have here in reality is a parallel tank circuit. It will resonate at one frequency natively and I can measure that and then use a simple online calculator to see what the inductance is based on my capacitor value and the frequency of the tank circuit. How do I get it to resonate then? Simple, use a battery…
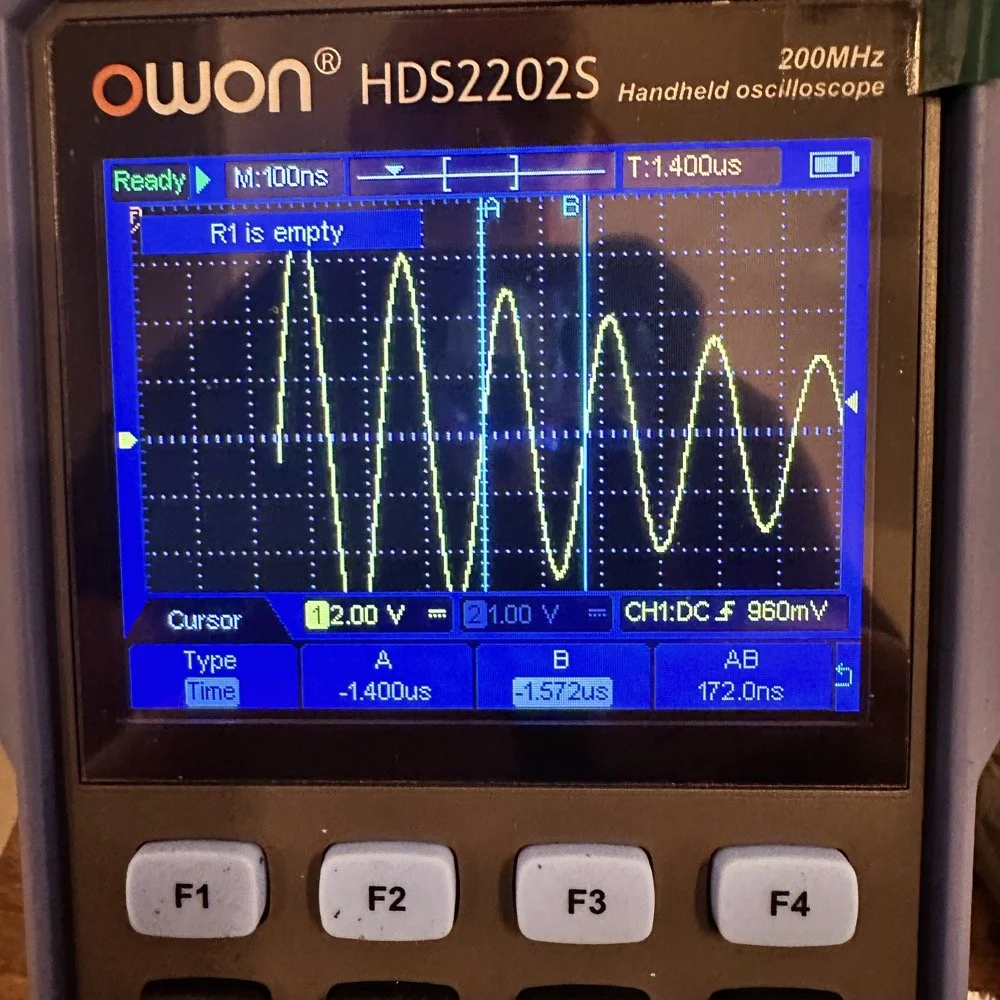
In the other video I had recently watched he showed simply setting the scope to trigger off of a voltage level close to the value of the battery which will allow the scope to capture the ringing of the tank circuit if you pulse it with a battery. I just took a AA out of my pocket flashlight and used it, set the trigger to normal and set the trigger level to about 1 volt and started touching the battery to the two red wires going out to the left in this photo below. This biased the tank circuit (simply applying a dc voltage across the capacitor and charging it) and I was rewarded with what you see below on the scope in the below photo. To be perfectly honest with you, I had done so much wrong in this process that I was honestly surprised that it worked. I even had to show it to Teresa and she had literally zero idea about what she was seeing here, but I had to show SOMEONE that it has actually worked!
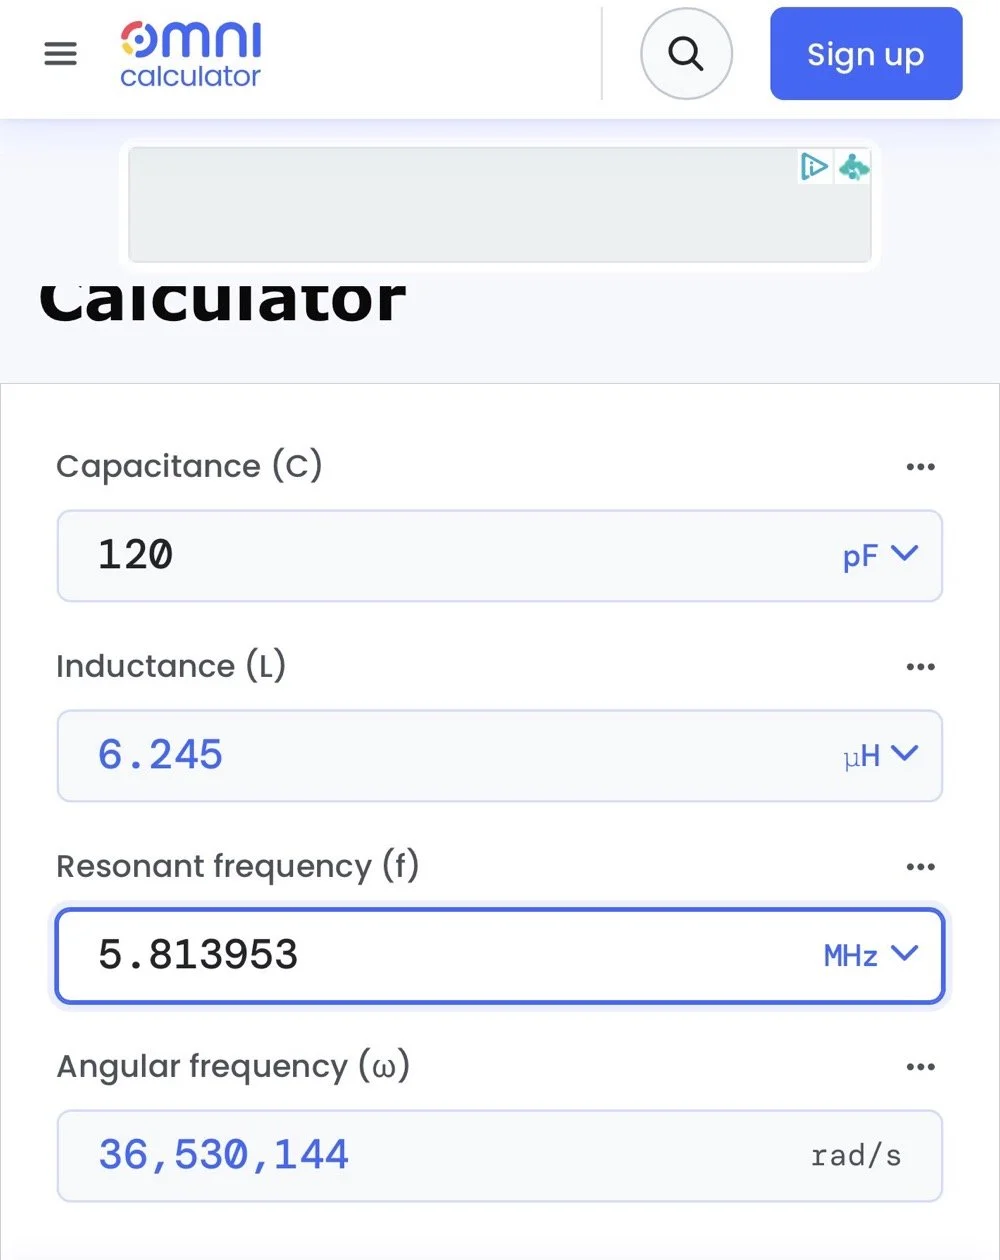
The ringing the scope captured is nice and clean and I was able to measure the period of the sine wave at 172 nanoseconds. Transforming the time into a frequency is easy, you simply invert the number or divide 1 by .000000172 and you get 5,813,953 hz. This frequency is not relevant to the ham bands but is only useful in telling us what the value of the inductor is, which is what we want anyway. As you can see from the screen shot below, this inductor is 6.245 uH (micro henrys). I did the plot on the smith chart for 40 meters for this antenna and came up with almost exactly this number, I came up with 6.62uH on the math. This also makes sense as I did this physical coil for the 213” (17.75’) WRC vertical and not this one that is longer that I am using now 221” (18.4’). Another possible reason for the variation from the measured and the plotted values is that my capacitor value could be slightly different from being moved around or being in proximity to metal or some such. You could touch the capacitor with your finger tip and the value would change so this is probably part of the variation…
I made this actual load coil by guessing to be honest, I did use the nanoVNA as a SWR meter when I made it and I would take off a coil or two and measure it and I simply walked the null in on the antenna for 40 meters that day. Now I know how to use a smith chart to do that math ahead of time. That is pretty cool.
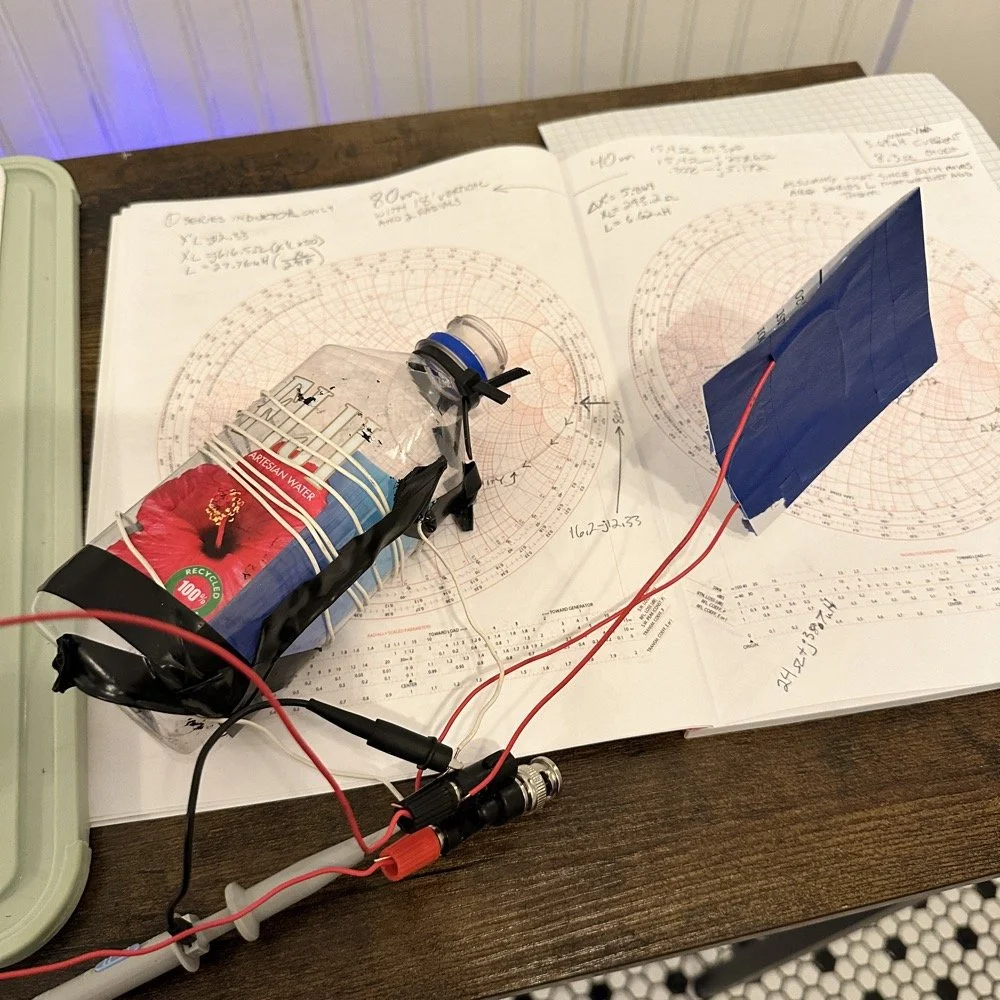
Literally using trash to resonate as a tank circuit is kinda cool to be honest with you. The wires for the capacitor are simply taped to the aluminum foil, nothing more as I didn’t have a way to solder them together or anything like that. This was truly a temporary test fixture for experimentation.
The next logical step was to make an inductor for 60 meters and to hook it up to the antenna and measure it with the nanoVNA to see how close I could get it. This is where things started to go south…
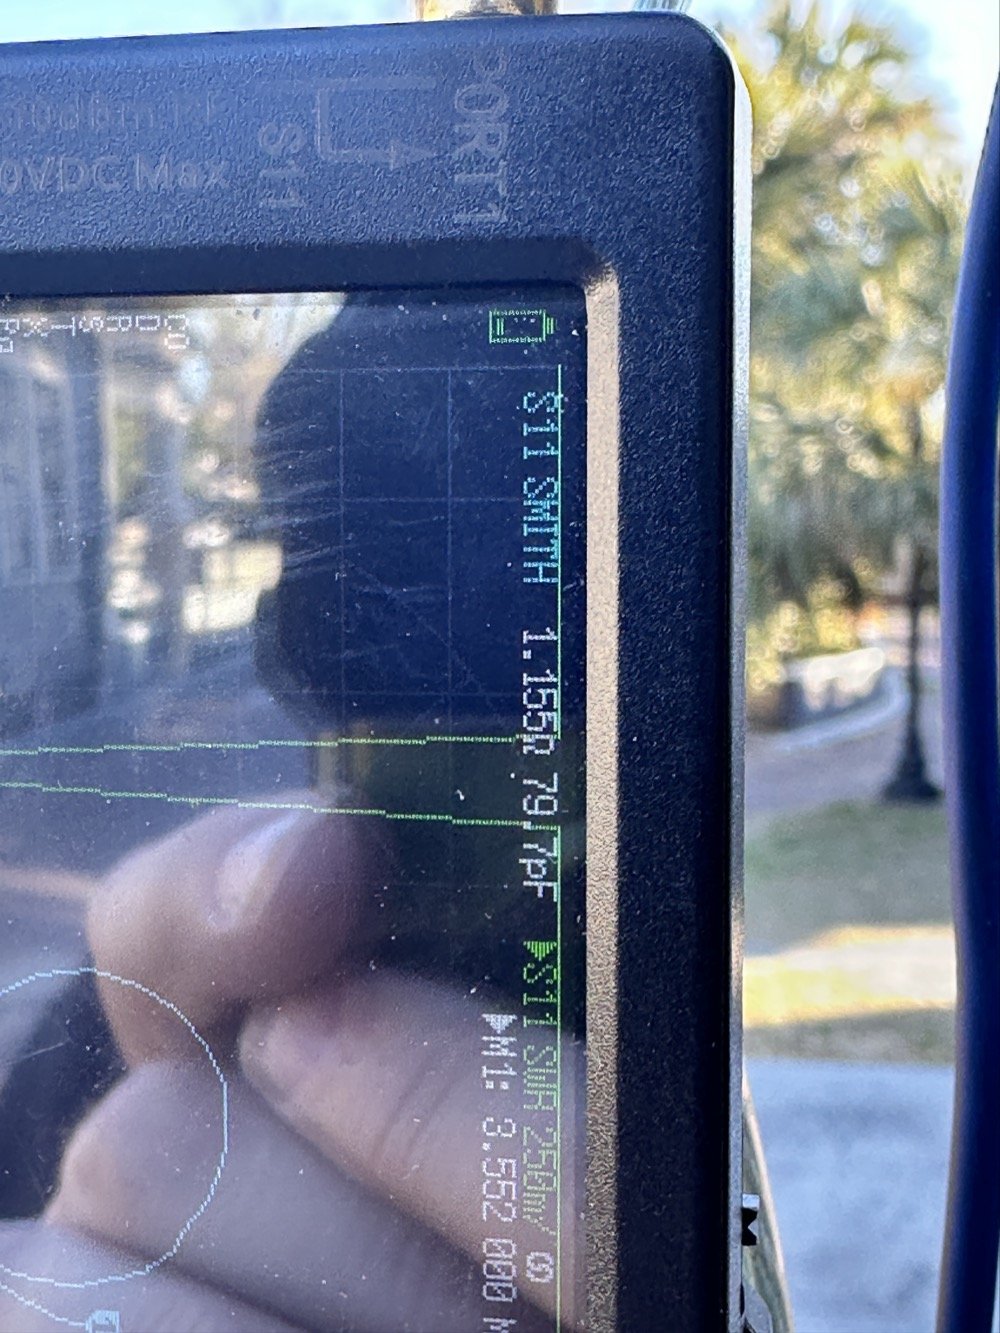
First of all, I had problems replicating the same resistance and capacitance from that day at the POTA park. The photo of the VNA above shows what I am talking about. Now it is 1 ohm… yeah basically a dead short for the RF. But more importantly it is different from the day of my test which was about 10 ohms (if memory serves me) but basically this doesn’t matter when you get to the region of the smith chart that this plot is landing in. The capacitance is what really drives this position between these two numbers and it was virtually the same. The amount of inductance will be more for 1 ohm but not a whole lot more.
Well what happened when I hooked up the coil and the vertical and stuff in the driveway was a whole bunch of nothing! It just made a circle around the outside of the smith chart, which is bad if you don’t know. You want your line to go through the center of the chart at the frequency you want to use and if it goes around the outside it ain’t going through the middle!
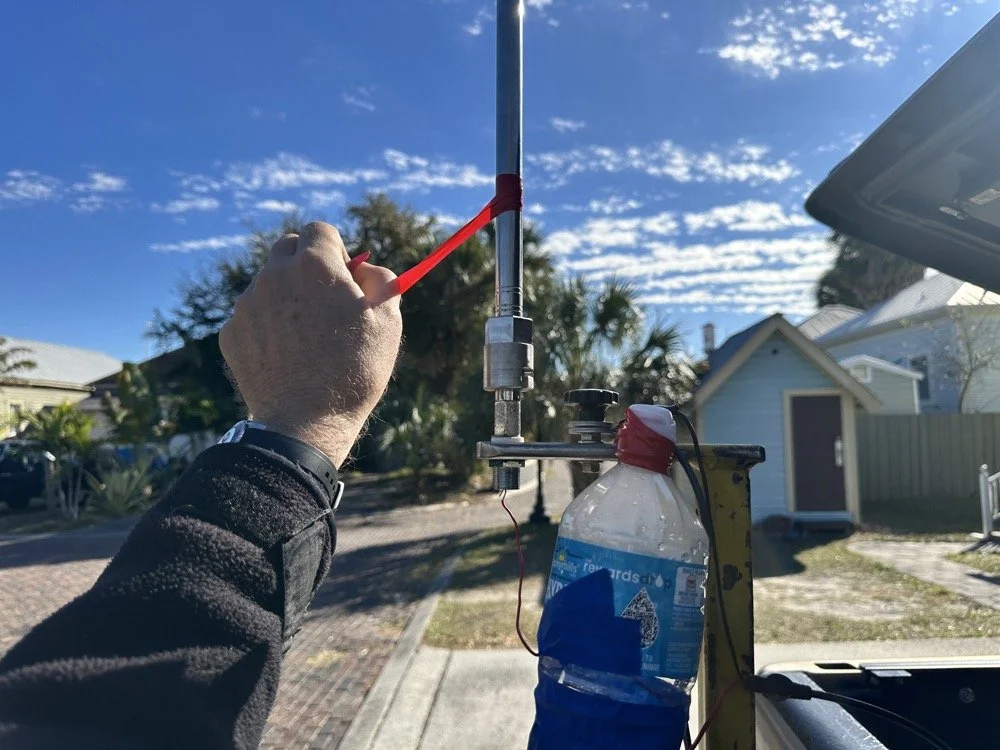
Deflated that I had probably done all that math wrong…again… I was about to throw in the towel when the wind blew and the plot on the nanoVNA moved towards the center! What just happened??? I start messing with this and that, as you can see in the photo above that the coil output wire is just poked into the coax port on the antenna. This has to be the worst way to make this connection, but if this is all you have, then this is what you do…
I could grab the vertical and that would make drastic changes to the smith plot, so I thought about moving the antenna without touching it and I found a roll of electrical tape and used that to tug on the vertical as it is in a QD mount (which is not a great connection to be honest that I have found). I even cleaned some stuff to no avail, but when I put the tape on the antenna and pulled it in certain directions, I would get the plot you see below. Notice the marker is at 5.340 mhz and at 55.2 ohms and just 1.49nf capacitive. This is less than 1.2 : 1 SWR and I am sure that it is off a little because of the system losses at this point. All the loose and dirty connections along with the random radial placement (I find this makes a pretty large difference with my systems) made getting repeatable results almost impossible. This told me that the coil worked though and that my math was not wrong! I had actually learned something here!
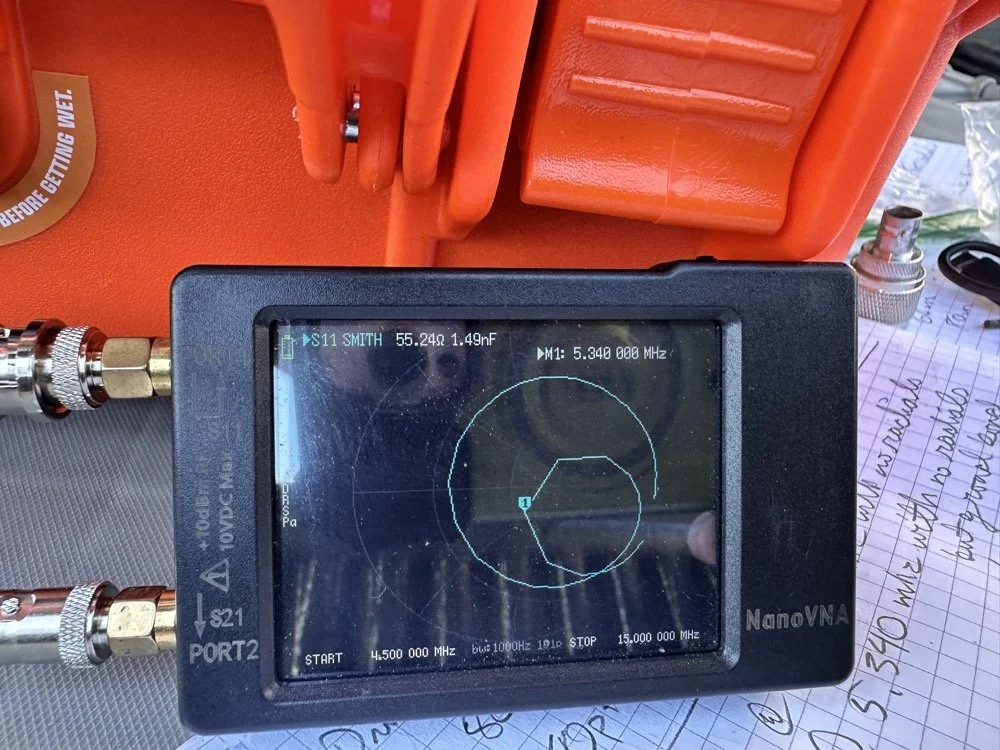
Once I figured this out and took a couple of photos for the blog, I tore the system back down and put it all away so I could get started on this write up about it. This has been an amazing process to do this and I learned way more than just how to do impedance matching with a smith chart. I learned that my system is way too inconsistent to simply make a coil and expect it to work in the system. If I had all the parts hard mounted in place with corrosion inhibiting paste on the connections then I could calculate this coil and it would drop right in. I was blown away by this and cant wait to find another use for my smith chart notebook. I hope this has helped you in some way either by simple entertainment or by learning something about smith charts and antennas, or maybe that there are YouTube videos about how to do this sort of stuff, either way, thank you for reading to here and I hope you come back for more of my ramblings in the future!
You can help support this website by using these Amazon Affiliate Links:
QRP/Portable Radios:
Antennas & Tuning:
CW Equipment:
Power & Accessories:
Organization & Transport:
BONUS ITEMS
73
WK4DS - David

Building a 60m Band Module for Ten-Tec Scout 555: Crystal Selection & Filter Design [Part 2]
I figured the the mixer’s bandpass filter would be the same as the IF filter but turn’s out I was wrong here. I looked at the existing part values on the chart for 40 meters and 80 meters (remember that part about not having a formal education in this stuff?) and simply decided that the inductors were again too big and I needed them to have a slightly lower value instead.
Well, if this is the first post of my blog you have found about the 60 meter band module, please Read Part 1 for the complete background on this project. or a lot of stuff is not going to make sense…haha.
The donor about to undergo surgery to become a 60 meter band module.
As you know from last week, I was able to get all the filters updated except the output bandpass filter for the mixer and changing the crystal, so let’s get into that today.
I figured the the mixer’s bandpass filter would be the same as the IF filter but turn’s out I was wrong here. I looked at the existing part values on the chart for 40 meters and 80 meters (remember that part about not having a formal education in this stuff?) and simply decided that the inductors were again too big and I needed them to have a slightly lower value instead. This is where things get engineery..is that actually a word? It should be. I started by simply using an online calculator to figure the values for this filter based on the chart from NA5N’s Website and my own simple math of a mixed product of 11.442 mhz. It falls right in the middle of the 80 and 40 meter LO frequencies on his chart. So now I needed a crystal…
Luckily I didn’t need matched sets like when making a crystal ladder filter so I was able to find 9.218 mhz crystals on Digikey for reasonable money. The calculated crystal frequency I came up with was 9.242 mhz to land at 5.300 mhz. This radio will absolutely transmit out of band and it is the responsibility of the user to stay in legal band space so I figured this would cover the entirity of the 60 meter band. The NA5N chart shows the PTO minimum frequency is 2.2 mhz so that is where I started my math.
2.200 mhz (PTO min.)+9.218 mhz (PTO XTAL)=11.418 mhz (LO) - 6.142 mhz (IF) = 5.276 mhz
The entirety of the 60 meter band is from 5.3305 mhz to 5.405 mhz so this will work perfectly fine.
All this math starts to make sense when you look at the chart at the bottom of this page. That is why I keep linking it…haha. So I build out the band pass filter and install the new crystal when it comes in and … nothing… Well, it did something actually. It would not lock onto the frequency at all, it would attempt occasionally, but most of the time it would just scroll numbers on the display of the radio. It obviously was not working. I was sure I had built the filter right… (turns out I was dead wrong…again…I am starting to see a pattern here…haha).
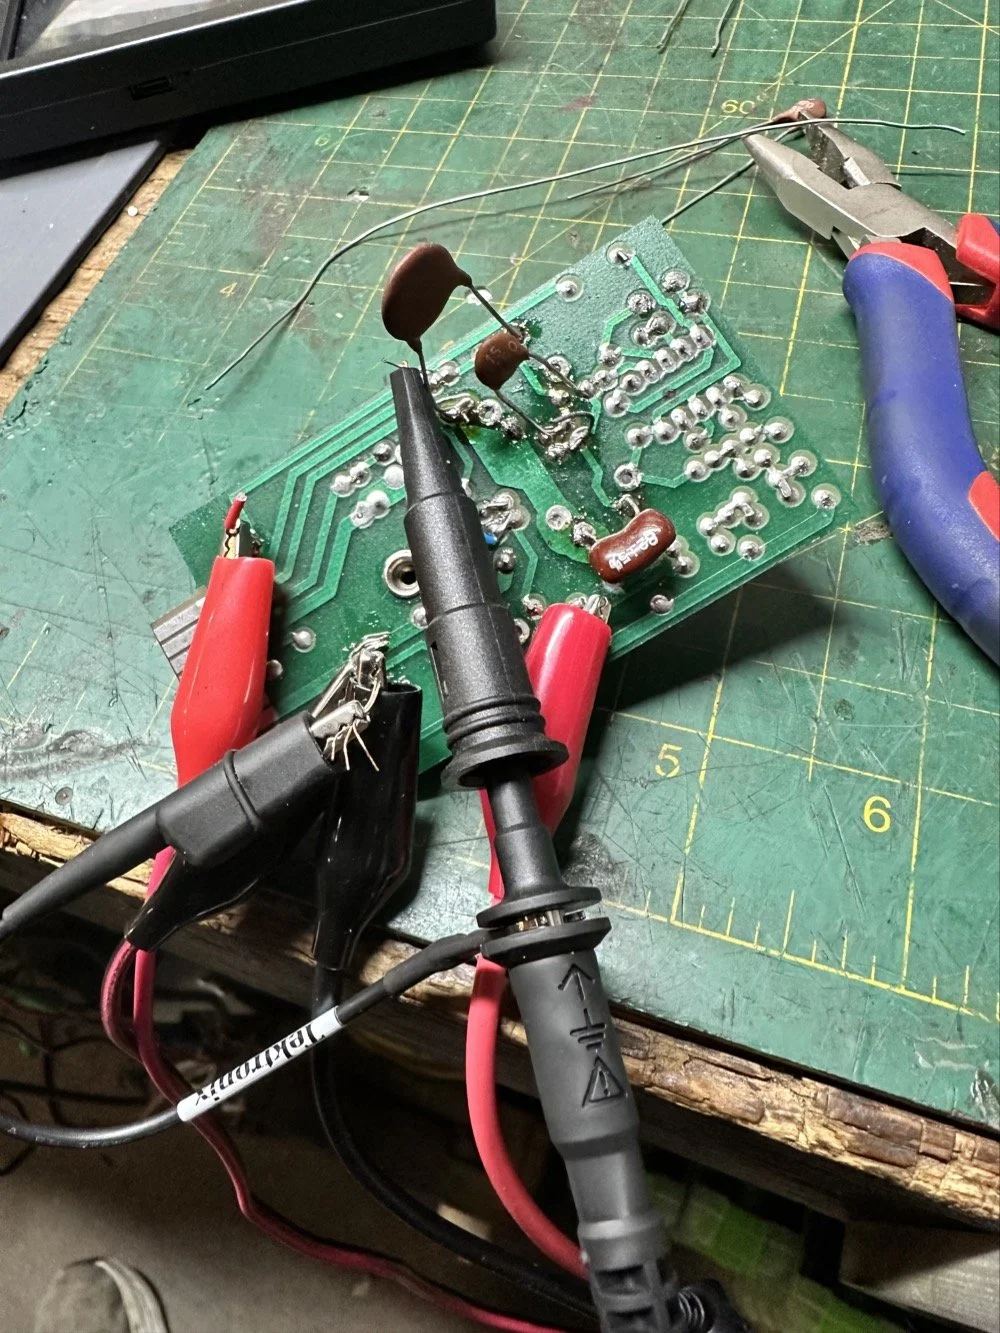
As I would soon find out, I built the filter for the 40 meter IF by accident. At this point I had a lot of numbers floating around in my head and scribbled on various pages laying around the bench and one was where I had done some of the math around the 40 meter circuit for some reason and I inadvertently used those numbers to make the inductors with. Couple this with a trip out of town for a week and you will see where I lost my train of thought. Once I returned from the trip I had just two days before leaving again to see what I could figure out.
Well, this is what I figured out.
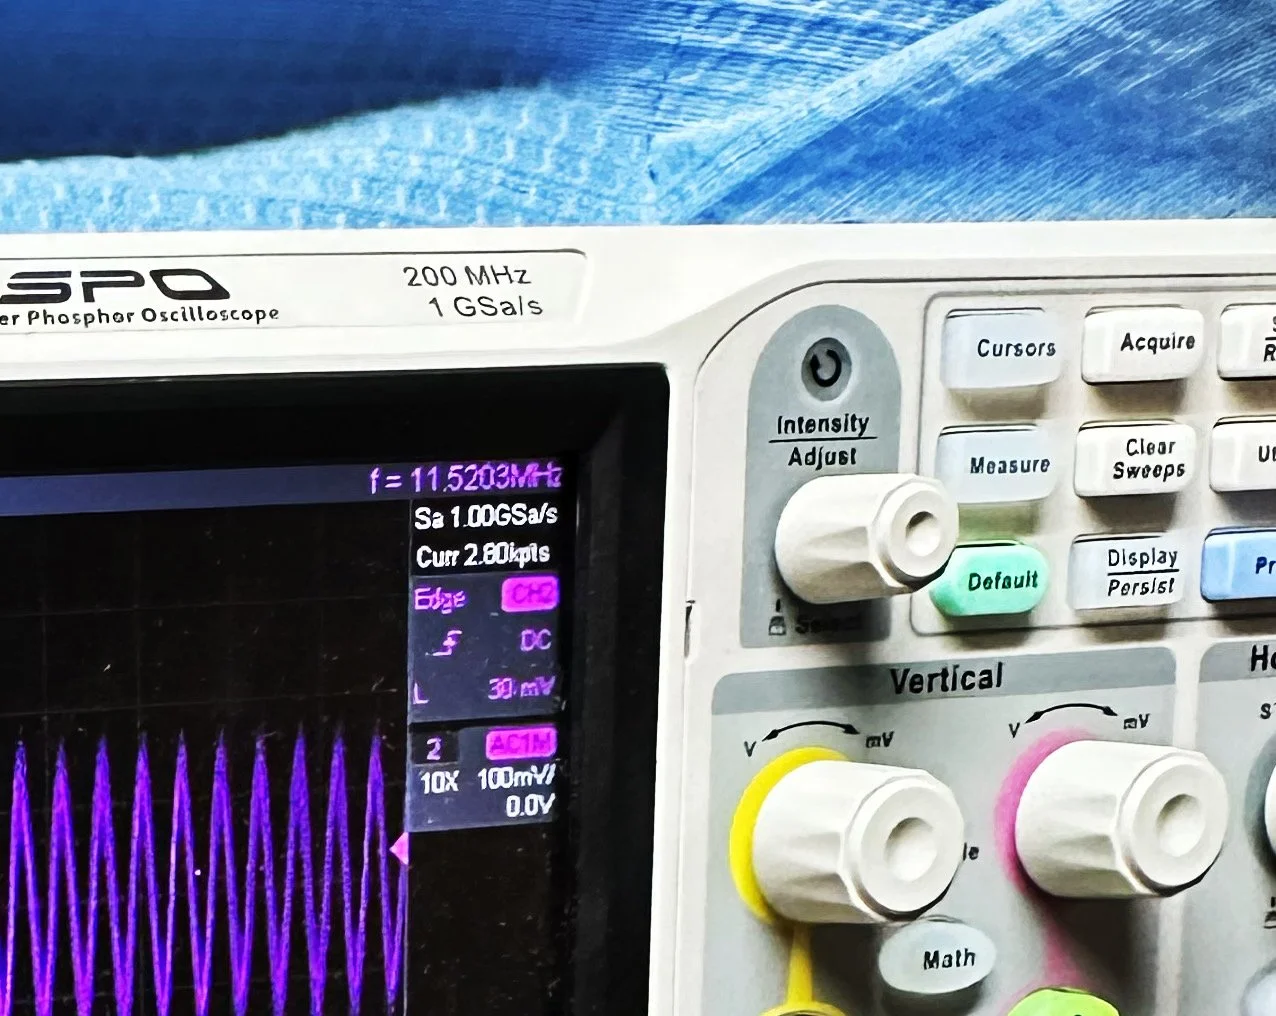
What you see above is a frustration point to be honest. I studied the print long enough to realize I could bring the circuit to life if I had a signal generator and a power supply. To get this to work I soldered several small scrap clippings from component leads to the board in strategic places to be able to connect leads for various devices and you get what you see above. I immediately went down a rabbit hole on signal generators and ended up with a UNI-T UTG962E and it arrived THE DAY BEFORE WE LEFT ON OUR TRIP. I get it going and power up the circuit with the 10 VDC bus and then inject a 2.2 mhz signal from the brand spanking new signal generator into the line (simulating the PTO) to see what I would get at the output… well… nothing. I checked the crystal and I had a clean 9.218 mhz signal at about 700mV going into the mixer chip but my 2.2 mhz injected signal was 50mV (the signal level based solely on the output shown on the block diagram going into the receiver control board as the data sheet for the chip I found didn’t show a signal level threshold that I could find.). This was obviously too low and I started turning up the signal generator and nothing happened at first. I was at 700mV of signal level coming out of the generator and I was getting nothing at the output of my filter. So I start walking it back to the output of the generator. I didn’t have anything at the output of the mixer chip as it turned out, so I check the inputs to the chip on the chip directly and the PTO input was almost non-existent. Turns out that the output impedance of the signal generator and the input impedance of the low pass filter for the mixer chip on the board must be different as it was dropping the level pretty dramatically. (This is something else I have learned while doing this project, you have to observe the impedance between stages or it wont work. ) So what do I do to solve for this? (Remember again I have almost no formal education in this area of expertise) I simply put the scope on the output of the mixer IC itself and slowly start turning up the 2.3 mhz amplitude till Eureka! The mixer sprang to life and I had a product!
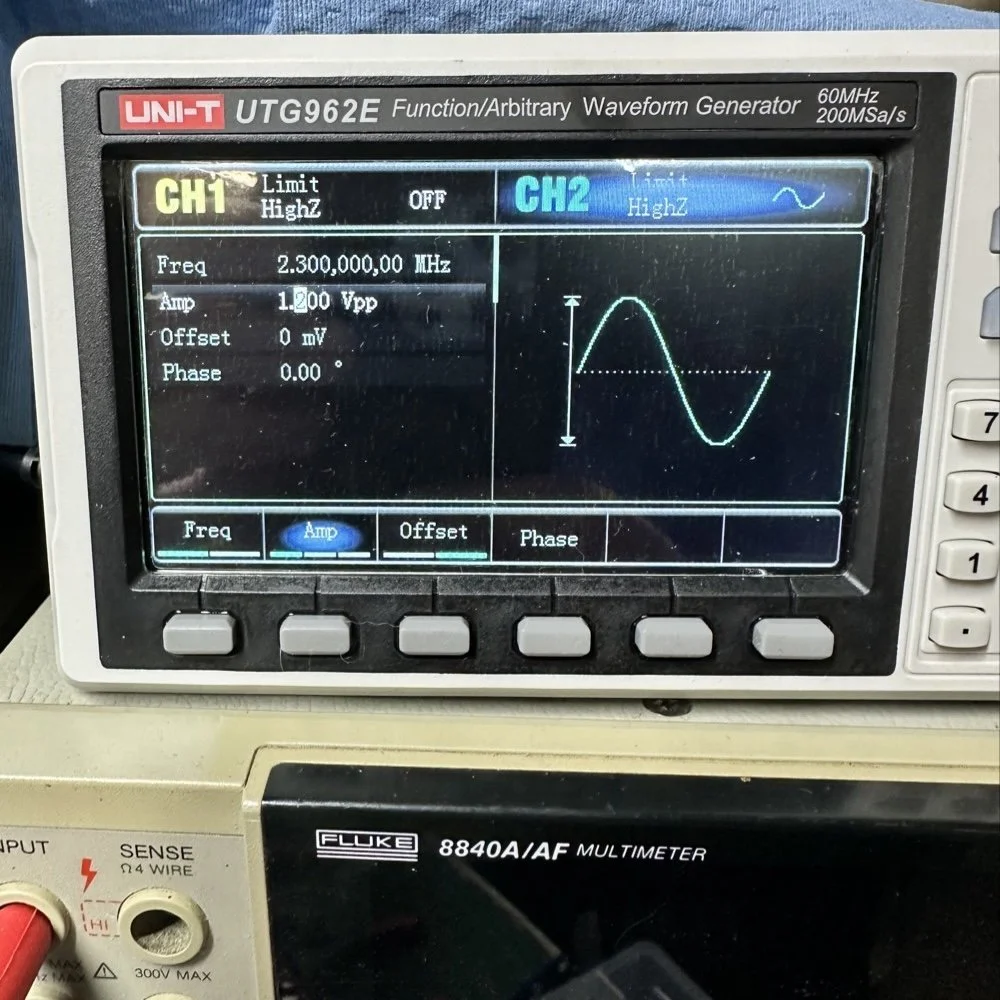
Note: I am using a different value here for the PTO reference signal because I didn’t notice that I had changed it till I got the mixer working. But it is fine as the PTO operates from 2.2 mhz up to about 2.7 mhz anyway. The key was getting the bottom of the mixed product below 11.425 mhz when the PTO is at minimum. This will allow tuning through the 60 meter band. But this is why the number in the photo below is 11.520 mhz and not 11.425 mhz.
Now that I have a signal coming out of the mixer IC, I need to see what it going to the receiver control board. You see on the signal path drawing from the NA5N site that he states it should be 50 mV or so there. Well I had nothing coming out of the band module at all. I start looking at the filter and this is when I figure out the filter is all wrong. Back to the drawing board again. I take the week long break and during this time away I dwell on what I had learned and spend even more time trying to learn how this bizarre filter works. It looks somewhat like a regular band pass filter but there are elements that don’t make sense to me. I spent a considerable amount of time studying this problem and decided to order some inductors and when I get back I could replace my home brew ones and see if I had done something wrong there.
Fast forward a week and I went home and had about 5 hours total to figure the whole thing out or it would wait yet another week… I start by replacing the two home brew inductors with two 2.2uH inductors from the variety kit I ordered. Still didn’t work, so there must be something wrong with the capacitors too. All of the caps at this time were class 2 capacitors so that would turn into a problem as they warmed up, but this thing was not working even when it was cold, so the values were wrong is all I could figure. The most logical thing was to strip them all out and start over. I had now gotten my hands on some NPO caps too, this allowed me to build out the filter completely with the correct rating capacitors thereby giving me the confidence that once it is working, it will hold value.
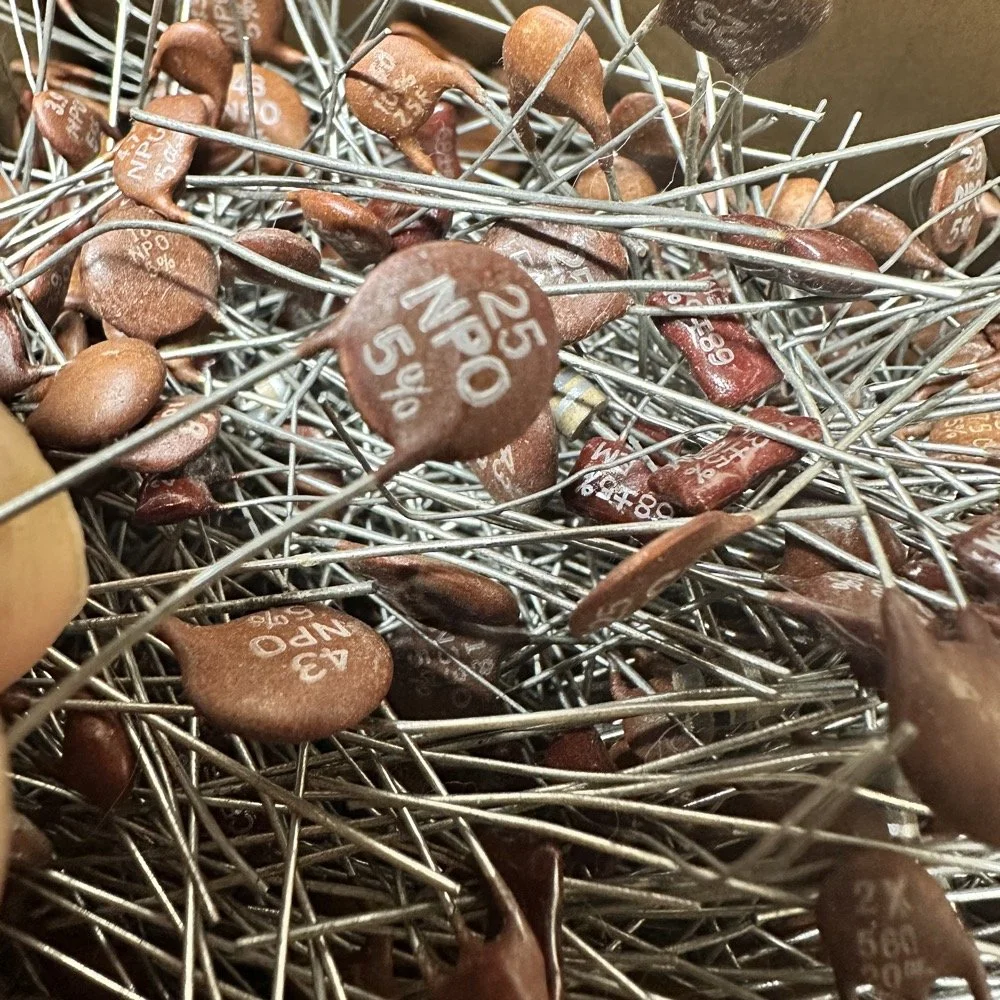
My first batch that I bought was a literal double handful of random NPO capacitors (and a few other ratings mixed in for fun) thrown into a box from eBay. I knew what I was getting so I also picked up some divider boxes to sort them when I got time. Now they are all sorted and I know where to find what when I need it. Of course, I don’t have every conceivable size to choose from but I do have a large assortment and can get by with most projects with what I have. Things like this are what I wished I had learned in trade school… I guess I should have chosen college instead…you know what they say about hindsight though...
The photo of the board above that shows all the leads connecting to temporary test points I soldered to the board has these capacitors on it. They are temporarily soldered on as I am experimenting with various values in different locations to see what will get me to where I need to go.
I tried to use the online calculators but this filter doesn’t fit into any of those models and all the outputs from those tools were not working for me. It looks like the coupling capacitors are also used to also limit the signal level from stage to stage as well. Correct me if I am wrong in this assumption, but tiny little 5 and 8 pF capacitors are not letting a lot of energy through them, even at HF frequencies and there are two in this filter circuit. I can only assume that they are also using these to match impedance as well or a larger value would couple the stages with more signal. Anyway, I was stumped and asking the internet for help is literally begging to be slandered and chastised for being stupid, so I didn’t even bother with that option. That only left experimentation and experimentation is what I did. I put all sorts of outlandish caps in this filter and found success doing it this way. It took me a few hours, not gonna lie, knowing how to calculate these sorts of things would have been immeasurably easier, but I was able to get the signal on the output trace of the band module and it had decent signal level too! Honestly, I am going to revisit the output signal level when I get back home (I may have already done it by the time this goes live on my site) and see if I can attenuate the level somewhat as it is higher than what the base of Q16 on the receiver control board shows in NA5N’s pictogram.
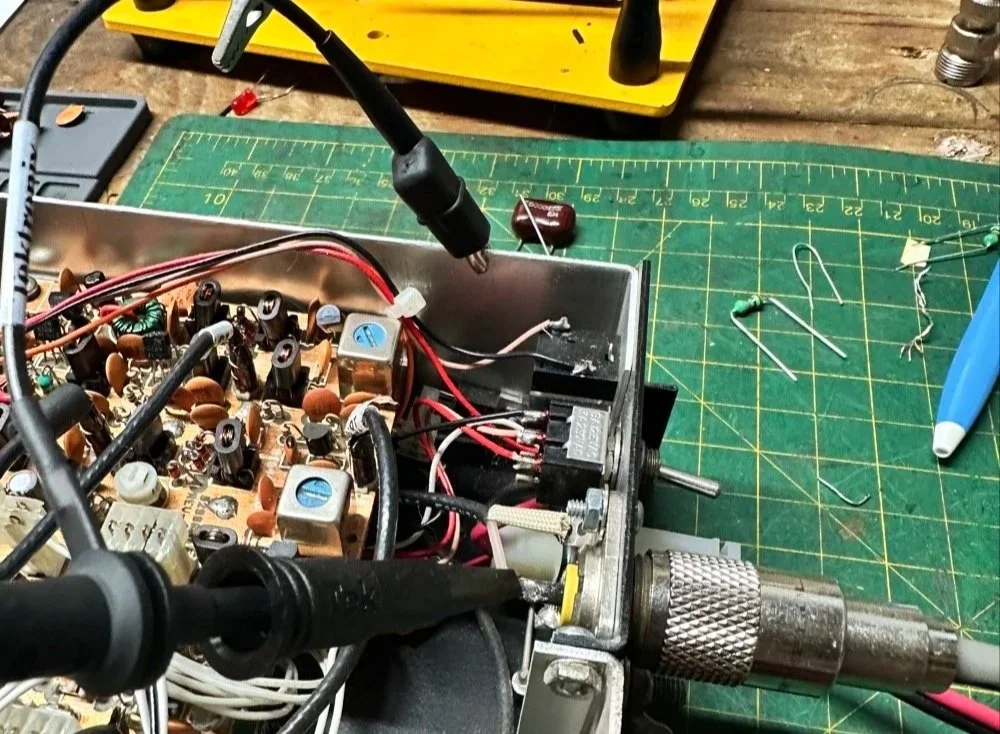
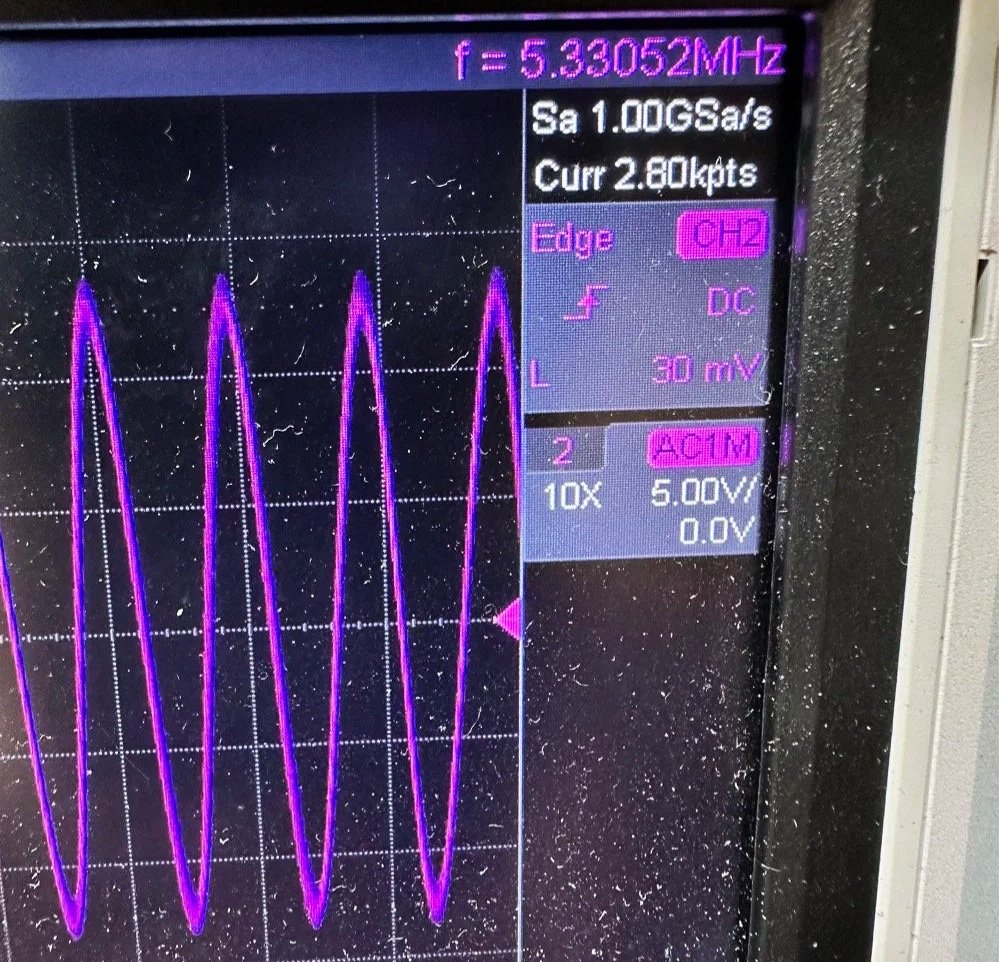
What you are seeing above is the output of one of my Argo 556 radios that I used as a test bed to check the signal levels and such to see what was going on with it. As you can see I simply connected to the output of the radio and looked at the signal going into a 50 ohm dummy load. I did the math (I know, I know… this has not been a great idea for me in this blog post… lol) and it comes out to about 1.8 watts and not 5 watts for this radio (I have not attempted to turn up the transmit power on this unit yet either so it might simply be turned down or something like that. Let me know if my math is wrong here, but 27 volts peak to peak and 50 ohms should give me a power level of 1.82 watts at the antenna connector?
Power= peak voltage (13.5volts) divided by the square root of 2 and then that is divided by resistance.
All that aside, I took the newly minted 60 meter band module up to the shack and setup a Scout 555 and connected it to my home antenna. Tuned the antenna up and started looking for a QSO. I promptly found one and had a short ragchew with VE3USP in Ontario despite some QSB along the way. It works perfectly too. I do have to dial up 600 hz to be on frequency as it is a Scout 555 after all, but that is not a problem!
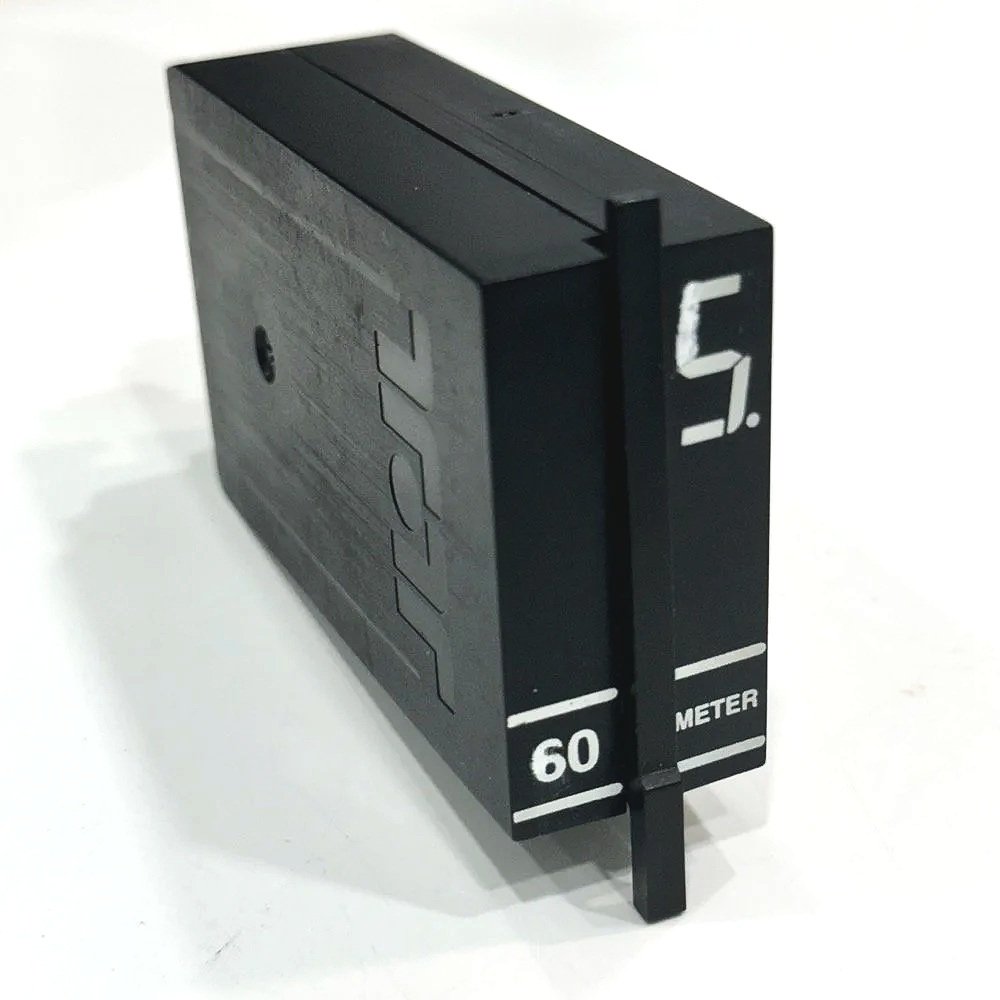
So I am not completely finished with this module as of yet. I still want to look at that output filter from the mixer and tune it some more. It is close, but it is not right as the signal level is too high. I found I missed a couple of capacitors when I dismantled it to clean it that need to be NPO capacitors instead of what I currently have in place as well. I would also like to improve upon my terrible painting skills if I could figure out a way to do it…lol Seems acrylic craft paint might not be the best solution here…
Next week we get into what happened when I took it to a POTA park… hint: I brought it back home and got inside a little more to fine tune it…. I discuss this next week and show you what I came up with for the mixer output filter ultimately.
To read the other parts:
- Part 1: Initial Conversion and Filter Design
- Part 2: Crystal Selection and Mixer Circuits
You can help support this website by using these Amazon Affiliate Links:
QRP/Portable Radios:
Antennas & Tuning:
CW Equipment:
Power & Accessories:
Organization & Transport:
BONUS ITEMS
73
WK4DS - David

Converting Ten-Tec Scout 555 to 60 Meters: Complete Band Module Modification Guide [Part 1]
You see it was starting to look pretty daunting since I didn’t understand what the reason for the odd frequency crystal was and that there were 4 tuned filters in each band module. Also the crystal value just didn’t make sense on the surface.
When I first decided I wanted to make a band module for the Ten Tec Scout 555 that was able to get on 60 meters, I had no idea what really was involved.
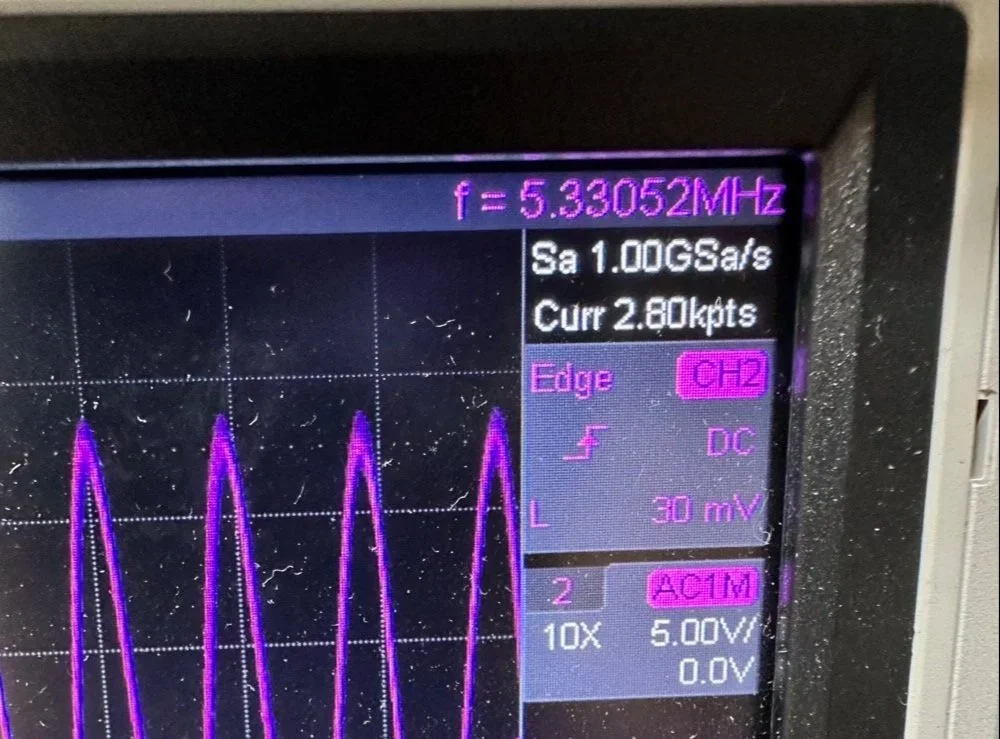
A little backstory here is kinda needed, you see the Ten Tec Scout 555 has become one of my favorite radios for POTA operations and I even find myself setting one up in the shack to tinker with from time to time. I own 3 Scouts and 2 Argos at the time of this writing if that tells you anything. I don’t know if it is the simple elegance of the radio or the fact that it can operate on almost all of the HF bands in such a small form factor, but I love it. Well there are a few things for sure that draw me to this radio like the fact that these radios have the now infamous Ten Tec full QSK (full break in) keying. This keying works flawlessly too by the way. Another reason for such love for these radios is the amazing receive they have even for such a compromise design. With headphones (or even those little earbuds), it is pretty easy to hear stations in the edge of the noise floor and make contact with them.
Well, if you noticed I said… almost… all the HF bands… This is because we have been granted, by the IARU, some space in the 60 meter band as secondary users.
Some of this band space is open to use with power levels up to 100 watts too. (There has been a recent change that modifies the allocation to allow a bandwidth section that is non-channelized but limits the power to 9.5 watts ERP so play in this area carefully. Basically this new region is a QRP only region for now.) Aside from that though, the Ten Tec Scout 555 can operate quite legally in the other 4 sections… or it could if… there was a 60 meter band module… You see this 60 meter band allocation happened after the Scout 555 production run had ended, so Ten Tec never made a factory band module for the 60 meter band that I am aware of.
I started this journey by digging through the owners manual for the Scout as Ten Tec always shipped complete schematic diagrams with their radios. Sometimes there would be missing insignificant data, but you could trouble shoot the radio just fine with them. Once the radio diagrams were located, I started looking at how the band modules made it change bands.This turned out to really be quite simple but I was missing one or two critical values. You see the Ten Tec Scout 555 band modules have a crystal in them and the frequency on the crystal didn’t make sense…at first.
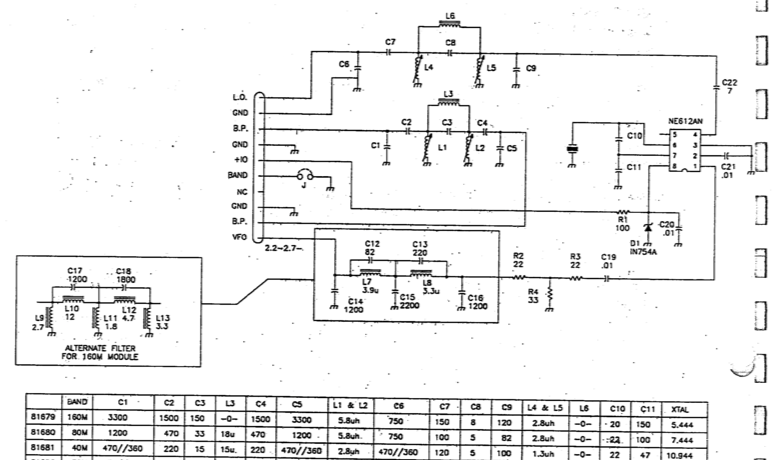
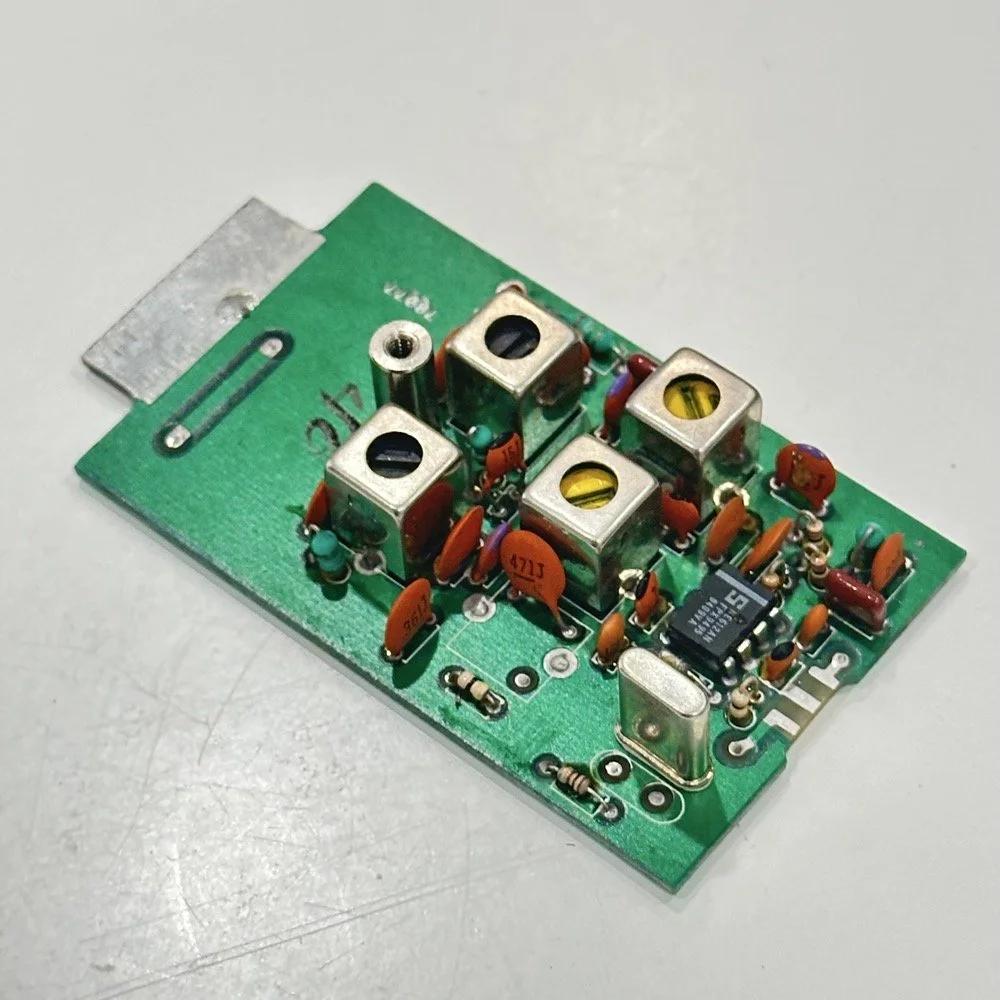
Above is the schematic and a photo of the board that goes with it showing the crystal that I couldn’t understand. This is what tells the radio what band it is on. Looks pretty straight forward at a glance, doesn’t it? Well look at that XTAL value at the end of the chart for 80 meters. Yeah, it takes a 7.444 mhz XTAL to get to the 80 meter band. So I figure the PTO is something like 3.0 mhz so it can get the first negative harmonic when mixed or something like that…nope…turns out I was totally wrong…
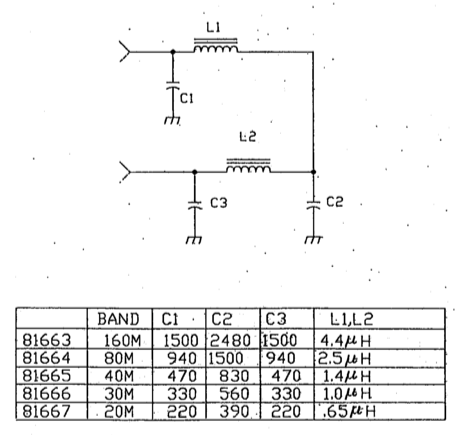
This is the other half of the band module. A classic low pass LC filter and that’s all. This is the output filter that the 50 power amp sends the RF to before it goes to the antenna. Below is what this part of the module looks like. These inductors and capacitors are shielded as they are delivering and filtering considerable power and could interfere with the small voltage levels on the other board that sits right beside it if they were not in the “can” or otherwise known as a ground shield. I don’t know why there is a hole in the shielding either as there is no adjustable parts inside the “can”. I chose this particular 80 meter band module for another reason as well. I have been inside this filter circuit before. When I acquired this module, the fellow I got it from told me it was dead and gave it to me. Turned out to be a broken lead on one of the inductors in this can. It took me a while to desolder this monstrosity to be able to access the parts inside of it. But persistence paid off as I was able to get it repaired and back in operation. I took a lead cut from a transistor and soldered it to the wire on the inductor and simply re-soldered it to the board and it came right back to life. So if you have a module that just stops transmitting all together, I recommend you pull the lid here and look at the inductors to see if one is broken free from the board, that might be all that is wrong with it. I also hot glued the toroids in place to help prevent this from happening again. Anyway, back to the project at hand…
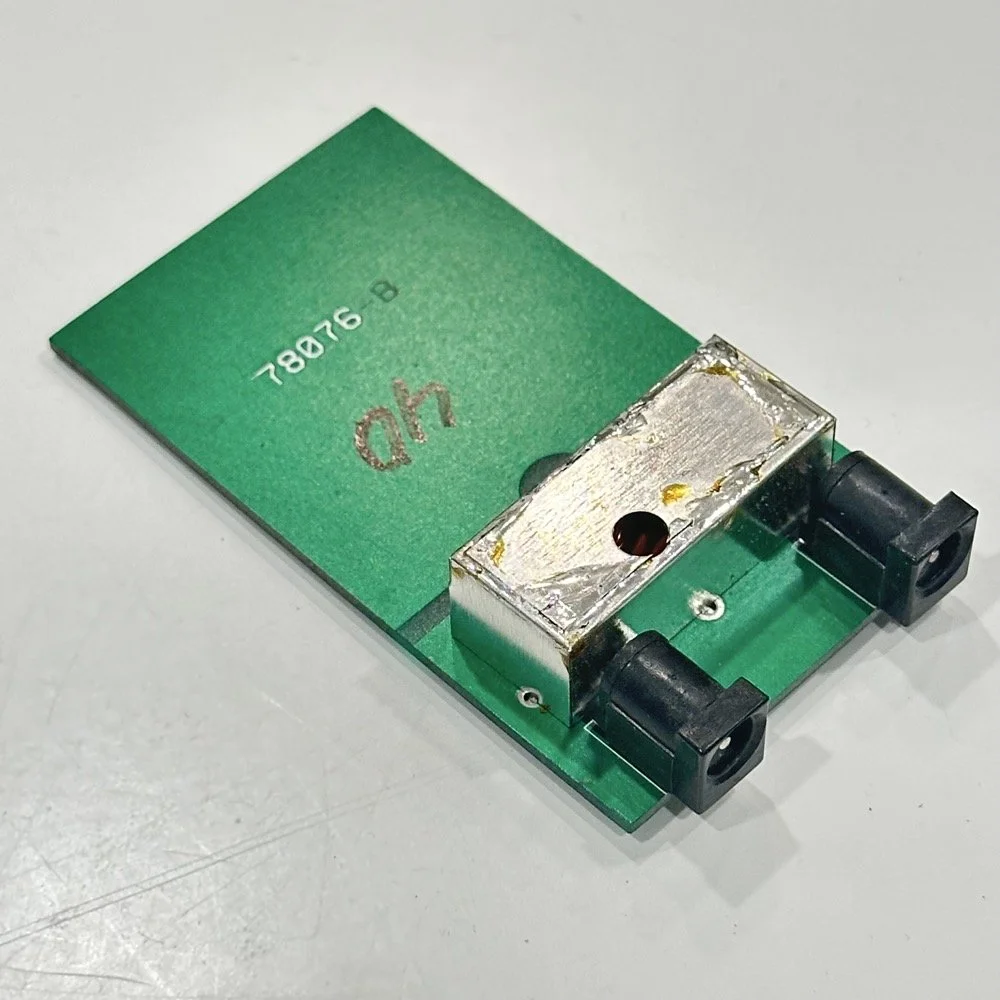
I also looked inside several band modules to see what the differences were and I found some interesting things when I did. For starters, the 10 and 12 meter band modules both use the same circuit boards. They just leave out the second crystal and the switch parts for the second crystal and put a crystal in it for the 12 meter band only when configured for 12 meters. I guess, to be fair, I should have also figured out how the PTO worked as well then I could have figured out the reason for the odd crystal values, but here we are…
Another thing I found was that the engineers at Ten Tec used whatever circuit board blanks that they had on hand to build the band modules apparently. I say this because I found 10m circuit boards (the ones meant for two crystals and the switch) fleshed out with parts to make them into 40 m band modules. (Like the one in the photo above) They apparently just used whichever ones they had on hand at the time. Needless to say, what I thought was going to be simple was starting to turn into a pretty major endeavor.
You see it was starting to look pretty daunting since I didn’t understand what the reason for the odd frequency crystal was and that there were 4 tuned filters in each band module. Also the crystal value just didn’t make sense on the surface. The values were all over the place. I was about to throw in the towel calling it just too complicated, even though the parts count in a band module is really low…till I found two things. One was I looked up what the “555 timer” on the board actually was (Here is a hint, it aint no timer) and the other was NA5N’s website.
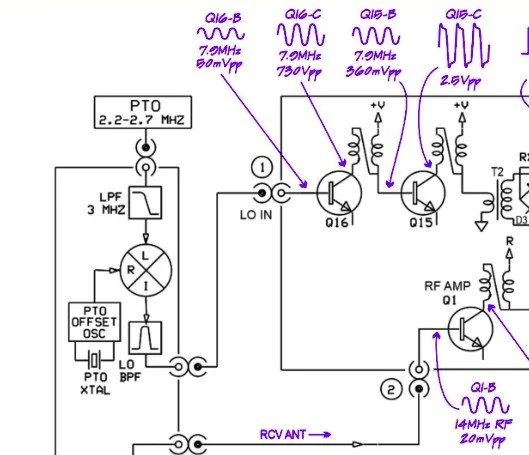
Excerpt from NA5N’s website showing the level of detail these drawings contain.
NA5N’s Scout 555 page is a figurative gold mine of information with just plain cash money piled on top of it, (just to drive this point home take a look at the piece above I grabbed for reference). I can not thank him enough for this information as without it I would not have been able to get this project working as quickly as I did. He also has some really interesting mods he has done to his own radio as well. If you want to perform his mods on your Scout, he gives you detailed information on what is done and literally how to do it…step by step almost. The greatest part of his page though is his info graphics he has built and placed there. These graphics show all sorts of information that the radio schematics leave out.
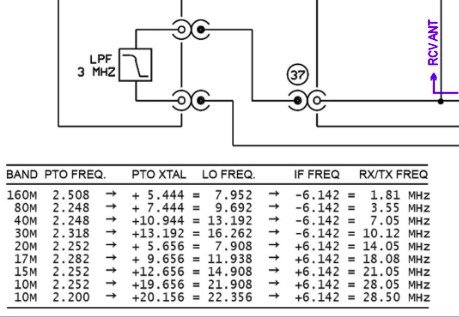
This and MUCH more is available on the NA5N website.
Things like the frequency path (pictured above) through the radio in a chart so you can understand how the engineers at Ten Tec arrived at each band frequency with these plug in modules and a PTO. Complete with oscilloscope test point and what you should be seeing at these points! Like I said, a gold mine buried in cash money…
Based on his chart I went through the band module and looked at the filters for the various circuits and decided (more like assumed based on the values of the parts) that I could simply re-tune an 80 meter module and “push” it up to 5.3305 mhz easily enough and without too much fuss…nothing could have been further from the truth.
So I start tinkering with the filters and piping them through the nanoVNA into the s21 input so I can see the filter shape and all is well from what I can see. Turns out the low pass 80 meter band module filter cut off frequency was about 5.5 mhz or so to start the rolloff so the 60 meter band was still in the pass band! One down three to go! Next I figured out that the PTO is the same for every module since it is part of the radio and not in any of the modules so that filter also didn’t need any mods. This left two filters to re-tune, just so happens it is the two with the adjustable inductors in them. So I start with the LO BPF (Local Oscillator Band Pass Filter) that filters the signal passing through the radio from the antenna. Why they call it the same thing as the LO BPF that is in the output of the mixer chip is beyond me, but here we are… This didn’t go well as I was not able to get enough adjustment out of the inductor slugs to get the passband up to 5.350 mhz, shoot I couldn’t get it to tune up past 4.5mhz if memory serves me. It was far enough that I couldn’t get it work so I looked at what I had and decided to wind some air-core inductors to a lower value and see what I could do like that.
Well, to be honest, I don’t know how I was so successful here. Maybe it was the sheer audacity in the fact that I was woefully unskilled in building filters for HF or the mind boggling lack of knowledge of how filters work and how to make them, but I got it almost perfect on the first try! I made a couple different inductors by winding magnet wire on a 1/4-28 bolt (that’s a little over a 6mm bolt for the rest of the world) and the threads made getting good tight coil layers easy. I borrowed my friend’s LCR meter and measured them and blissfully declared them good to go at 2.0uH each. Did I mention this is a budget LCR meter and I have no way of knowing what the level of calibration is for this part of the meter? I also learned later that I can measure my inductors with a signal generator and a oscilloscope. Guess who now owns a signal generator as well as an oscilloscope...
Once wound and “measured” in the board they went! I then tinkered with the capacitors till the pass-band looked close to what I thought it should look like. (I had also learned from the wonderful world of youtube that I should see less than 1dB of loss in the pass-band and the 3dB cutoff point is where the filter technically is measured..typically.) As I mention in a bit, I used the wrong kind of capacitors (the little blue ones) to start with, although the module did work like this, I updated it with NPO capacitors ultimately as well.
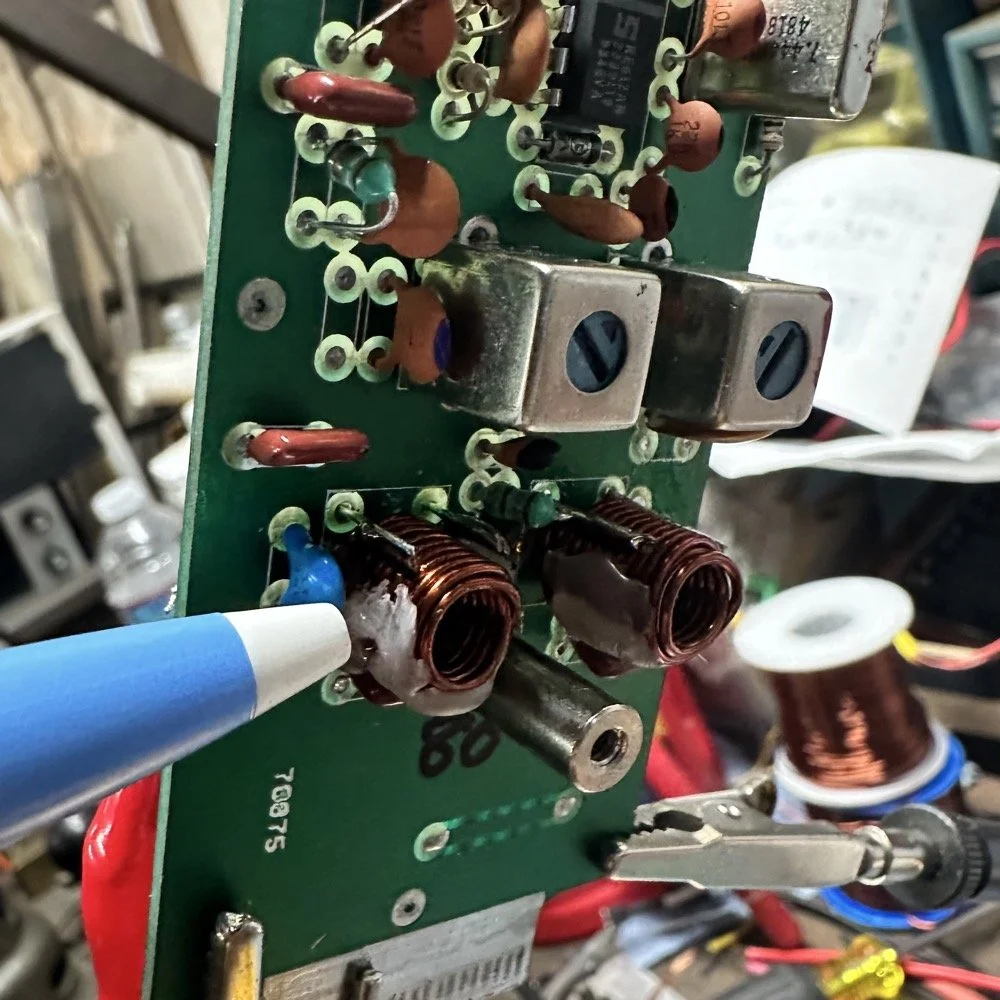
I went down a long path of learning on this project, if you haven’t already noticed from the inserted comments in the story. I have very little formal training in Electrical Engineering, you see I went to a two year trade school back in the 1980s and basically got the “intro to electronics” that EE’s would get before learning things like matching the impedance of the filter to the next stage and to use temperature stabilized capacitors in RF filters so they don’t move the pass-band around when they get warm. NPO capacitors have become my best friends here…lol. A hint for my peeps who also didn’t study RF in college, look at the circuit board above that has the crystal on it. You will see the little capacitors on that board and some have little painted tops on them. This indicates NPO capacitors when the letter designation will not fit. I have now purchased a lifetime supply of these caps off of eBay…haha.
Anyway, now the pre-amp band-pass filter was functioning like it should. One to go…
Tune in for part two where we get into the problems I had to solve to get this module working and how well it works now that I have figured out my mistakes.
Continue reading the series:
- Part 1: Initial Conversion and Filter Design
- Part 2: Crystal Selection and Mixer Circuits
You can help support this website by using these Amazon Affiliate Links:
QRP/Portable Radios:
Antennas & Tuning:
CW Equipment:
Power & Accessories:
Organization & Transport:
BONUS ITEMS
73
WK4DS - David

Multi-Mode POTA Activation: Penntek TR-35 CW & HT FM on 4 Bands at Sitton Gulch [K-2169]
I made over 20 contacts in short order with the Penntek TR-35 radio in bare bones configuration today so that I could get it up and running faster. This radio is a gem to use like this with a simple set of headphones and I dont mind operating like this one bit. This actually makes it easier for me to hear the calls to be honest about it.
Today I wanted to work an activation but I also wanted to grab a couple more bands as well so I hatched a plan to grab some VHF and UHF bands on FM Simplex if my friend KG4WBI happened to be home.

Today was also cold, which you can not see in the photos, but trust me…it was pretty cold. Since it was so cold, I opted to operate from inside the truck and setup a hamstick on 20 meters (I was being lazy today and didn’t explore the other bands) as I wanted to get the activation completed in about an hour since I had to be in Chattanooga for lunch. The 20 meter band will usually guarantee that to happen for me on CW, so I started there.
I noted in the below photo that the one shorter radial had to be pulled taught and the this is where the counter weight was at that held it in position. This is of little consequence other than I am starting to wonder how much capacitance I am getting at the end of the radial from these stainless steel weights at the end of each radial? They are not connected physically to the conductor but are probably capacitive to it through the wire insulation. I used speaker wire for these radials and it has worked really well over the years. I think the next deployment is going to have a smith chart plot where I take the weight off and just tie it off to a stake of some sort. Maybe a chop stick since there is really no tension on these radials. That way I can see just how much capacitance these weights are adding and I can also see if it is helping or hindering performance.


In these two photos I tried to capture something that was of interest to me, today the 20 meter hamstick seemed to tune much better with one of the radials drooped down to the ground and not outstretched like the other one. The one that is pulled taught is the one that is shorter due to the wire breaking over the years and me twisting it back together by hand so I could use it. With this setup, the nanoVNA said the SWR plot was 1.1:1 and it sounded like it on the air! The stations were booming in! I was getting reports back from many stations of 599 with my little Penntek TR-35 radio too!

Once I got everything setup and tuned, I hopped on 20 meters CW to see what I could scare up. Well that turned out to be a great idea as i quickly had a good pileup going and had great fun working through it.
I made over 20 contacts in short order with the Penntek TR-35 radio in bare bones configuration today so that I could get it up and running faster. This radio is a gem to use like this with a simple set of headphones and I dont mind operating like this one bit. This actually makes it easier for me to hear the calls to be honest about it.
Being cold like it was today, I decided to operate in the truck so I could stay warm and could feel the key in my hand unlike the trip to DeSoto Falls state park recently…lol.

Once I was finished with activating on 20 meters CW, I thought I would try to work my friend KG4WBI who lives a few miles away from this location. I knew he had the ability to work me on all three VHF and UHF bands that my HT can transmit on, so I hopped on my trusty HT and gave him a yell on his repeater the KG4WBI/R 1.25meter machine.
He was, in fact, home and he was more than happy to hop on simplex for a few peer to peer FM QSOs so I could add a few more contacts to the log as well as a couple of new bands as well. In the above photo, I had walked across the parking lot to the building in the background that you can see in the photo above. It is behind the white truck in the antenna photo. This spot gets most of the stuff out of the way so I had the best chance at a contact with a HT. Turns out it worked great on 2 meter and 1.25 meter, but 70cm just would not work from here with all the trees in between us. So I gave up on that band and went back to the truck to pack up and head on to a lunch date I needed to be at.
On my way to the truck I had an epiphany. I could just drive down to the lower lot and walk out to the northern most viewpoint on the canyon edge and it should give me clear enough line of sight to make the contact! I would still be WELL within the park bounds and it was the same UTC day. So I packed up the HF gear and headed down to the canyon rim. Called Roger on the repeater again and informed him of my plan, which he agreed to merrily. So we switched over to simplex again and I put in the 70cm call frequency then called Roger’s callsign and he immediately came back with a 59 signal report! Success!!! 4 bands again!!! Woohoo!
The lower photo is me down by the canyon rim where I made the 70cm contact. Don’t I look happy… lol.

I wanted to share this activation with everyone as it highlights a part of POTA that alot of people overlook. Well, actually two parts… one is that it extends to ALL hambands and the second is that you can absolutely use your HT to make short range contacts on FM and they count just as much as those great distance HF contacts. Dont discount 2 meter SSB either. There is plenty of people there too.
Anyway, it was a great day for radio and I appreciate yall coming along for the ride.
You can help support this website by using these Amazon Affiliate Links:
QRP/Portable Radios:
Antennas & Tuning:
CW Equipment:
Power & Accessories:
Organization & Transport:
BONUS ITEMS

Elecraft T1 Antenna Tuner Review: Field Testing with 41' EFHW at DeSoto State Park POTA
I wanted to put the Elecraft T1 automatic antenna tuner in “remote” location mode to experiment a little with it. This meant placing it at the antenna feed point (that is the BNC to Banana plug adapter you see below. I simply tied the 41’ wire to the red and the 9’ counter poise wire to the black and then ran a COAX from ABR Industries to the radio. I like this coax as it has the common mode choke preinstalled so I dont have to add my other one to the system.
I finally bit the bullet and bought me one of these amazing little tuners! The Elecraft T1 automatic antenna tuner is a marvel of modern engineering and I dont know why I waited so long to get one. I took it with me today to test out and see if it would do what I needed…

Today saw me at DeSoto State Park which is located atop Lookout mountain in the NE corner of Alabama. This park is beautiful an was built during the Great Depression by the CCC (Civilian Conservation Corps) and most of that stone work is still there today. The photo below shows the original entrance to the park and the stone work at the entrance is still there. Today, you enter the park from a different road for most stuff but this road it still open to use and I love going this way just to see these vintage masonry works.
If you are interested in learning more about this park just follow this link to the State park website.


Once on location, I set out to put a 41’ random wire into the nearest tree to the truck so I could tune it to all four bands in the Penntek TR35 radio if I wanted to and kept me from having to dig out the hamsticks and all that hardware. I tied the lower support rope to the door handle of the truck them threw the line over the limb I am pointing to in the above photo and got almost all of the antenna in the air before getting into the branches. It was not shorted to anything, but it was in the branches so I was glad to have a tuner handy to dial it in.
I wanted to put the Elecraft T1 automatic antenna tuner in “remote” location mode to experiment a little with it. This meant placing it at the antenna feed point (that is the BNC to Banana plug adapter you see below. I simply tied the 41’ wire to the red and the 9’ counter poise wire to the black and then ran a COAX from ABR Industries to the radio. I like this coax as it has the common mode choke preinstalled so I dont have to add my other one to the system. This cleaned up the install greatly, but did create one little problem… I had not made up a remote “tune” switch yet so I had to get creative with the tuning process. Since the whole thing was on the truck bed cover, I was able to get the CW key over to the tuner so I could key the transmitter and hit the tune button at the same time.
I already have a plan on making a cable that will allow me to tune the antenna remote from the radio in the future.I will share that once I get it put together, but rest assured that it wont be a long time…lol.


I setup the whole shebang today with my homebrew S meter and the auxiliary system box I made up for the Penntek. You dont know how hard it is to get the display to show the whole frequency during the daytime with an iPhone. HaHa. The refresh rate and the shutter speed are so different that you have to time it to get the whole number to show up. You can see the Elecraft T1 in the background where I had it tied to the antenna. You can also see how I have just slid the key over to tune it for the next band change as well. If you will simply plug the paddle into the straight key input, one of the paddles will act like a straight key allowing you the key the transmitter for tuning purposes.
To be honest, I have used this input in the past when I was trying to use a cheap eBay paddle I had bought to test out for travel. One arm literally broke off and I laid it on it’s side and used the other paddle like a straight key to finish the activation. You do what you gotta do I guess…
Another thing is that it finally turned off cold here. it took it till mid November to find us, but winter is here now and it was kind of all at once too. Like last week it was in the high 60s and low 70s and now it is in the 20s and 30s all day. The cloak in the sun is wonderful though and will keep me warm just fine for things like this. This cloak is make of wool so it is incredibly warm and can quickly become too much if I am active much at all.


Today also saw the deployment of the Gemini travel key as the Penntek has two keyer memories and I dont need the PicoKeyer to work this radio. I could still use the PicoKeyer if I just used the straight key input, but the internal memories do all I need and I like have them in the radio. It just makes the whole system smaller an more compact.


I know that I failed to number the contacts, but this is because I had such a strong run on 20 meters and didn’t have time to write down the numbers. It is over 40 contacts and that is a great day for me in the field! Once I moved to 17 meters I could have wrote them in, but at this point I didn’t see any reason to start so I just omitted them this time. It didn’t matter as I still have a great time and the hunters seemed to enjoy the day too. Thanks for following along and a I hope to see you again soon!
You can help support this website by using these Amazon Affiliate Links:
QRP/Portable Radios:
Antennas & Tuning:
CW Equipment:
Power & Accessories:
Organization & Transport:
BONUS ITEMS
72
WK4DS

sBitx V2/V3 CW Problems: Why I Switched to Ten-Tec and Penntek for POTA Operations
When I first got this radio, I found it had some keying problems on CW but I just adapted to them and used it anyway. These problems are in how the software monitors the CW circuit and keys the radio and such. Turns out that as the radio heats up, the problem tends to get worse causing me to have to slow down the keyer to be able to send accurate code. Even with these tactics, I still send many mistakes towards the end of an activation due to the lag in the keyer.
I have an interesting relationship with this radio…

When I first got this radio, I found it had some keying problems on CW but I just adapted to them and used it anyway. These problems are in how the software monitors the CW circuit and keys the radio and such. Turns out that as the radio heats up, the problem tends to get worse causing me to have to slow down the keyer to be able to send accurate code. Even with these tactics, I still send many mistakes towards the end of an activation due to the lag in the keyer.

The reason I currently dont use it for SSB is the audio is terrible and I need to trouble shoot that on the bench to see what is going on there. At first it had a weak microphone element so I made a preamp to correct for this but it still doesn’t seem to work all thatwell. Based on all this, I have not used SSB. (I do plan to revisit the SSB circuit to see if I can get it right)
As I also own several portable Ten Tec and Penntek radios that work wonderfully for SSB and CW, I threw in the towel and just started carrying one of those as well as the sBitx. It doesn’t take long to change out the radios since they are so small and light and I really like the break in on Ten Tec radios (the Penntek has wonderful break in too). Another huge plus is that the filtering on the Ten Tec radios is much better than the sbitx in my opinion. Now to be fair, the sBitx filtering is good, but the Ten Tec radios are just better. The Penntek TR-35 suffers the same problems that the sBitx suffers from. Strong, nearby stations will dull the receiver sensitivity.

What I have found that helps in the scenarios is to simply move. There is nothing an overloaded front end can do to help this problem. I do like the features that are available in CW on the sBitx though. Things like the memories and how easy they are to employ is awesome. Another thing is the waterfall is real nice that runs right alongside the CW decoder which has helped me a couple of times. I dont watch the decoder much, but it is nice to be able to see it match what I copied at times for call signs and such. Another great thing about the sBitx is the touchscreen. Not needing buttons is real nice. The only part of the experience that is honestly lacking in CW is the keying problem. Once someone solves this problem, this will be a game changer for a radio. I am still experimenting with different cooling solutions to keep the machine cooler to see if I can get the keyer to work better.

As you can see, this machine makes for a great FT8 field radio. The lack of a need for an external computer is a huge benefit when it comes to this. I just wished the dev team could sort of the CW keying problem this radio has that makes it less than ideal for this application at this time. One thing I plan to do soon is to set it up and see how running QRP power only helps alleviate the heat problem by not running 20 watts on 15 meters and building up the extra heat. This may solve most of my problems but the radio is designed for more transmitter power so I want to access that power.. Another option is to use a keyboard to send the code as it generates the code internally in software instead of polling the IO architecture to get the keying input. This is fun to me too but a nice key is also fun to use. So till the dev team does come up with a solve for the CW keying problem, I will relegate this radio to keyboard CW and FT8 (and maybe even SSB once I address the audio problem again)… But the main reason I wanted the radio to start with was the built in FT8 function that it has, so in that regard I have a great radio that I love to deploy!
If you are considering getting one of these radios, just be aware that it is far from perfect and it is literally made for experimentation. As long as you keep your expectations in reasonable bounds, this radio can be a lot of fun.
You can help support this website by using these Amazon Affiliate Links:
QRP/Portable Radios:
Antennas & Tuning:
CW Equipment:
Power & Accessories:
Organization & Transport:
BONUS ITEMS

Multi-Band POTA Strategy: Ten-Tec Scout 555 + sBitx FT8 on 15m/17m/20m/40m
The location is all too familiar, but I set out to do a sort of special operation today. I wanted to complete a POTA activation using two radios, 3 modes and 4 bands in one sitting. This doesn’t sound like a tall order but since I am operating inside the truck cab, this does involve a little logistics to not just have stuff piled everywhere while I am operating. As you will see in the photos below, I still ran into this problem somewhat, but it was manageable.
Today was a fun day…

The location is all too familiar, but I set out to do a sort of special operation today. I wanted to complete a POTA activation using two radios, 3 modes and 4 bands in one sitting. This doesn’t sound like a tall order but since I am operating inside the truck cab, this does involve a little logistics to not just have stuff piled everywhere while I am operating. As you will see in the photos below, I still ran into this problem somewhat, but it was manageable.
I setup at the disc golf parking lot again, but this time there were quite a few people there and some of them actually quizzed me about what I was doing. One gentleman, Jerry as noted in my log, actually chatted for a good bit about how he has been looking to get into ham radio but the Atlanta area is kinda tough on locating local hams for some reason. I gave him a card and told him to email me and I would give him as much info on it as I could find to get him on the right path…
As you can see in the photos, I set up ham sticks and this time I started on 40 meters FT8. I wanted to get the FT8 portion of my “sprint” if sorts out of the way first as the other two modes were going to be on the Ten Tec Scout 555. I had recently activated with it and it was acting up with chirping on CW and reports of RF noise on my audio on SSB. I attributed this to poor connection of the 20 meter band module as it was fine on 15 meters. Armed with this knowledge, before I left out for the park, I took the radio to the shop and use the Deoxit for gold contacts and a tooth brush to clean the contacts on the band modules. I even wetted one module pretty good and used it to “clean the contacts in the radio by plugging and unplgging the module a bunch of times.
This improvised procedure worked as I got good reports and the CW ran flawlessly as you will see later. Deoxit is magical stuff, if you dont have any, it is work your investment to grab a small can of it.


I really enjoy using this radio for my FT8 operating and with the upgraded finals and RF deck, it runs flawlessly now with SWRs in the 2:1 and even slightly higher range without problem. Today saw SWR levels on transmit of about 1.7:1 and it happily skipped right along making several contacts in a row at one point.
After completing 6 QSOs on FT8 I figured it was time to get the Ten Tec Scout 555 out of the case and see what I could scare up on CW.
The 40m Ham stick that I have must have a really high Q as it is very narrow banded. So I have it tuned for the CW portion of the band and the SWR in the SSB area can be quite bad at times. For this reason, I chose not to hunt any SSB contacts on 40 meters today. Once on CW (this was about 1/2 hour later as this is when I talked to Jerry) the band must have been closing or the band noise was getting so bad that I could not hear many stations. I was able to work Alabama and Tennessee before the call signs faded into the noise. That is something you will learn pretty quick about HF radio propagation, if you want to work closer in stations, use the lower bands, but if you want to reach the west coast from Georgia on a ham stick, use the higher bands like 15 and 20 meters. When 10 meters is open I have worked other continents with ease… Don’t discount those higher bands, they are truly magical.

In the above photo I have the CW key and keyer staged but not connected. The mouse is actually driving the FT8 machine and makes working FT8 so much easier to be honest.

In these two photos you can see what you have to work on constantly. The above photo shows the cable that came with my Ten Tec Scout 555 when I bought it. This is a common issue you will find with home shop made cables. These were stripped back way too far and as I used the cable, the conductors started breaking and I was beginning to worry about blowing fuses.
I happen to own a tool that is designed to remove these pins from the connector, so I am able to dismantle this connector properly. I dismantled it, then took it apart and cleaned it up, properly stripped and re-soldered the pins, then put heat shrink tubing on it all to insulated and protect it better. Now I am not so worried about it either shorting and melting the wire or blowing the fuses and shutting down the activation over something as simple as a cable…


Once I finished on 40 meters and had two modes in the bag on one band, I switched over to 15 meters CW to see what was happening there. There was a contest going on so it was a little crowded and I didn’t understand the exchange so I didn’t jump into the contest, but rather setup on a clear spot and calledCQ and worked a couple of stations there, one station of which is DX!!!
At this point. I got a phone call from KG4WBI about a completely unrelated matter, which we discussed and I told him to fire up his HF rig and we would see if ground wave would make the trip to his house from the park so I could get Georgia in the log as well as a 2nd mode on 15 meters! Well, it worked just fine and we had a great QSO on 15 meters SSB before he had to sign off and go run errands. So having confidence that SSB was going to work better I started calling CQ on SSB.
I got literally zero replies to my calls… so I went hunting instead. I found two more ops that could hear me and I was able to bag a couple more QSOs and these were Park to Park contacts to boot!


These three photo show me installing the band module into the Ten Tec Scout 555 transceiver. It really is that simple to change bands on this radio. Now to be fair, this is not as simple as just turning a knob, but it really isn’t that bad.
To remove the module you pull out the bottom of the little lever on the front of the module and it will pop out enough to be able to slip it out, then you grab a different one off of the pile and stick it back in the slot in the radio. Push it to seat it and then your ready to go.

At this point, I switched over to 20 meters and since the PTO (notice it is not a VFO) was still up in the SSB area, I decided to see if I could hunt some contacts with that mode. I landed one contact in SSB on 20 meters and was happy to get them in the log.
After working the one lonely SSB contact on 20 meters, I decided to give CW a try as well… Remember me mentioning a contest? Well, it was here too. It was going strong as well and because of this I was only able to work one contact on CW as well. If nothing else it netted me another band!

My last stop of the day was 17 meters. The 17 meter band is a WARC band and therefore it is off limits to contesting. Now, to be fair, POTA has been called contesting of sorts, but as of right now it is not considered a contest but is more in the spirit of something similar to a rare DX station activating on the same band and developing a huge pileup there. So I proceeded to hunt me an empty spot (18.078mhz) and started calling CQ.
This is when things literally took off! I netted a whole page of contacts in about a 1/2 hour span of time! What a day! 4th band in the books and I was stoked!!! 17 meters must have been where all the POTA ops had went due to the contest and I didn’t get the memo…lol. The Scout worked flawlessly after the cleaning and I cant be happier now with the old girl.

One of the great things about 17 meters is the propagation is really anybodys call. I worked Hungary at one point as well as California, Alaska and Idaho, then there is a ton of east coast stations too, it was everywhere today on 17 meters. Ham radio is so cool…

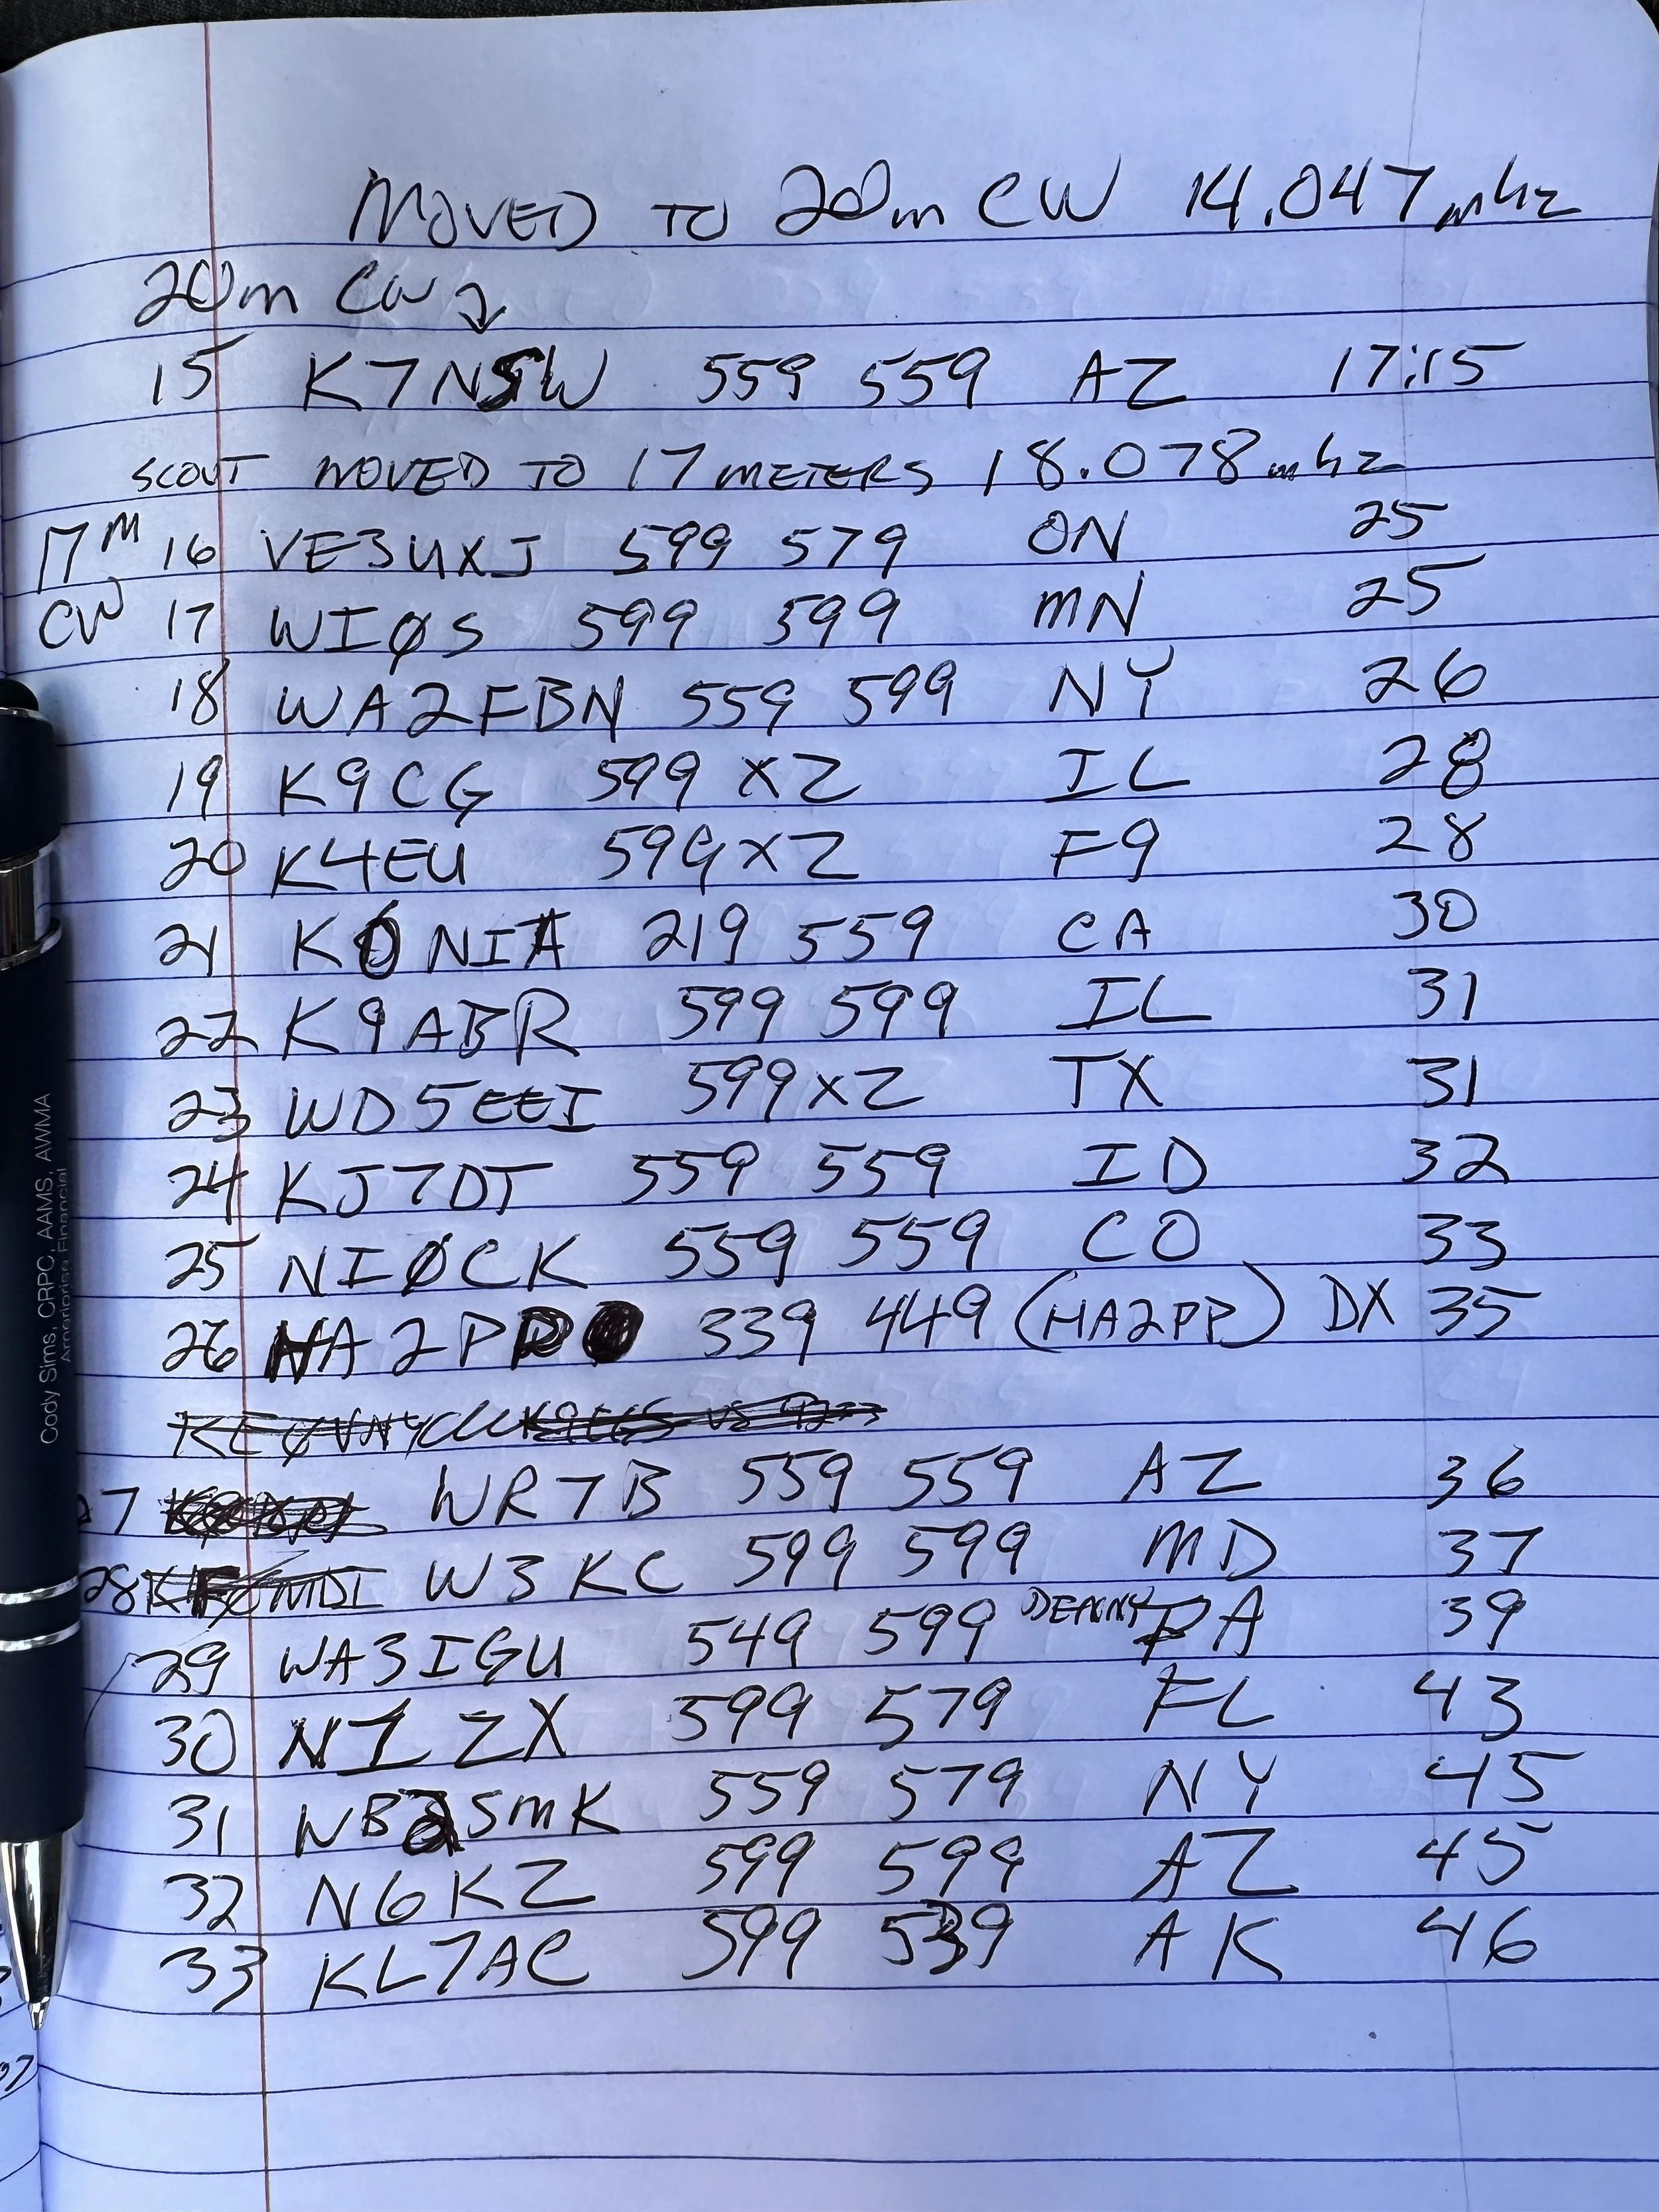

Before closing today I wanted to mention that Aaron KV9L and I have a youtube channel and we just hit 2000 subscribers (as of this writing)! If you are into ham radio and watching videos about it, then we would love for you to come over! I am currently doing a series of short form videos that are teaching CW one letter per day. There is no limit to the number ofd times you can watch them so I am hoping these become long term training aids for people.
Once I get the letters, numbers and punctuation done, I am going to start doing words next. After words will come sentences so we will see how it goes. Anyway, I just wanted to thank the 2000 people that made us as successful as we are!
You can help support this website by using these Amazon Affiliate Links:
QRP/Portable Radios:
Antennas & Tuning:
CW Equipment:
Power & Accessories:
Organization & Transport:
BONUS ITEMS
73
David -WK4DS

Ten-Tec Scout 555 POTA: 74 CW Contacts at Raccoon Creek WMA [US-9875]
As you can see from the QSO map above, the bands were alive and well on this day from Raccoon Creek WMA (US-9875). The calls just kept coming in and I finally had to got QRT, with people still calling, and pack up as I had to meet the wife for a dinner date! I normally clear the little pile up I will draw in and then I can simply power down. I really felt bad about having to shut down with stations still calling me. I now know what those rare DX station feel like… It is surreal to experience that to be honest… especially from Alabama.
Today got so fast paced that I forgot how to do CW properly! Let me explain…

As you can see from the QSO map above, the bands were alive and well on this day from Raccoon Creek WMA (US-9875). The calls just kept coming in and I finally had to got QRT, with people still calling, and pack up as I had to meet the wife for a dinner date! I normally clear the little pile up I will draw in and then I can simply power down. I really felt bad about having to shut down with stations still calling me. I now know what those rare DX station feel like… It is surreal to experience that to be honest… especially from Alabama.
You see, today I activated US-9875 Raccoon Creek WMA and I went at a different time of day. I wanted to spend several hours here today as I dont get over to the area often and I wanted to try to get as many contacts as I could in the afternoon. My goal was 60 QSOs today which is way more than I usually worry about, but like I said, this park is a solid 40 minutes in one direction and I dont go this way too often so I wanted to “make it count” if you know what i mean.
I rolled into the WMA at about 14:30 local time and set out to build the radio down by the Tennessee river. This is a small parking lot at the end of one of the gravel roads into the WMA and a lot of locals come to this spot to fish in the river from the shore. Did I mention it started raining right after I got the antenna setup and I got into the truck? Well, let me tell you, the rain set in and it didnt stop the whole time. I even broke down the antenna and stuff out in the rain today!!!


The above photo shows what the station looks like right before I plug all that stuff in and turn the power on. Everything I need to get on the air is in that pile for both SSB as well as CW. To be fair, I can get by without the Picokeyer and the 1/8 mono to 1/8 mono cable and I could simple plug the paddle right into the radio and it would work just fine. So there is really excess here above what is absolutely needed.
I did get the nanoVNA out and look at the antenna to make sure the rain didn’t do something to it like push it out of band due to the conductivity of the wet earth or what ever. Turns out it was just fine… It was a little low with the water on everything but the null was really close to the bottom of the 15 meter band edge so I used it and didnt worry about it. If you will notice, it was only 1.233:1 SWR at the band edge so it was plenty happy and we never checked it again after this on 15 meters. When I switched to 20 meters, the SWR had moved up to about 1.8:1 or maybe it was at 2:1 but I ran it and as you can see in the log, that didn’t seem to matter at all.

I setup shop on 15 meters SSB for a change and wanted to see what I could get before 15 faded out, but I noticed almost immediately that the ALC light wasn’t coming on at all when I would transmit audio. This lamp should just blink on the energy peaks but it wasn’t coming on at all. I messed with the mic gain and nothing. I did notice that I could wiggle the cord at the plug and it would make all sorts of stuff happen. This pointed me to the connector being faulty somehow but workable to some degree.
I made a few contacts with it like this and basically yelling at the radio would barely get the ALC to illuminate. I asked the last person for a report and they told me the audio was muffled and weak. Armed with all this knowledge, I decided to open the connector and see if a wire was broken. Well, they were not broken…but they were also not connected either. There were two cold solder joints from the factory…figures. I got a pretty decent photo of the green wire in the below photo. Well…that shuts down the SSB portion of this activation so onto 15 meters CW!

The 15 meter band has two things that make it unique. It is quieter than the lower bands for me and the “skip distance” is MUCH further with mobile, or improvised antennas. I didn’t make many CW contacts on 15 but check out the locations! Washington state is pretty common for me on 15 meters, in fact the entirety of the western United States is easier for me to work on 15 meters during the day. But a lot of people apparently don’t know this so lots of times the band will be open but there wont be anyone on it. Case in point today, I worked 4 ops in 11 minutes of calling CQ.
After vacuuming the bands of CW ops, I moved to FT8 to see what was happening and this is my “yardstick” of how open the band is. Turns out it was REALLY open! 15 meters FT8 netted a nice dozen contacts and got me almost half way to my original goal of 60 QSOs! This didn’t take long either and just goes to show that the higher bands are great if you will just go check them.

I had switched radios to use the sBitx V4 (I did the software upgrade and got some new features like the color coding of FT8 information you see below) You can also see that I was transmitting with 17 watts too. This is not precise, but it is close and I use it for my logbook notes.

After finishing on 15 meters I moved down to 20 meters to finish out the day. The sun was starting to set at this point and I knew 20 meters would serve me better at this point. after hunting W9XT, I set up shop on a clear frequency and started calling CQ, this is when things got a little crazy. I had a nice little pileup form pretty quick that took me about half an hour to clear, then nothing… It must be band fading at this point as the stations just vanished. I figured I would switch over to FT8 for a few minutes at this point too and see what I could get in that mode. I didn’t mention that I used the sBitx for CW at this point and to be honest, I dont think I will use it for CW seriously till there is a software change to make it work better. If you try to use it much past 18WPM it is like it fights you and induces mistakes for some reason. The people smarter than me in the email reflector seem to think is has to do with how the software scans the inputs on the radio, but I do know it will induce mistakes in your sending if you are not very attentive and send a very specific way. It will work if your careful and go about 18WPM max. I can use a keyboard to send CW but that really isnt all that much fun to be honest.
I struggled with FT8 today on 20 meters for some reason. The QSO could not complete to the 73 so it would not autolog the QSO. It would also not finish the exchange many times either. I could get it to send the signal report then they would send back and they would just get stuck in that step and never move past it. It got really frustrating towards the end, but I did manage to net some contacts here too.
At this point I had made 48 contacts which is a phenomenal day out for me, but I wanted 12 more to have that 60 that I started out my goal with! So at this point I move back down into the CW portion but this time on the Ten Tec Scout 555 instead since the CW mode on it works beautifully.


It took me a couple minutes to switch the radios out and to find a clear frequency and get started, but once I did, it didn’t take long to get a HUGE PILE UP going!!!! I got so excited during this part that I was racing the clock to see how many I could work before having to shut down the radio and go home as I was almost out of time. I started rushing the closing and it was here that I got sloppy with my CW. You see, I normally use QRP power levels for the most part, just the sBitx and the Ten Tec Scout are QRO by the rules and the sBitx is borderline to me. I will usually turn the power down to 5 watts or so anyway to preserve the finals in the radio but today I had the Scout and it is set at 50 watts and is not easily field adjusted from that power level.
As the pile up raged on, I got so lost in the process that I started sending 72 intermingled with contacts getting 73 instead and finally someone stopped me and asked why I am signing both modes and this is when it hit me. I had been running on autopilot about half the time just logging contacts and the muscle memory would just send the 72 and I would not even think about it. I would then called QRZ and get another call, rinse and repeat… Here is the next problem for me. My ragchew copy and my POTA copy are very different levels. He sent me the message at the speed I was working POTA contacts. Your brain will learn how to copy the formatted style exchanges without even thinking about it. I know that I am going to get a two letter state after the signal report and I can copy callsigns really well for some reason up to about 25 WPM, but send me a full sentence question and it breaks my brain. I cant copy half of it without writing it down. I can ragchew comfortably at 18 WPM max at this time, but if you ask me a question about my radio or something that isn’t part of the usual banter in a POTA contact and I am lost… I apologized for this mistake I had been making for probably 20 minutes without even realizing it and it was really close to when I had to leave anyway so I went ahead and called QRT to get the radio put away as it was raining really well at this point too…
To everyone that reads this that I didn’t get to work on this day, I am sorry to have to had shut down the rig and leave, I was having a wonderful time and wanted to stay longer!!!


The moral of this part of the story is dont get in such a hurry that you cause confusion with the hunters, take your time and be sure in what you are actually sending out over the airwaves.
On a brighter note, I got my 60! and 14 more!!! I dont know how long it has been since I got that many calls in the log in one day. Until next time I hope to work you on the air!
Read more Ten-Tec Scout 555 POTA activations:
- [Another Scout 555 POTA post]
You can help support this website by using these Amazon Affiliate Links:
QRP/Portable Radios:
Antennas & Tuning:
CW Equipment:
Power & Accessories:
Organization & Transport:
BONUS ITEMS
73
WK4DS - David

Ten-Tec Scout 555 POTA Activation: 26 Contacts in 15 Minutes CW & SSB Setup Guide
Looking for a reliable POTA activation setup? Here's my complete guide to activating parks using the Ten-Tec Scout 555 transceiver. In this activation, I made 26 SSB contacts in just 15 minutes, plus worked several stations on CW using ham stick antennas and portable power. Whether you're new to Parks on the Air or looking for equipment ideas, this post covers my portable ham radio setup, antenna tuning tips, and real-world activation results.
Looking for a reliable POTA activation setup? Here's my complete guide to activating parks using the Ten-Tec Scout 555 transceiver. In this activation, I made 26 SSB contacts in just 15 minutes, plus worked several stations on CW using ham stick antennas and portable power. Whether you're new to Parks on the Air or looking for equipment ideas, this post covers my portable ham radio setup, antenna tuning tips, and real-world activation results.
My Ten-Tec Scout 555 POTA Equipment Setup
My setup process has gotten pretty streamlined over the years. I pull into the parking spot, grab the Scout case and antenna bag from the truck bed, and I'm usually on the air within 15 minutes. First thing I do is get the hamsticks mounted and run the radials - usually just two per antenna is enough for POTA work. While those are getting situated, I'll set up the radio in the truck cab, connect power, and do a quick SWR check with the nanoVNA. If the SWR is under 2:1 I'm happy enough to start making contacts. The key is keeping it simple - I've learned the hard way that complicated setups mean more things that can go wrong in the field. Harbor Freight cases have been a game changer for organizing everything too. Everything has a place and I can just grab the case and go.
Today saw me use the Ten Tec Scout again to great effect. Below is the case I carry it in showing the full compliment of band modules (I keep one in the radio and today that is the 20 meter module). Under the radio is the power cable in a pocket just for it and next is the spot for the microphone in a more permanent role. You can see the impression from where it sits in the case currently. This Ten-Tec Scout 555 POTA activation demonstrates why this radio is popular for portable ham radio operations.
These hard cases come from Harbor Freight and make wonderful travel cases for my POTA radios to be quite honest about it. I need to get two more and kit out my Ten Tec Argonaut 5 and my Penntek TR-35 and the set will be complete. The Argonaut has a nice hard case, but it is really large and kinda hard to maneuver with. I thought it would be a great kit for POTA and it does work, but I would really like something different… As an aside, I store the owners manual to each radio behind the lid foam on all of these. That way I have a instruction book should I forget how to do something obscure that I dont use all that often.

My Ten-Tec Scout 555 travel case showing all band modules for POTA activations

Scout 555 band modules - simple to swap for different frequencies during activation
I have not dismantled a band module to see what all is inside it but there is a good bit of stuff going on in each one. They are about 3” long and the circuit board goes all the way to the front. So there is plenty of widgets inside them to make the magic happen.
Today, I only used the 15 and 20 meter modules as I was being a little lazy and only put out radials for these two ham sticks. A quick SWR check with the nanoVNA and I was off to the races.

N3ZN straight key with Picokeyer adding memory functions for CW POTA activations
POTA CW Equipment: N3ZN Key and Picokeyer Setup
The above shows my CW key and keyer. The key is made by N3ZN and if you have not tried one then I highly recommend them. It works beautifully for me. The keyer is a Picokeyer from Hamgadgets.com and works way better than it should for what it costs. Since Ten Tec radios traditionally dont have memories for the CW keyers, this is the way to have those memories really easily. For Parks on the Air activations, having a portable CW key with and a electronic keyer with memory functions is essential (at least to me it is…).
Operating SSB on POTA: Hand Mic and Voice Contacts
The next thing I did that was out of my usual character is to get the hand mic out and work some SSB today as well. It worked OK, but there were times when the audio was odd and I would get little hints to something being wrong but all in all it worked fine.

Hand mic for SSB operation - made 26 contacts in 15 minutes with this setup

Quick SWR check with nanoVNA before starting the POTA activation
Choosing a POTA Activation Location
When I scout out parks for POTA activations, I'm looking for a few key things. First, low RF noise is critical - no nearby power lines, businesses with switching power supplies, or heavy traffic. This park checked all those boxes and then some. The parking lot being empty is a huge bonus as it means no ignition noise from cars starting up or idling nearby. I also look for parks that allow me to set up antennas without disturbing other visitors. Some parks get really busy on weekends, so I'll often activate during weekdays or early mornings. Having good cell coverage helps too, though it's not required - I like being able to spot myself on POTA.app without relying solely on the Reverse Beacon Network. This particular spot has become one of my go-to locations because it's quiet, accessible, and the park staff are friendly to hams.
As per my usual outings, I had the place to myself today with only a couple of cars rolling by during the entirety of my activation. I like it like this though as there is no ignition noise to deal with or inverters making RF hash, just the peace and quiet of the park and my radio chattering in the truck. During this time of day, the sun will beam into my door if I roll down the window beside me so I usually just roll down the other three and the one beside me just a little so the air still moves through the truck taking away the heat from the radio and making it nice and pleasant.
Just look at that parking lot all for me! HaHa! That never gets old! There is just something magical about the peace and quiet of a park like this.

Perfect POTA location - empty park means no ignition noise or RF interference
Ten-Tec Scout 555 CW Operation Tips and Side Tone Settings
A few operating tips I've picked up over my POTA activations - start on CW if you can work it, as the Reverse Beacon Network will auto-spot you and save you from needing cell service. Once you've got 10 contacts in the log, switch modes or bands to see what else is happening. Don't be afraid to QSY (change frequency) if things go quiet. During this activation, moving from 15 meters to 20 meters made all the difference - 15 was fading out but 20 was on fire. When you get a pile-up like I did on SSB, just work them as fast as you can log them. Don't worry about being perfect, just get the call sign and signal report down. You can clean up the log later if needed. And always, always bring spare coax and adapters. Murphy's Law is real in the field!
Something I learned today that is different between the Argonaut 5 and the Scout is that I have to use the key jack to make this radio transmit a side tone in CW. I can key the transmitter with the “mic jack cable” that I made for the Argonaut 5 but it wont produce a side tone with the Scout for some reason. So I instead used this port on the back of the radio to get it to work right (see photo below). Another special thing about this radio to me is that it has a Curtis keyer chip in it and you can plug a set of paddles directly into it and it will work as you would expect, but it is in a different port… Go figure. All these options are hot all the time too. Plug a straight key into it and key it to send CW then you could (theoretically) just pick up the microphone and talk to someone on SSB without changing anything else on the radio. It appears that it is in SSB mode all the time and CW is just the side tone being transmitted instead of the audio from the microphone. This does cause one little issue that a user will notice pretty quickly. The zero beat is the display frequency plus or minus (depending on band) the side tone frequency. The filter is simply a bandpass knob that adjust the filter bandwidth and that is it. A very simple radio that just works.
An example of the side tone offset in CW can been seen in the photo above where I am tuned up on 15 meters. It displays 21.0523mhz but the radio is actually operating on 21.053mhz when transmitting. So if you are near the band edges on say 40 meters CW, just keep this in mind so you are not transmitting out of band. The owners manual even mentions this to make sure you stay compliant with FCC regulations.

CW key jack on Scout 555 back panel - required for proper side tone in CW mode

First page of activation log - starting on 15 meters CW and SSB

20 meter SSB pile-up - 26 contacts in just 15 minutes!

Final page showing all contacts from the activation
POTA Activation Results: 26 Contacts in 15 Minutes
As you can see from the log above, I started out on 15 meters CW and worked several stations there before moving to 15 meters SSB till the band essentially faded out. At that point I decided to see what would happen if I went down to 20 meters SSB and called CQ… Well the log speaks for itself. I made 26 contacts in 15 minutes! This has to be some sort of world record!!! LOL…for me that is… It was wild how big the pile up was and how quick it happened! The people were super nice and courteous and really helpful so I thank all of you that called me this day and I really appreciate you stopping by to say hello! This POTA activation shows what's possible with a simple portable ham radio setup."
Frequently Asked Questions About POTA Activations
What equipment do I need for a POTA activation?
For a basic POTA activation, you need a portable ham radio transceiver (like the Ten-Tec Scout 555, Icom IC705, or the like), an antenna (ham sticks work great for portable use), a power source (battery or vehicle power), some interconnect cabling such as coax and things like that, and a way to log contacts. Optional but very helpful equipment includes: a CW key for Morse code operation, a portable table or chair for comfort, an antenna analyzer like the nanoVNA for precise tuning, and a keyer with memory functions for repetitive CW exchanges. The beauty of POTA is you can start simple and add equipment as you learn what works for your operating style.
How many contacts do you need for a valid POTA activation?
You need a minimum of 10 QSOs (contacts) for a valid Parks on the Air activation. These contacts can be made on any amateur radio band and any mode - CW (Morse code), SSB (voice), or digital modes like PSK31 or FT8. Park-to-park contacts (when you work another station who is also activating a park) count double for hunters, but still count as just one contact toward your activation total of 10. Remember VHF and UHF contacts count too as long as they are simplex only.
What is the best radio for POTA activations?
The "best" POTA radio depends on your operating style and preferences. The Ten-Tec Scout 555 is excellent for CW operation thanks to its clean receiver, simple design, and reliable performance. Other popular choices among POTA activators include the Yaesu FT-891 for 100-watt capability, the Elecraft KX2 or KX3 for QRP portable operation, and the Icom IC-705 for all-mode including VHF/UHF. Choose based on your preferred operating modes, power requirements, portability needs, and budget.
How do you tune a ham stick antenna for POTA?
The easiest way to tune a ham stick antenna is with an antenna analyzer like the nanoVNA, or you can use your radio's built-in SWR meter. Start by adjusting the length of the whip section - make it longer to lower the frequency, shorter to raise it. Make small adjustments (just a fractions of an inch at a time) and recheck your SWR reading. For POTA activations, an SWR under 2:1 is generally acceptable and will work fine, though under 1.5:1 is ideal for maximum power transfer. Anything under 2:1 will not damage your radio though so don’t stress too much over this part.
Can you operate POTA from inside your vehicle?
Yes! Parks on the Air rules allow operation from inside your vehicle, which is different from SOTA (Summits on the Air) that requires outdoor setup away from vehicles. Operating from inside your car or truck is actually quite common during POTA activations, especially in bad weather, extreme temperatures, or when dealing with insects. As long as you and your entire station are physically located within the park boundaries, you're good to go. Just make sure you're parked in an authorized area.
What is the best band for POTA activations?
20 meters is often the most productive band for POTA activations because it provides a good mix of both local and DX (long distance) contacts throughout the day. 40 meters works exceptionally well for regional and NVIS contacts, especially in the early morning and evening. 15 and 10 meters can produce excellent DX contacts when conditions are right and solar activity is favorable. Many experienced POTA activators work multiple bands during a single activation to maximize their contact count and variety. In my activation with the Scout 555, 20 meters SSB produced 26 contacts in just 15 minutes - that's the power of picking the right band at the right time!
Whether you're new to Parks on the Air or an experienced POTA activator, the Scout 555 makes for an excellent field radio.
Have you tried POTA with a Ten-Tec Scout? Share your activation stories in the comments below! If you're planning your first Parks on the Air activation and have questions about equipment setup, feel free to ask.
Want more POTA content?Subscribe to my ham radio blog for more activation reports, equipment reviews, and portable operating tips.
---
## POTA Activation Summary
Equipment Used:
- Radio: Ten-Tec Scout 555 (50 watts)
- Antenna: Ham sticks on 15m and 20m with tuned radials
- Power: Vehicle electrical system
- CW Key: N3ZN paddle key with Picokeyer
- Microphone: Ten-Tec hand mic
- Accessories: NanoVNA for antenna tuning, Harbor Freight case
Operating Details:
- Bands Worked: 15 meters and 20 meters
- Modes Used: CW and SSB
- Total Contacts: 30+ QSOs
- Best Run: 26 contacts in 15 minutes on 20m SSB (that was wild!)
- Setup Time: Approximately 15 minutes from arrival to first contact
- Activation Duration: About 90 minutes total
Key Takeaways:
The Scout 555 continues to prove itself as a solid POTA radio. Simple, reliable, and the receiver is clean even with nearby RFI sources. The band module system makes it easy to swap bands, though it's not as fast as just turning a knob. The big lesson today was remembering which key jack to use for proper CW sidetone - small details like that can save you troubleshooting time in the field. Also, 20 meters SSB was absolutely on fire today - sometimes you just catch the band at the right time and everything clicks.
---
You can help support this website by using these Amazon Affiliate Links:
QRP/Portable Radios:
Antennas & Tuning:
CW Equipment:
Power & Accessories:
Organization & Transport:
BONUS ITEMS
73, WK4DS - David

Go bag POTA!
The idea behind building a POTA go bag is simple. You want everything you need in one place, ready to grab and go. No hunting for coax in the garage, no trying to remember which box has the paddle, no scrambling to charge batteries. Just grab the bag, throw it in the truck, and you're ready for a park activation. Or an emergency. That's the whole point!
The idea behind building a POTA go bag is simple. You want everything you need in one place, ready to grab and go. No hunting for coax in the garage, no trying to remember which box has the paddle, no scrambling to charge batteries. Just grab the bag, throw it in the truck, and you're ready for a park activation. Or an emergency. That's the whole point!
Why Build a POTA Go Bag?
Today was about testing my emergency / travel radio kit to see how it actually performs in the field at Eagle's Nest (US-0716). Spoiler: it works better than I expected, even with some equipment drama along the way.

The QRP Guys SWR meter checking the Reliance Antennas 40m EFHW before starting the activation. I wanted to make sure the SWR was acceptable before putting power through it.
Complete Gear Walkthrough: Everything in the Bag
Here's every single item in my POTA go bag with approximate costs. This is everything you need for a complete field station that fits in one bag:
Radio and Accessories:
Penntek TR-35 QRP transceiver: N/A (no longer available… sad radio sounds…)
Xiegu G90 HF Radio Transceiver: 465$ (A great Alternative but not quite as small)
N6ARA CW paddle with case: ~$70
Headphones in ziplock bag: ~$20 (any decent pair works)
QRP Guys SWR meter: ~$20 (for field checks)
Power:
10-cell AA battery holder from Amazon: ~$12
10 rechargeable AA batteries (Eneloop or similar): ~$25
Power cord with Anderson Powerpoles: ~$10
Antenna System:
Reliance Antennas 40m EFHW: ~$60
ABR Industries coax with ferrite choke: ~$70
Backup coax (generic RG-8X): ~$30
Arborist throw line (40 feet): ~$8
Throw weight (1" nut from machine shop): Free!
Accessories:
Nylon tool bag from Amazon: ~$25
Small notebook for logging: ~$3
Pen (main) and pencil (backup): ~$5
Ziplock bags for organization: ~$2
Total Kit Cost: Approximately $825
Now, I know that seems like a lot upfront, but remember this includes the $465 radio. If you already have a QRP rig, you're looking at about $350 for everything else. And this entire kit lives in one bag ready to deploy. No hunting for gear, no forgetting critical pieces. That's worth something!
The beauty of this setup is that it's modular. Start with the basics (radio, antenna, power) and add the nice-to-haves over time. I didn't buy everything at once. I built this kit over about six months as I figured out what I actually needed in the field.
I did the entire activation from Eagle’s Nest in US-0716 with just the “kit” radio that I have put together. I have the QRP Guys SWR meter in the photo here as well (it is in the clear plastic case), but this is because I wanted to check the 40m Endfed Halfwave Antenna from Reliance Antennas to make sure the SWR was ok. He cuts them long so you can tune them once in the field and I have not cut mine yet.
You might be wondering, why go through the trouble of building a dedicated go bag instead of just grabbing gear as needed? Fair question! Here's my thinking:
For POTA operations: Having everything organized in one bag means I can decide to do an activation on a whim. If it's a nice day and I have two free hours, I don't need to spend 30 minutes gathering equipment. Grab the bag, drive to a park, and I'm on the air. This makes POTA way more accessible and way more fun.
For emergency communications: This is the real reason I built it this way. If there's ever a real emergency where I need to set up communications quickly (hurricane, power outage, whatever), I don't want to be hunting through the garage for my radio gear. The go bag concept means I can grab it and have a complete, tested, working field station ready to deploy immediately.
For travel: The bag is small enough to throw in the car for road trips or to check as luggage on a flight. Having everything self-contained makes it easy to operate from anywhere. I don't need to bring my whole shack, just this one bag.
The mindset shift: Building a go bag forces you to think about what you actually need versus what's nice to have. Every item has to justify its space in the bag. This makes you focus on core functionality rather than bringing every gadget you own. It's a good exercise!
The result is a system that's ready when you are, tested and proven in the field, with no excuses for not getting on the air.

One side of the bag showing the Penntek TR-35, the 40m EFHW antenna, power cord with Anderson Powerpoles, and the throw line with weight. Everything organized and ready to deploy.
The Penntek TR-35: Heart of the Go Bag
This particular nylon bag came from Amazon and has two main sides that unzip and lay flat. Inside each side are additional pockets to hold small, thin items as well. I have organized mine to hold the Penntek TR-35 and all the stuff needed to deploy it in the field. Literally everything. Let’s go for a short “walk” through this bag.
In the above photo is the radio, antenna and a power cord with Anderson Powerpoles installed. I also have the battery pack in the zippered pocket (more on that later). As well as a rope and weight for throwing a line up into a tree to haul up the wire antenna with. I just wound off about 40’ or so of arborist throw line for this kit and I have included a huge 1'“ nut from the machine shop for a throw weight, which works perfectly…
The other side contains the coax for the antenna and this is the only thing that I have two of in the kit. Coax has let me down more than once while out at parks so I now carry backup coax. No matter how careful you are with this stuff, it will fail on you. It just ins’t designed for all that movement and eventually you will break the center conductor. This is also why I check my system with the nanoVNA before starting…except today where I used the little SWR meter instead. One of the coaxial cables is the gold colored one made by ABR Industries and it has the ferrite common mode choke built into it. This is really wonderful coax and I wished I had learned how important quality coax was a long time ago…it makes a huge difference.
Also in view in the below photo is the N6ARA CW key in the little storage box it comes in and the headphones are in a ziplock bag to keep dust and dirt out of them. Nestled into the pocket behind the coax is a small notebook for logging. I also have a pen (my preferred tool for logging as I can see it easier than pencil) and a pencil since a pencil never runs dry, it is my long term back up to me pen…lol. I dont really trust pens either…haha.

The other side holds coax (including backup coax, because it will fail on you eventually), the N6ARA CW key in its case, headphones in a ziplock bag, and a notebook with pen and pencil for logging.

The N6ARA CW key comes in this little storage box which fits perfectly in the bag. Headphones stay clean in a ziplock, and the notebook/pen/pencil combo is my preferred logging method in the field.
So here is the station assembled and under power. You would be surprised at how long this radio will run on those AA batteries too. It is really shocking to me how well this little system works. I have yet to have the batteries die during an activation and one of them was three hours long. I need to run them till the radio dies to just see how long they will last at some point, but for now I know I can get at least three hours out of them. Also note that it is 10 AA rechargeable batteries, this gives me almost 14 volts which is what a car battery produces when new.

The station assembled and under power at Eagle's Nest (US-0716). You'd be surprised how long this radio runs on 10 AA batteries. I've never drained them during an activation!

Pointing to how I routed the coax. Started with it in a U-shape and got 2.6:1 SWR. Straightened it out and SWR dropped to 1.7:1, much better! This is why you check things in the field.
Here I am pointing to the coax that I used showing how I laid it out. I started with it in a “U” shape at first but the SWR showed to be 2.6:1 and I did use this for a bit as the TR-35 has final protections that make it pretty much impossible to damage them.
After a few minutes though, I decided to straighten the coax and this moved the SWR down to about 1.7:1 making me much more comfortable. I then checked all the bands that the TR-35 covers and only 30 meters was not usable. So that is why you see contacts on three bands instead of 4 today. Haha

My makeshift antenna support keeping tension on the wire and keeping it off the coax. It worked okay, but next time I want to get the wire higher. 30-40 feet would be better than the 15-20 feet I got here.
This is what I came up with to keep tension on the wire antenna and keep it off of the coax. It worked OK, but it the future, I would prefer to get the antenna higher. I also want to add another piece of cord so I can raise the transformer end of the antenna off the ground too. I think this will also help with radiation angle and pattern. The Reliance Antenna EFHW works really well and I am glad I got one from them. This is one of those items from the “Ham Made Gear” forum on QRZ.com. I have bought a few items from this area and have never been disappointed.
In the below photo, you can see my truck parked where I normally activate from and on the right side of that are a couple of trees that I tied the antenna up into. It is strange looking out on it now that it is cleared compared to just a few weeks ago.

Wide shot showing my truck where I normally park and the trees on the right where I tied up the antenna. This area was just cleared a few weeks ago so it looks different than it used to.

Here's what happens when you short circuit a 10-cell AA battery pack! The springs melted completely through the plastic housing. This is what I get for storing it with the power connector attached. Live and learn!
The Battery Pack Disaster (And What I Learned)
Now I need to tell you about the battery pack disaster, because this is the kind of thing that happens when you're figuring stuff out in amateur radio!
When I pulled the batteries out to charge them before this activation, I noticed the springs were melted completely through the housing. Like, melted through the plastic and everything. It took me a few minutes to figure out what happened, and when I did, I felt pretty dumb.
Here's what went wrong: The power connector barrel plug has the ground connection on the outside ring. When I stored the battery pack in the bag with the power cord attached, that barrel connector must have shifted and contacted one of the metal points along the battery bank on the outside of the holder. This shorted several batteries directly to ground!
Turns out when you short circuit AA batteries, they dump a LOT of current very quickly. Those poor springs turned into heating elements and melted the plastic housing. I'm honestly lucky the whole thing didn't catch fire or rupture the batteries. This could have been way worse!
What I learned (the hard way):
NEVER store the battery pack with the power connector attached. Ever.
A simple inline fuse would have prevented this entirely. I'm adding one.
I stretched out the melted springs and the pack still works, but I'm watching it closely.
I now store the last battery in the bank in a separate ziplock bag so nothing can short across the holder.
This is why we test equipment before we need it in an emergency! If this had been a real emergency situation and my battery pack was dead because of a storage mistake, that would have been a problem. Now I know better, and hopefully you can learn from my mistake without melting your own battery pack.
AA Battery Power: 3+ Hours of Runtime
Let me talk about why I went with AA batteries instead of the fancy LiFePO4 packs everyone recommends. Yeah, LiFePO4 batteries are great. They're lighter, hold more capacity, and last longer. They also cost $100 to $200 for a decent pack!
This 10-cell AA battery holder cost me $12 on Amazon, and a set of 10 Eneloop rechargeable AAs runs about $25. That's $37 total for a power solution that gives me 3+ hours of runtime with the Penntek TR-35. I've done a three hour activation and never came close to draining the pack.
Even better: AA batteries are available everywhere. If I'm traveling and forget to charge my batteries, I can walk into any gas station or convenience store and buy alkaline AAs to get me through an activation. Try that with a LiFePO4 pack!
The 10 cells in series give me about 14 volts when freshly charged (this presents a small problem with Alkaline batteries as the voltage is greater by .3 volts! I guess I need to get two dummy cells so I can “detune the pack for Alkaline batteries), which is perfect for the TR-35. As they discharge, voltage drops to around 12 volts, but the radio still works fine all the way down. I typically recharge them when I get home, even if they're not fully drained, just to keep them ready to go.
Is it the most elegant power solution? No. Is it the lightest? Definitely not. But it's cheap, reliable, and universally available. For a go bag / emergency radio setup, those qualities matter more than saving a few ounces.

Close-up of the melted springs. The barrel connector contacted the battery holder and shorted several cells to ground. Those springs turned into heating elements real fast. I'm lucky it didn't catch fire!

My paper log showing contacts on three bands (20m, 17m, 40m). 30m wouldn't tune because I haven't trimmed the antenna to resonance yet. I still use paper logging as my primary method in the field.

Complete Go Bag Checklist and Cost Breakdown
1. Get the antenna higher I only got the wire up about 15-20 feet using the tree right next to my operating position. This worked fine, but higher is always better for HF propagation. Next time I'm bringing a longer throw line so I can aim for branches 30-40 feet up. The extra height will help with DX contacts and cleaner signal patterns.
2. Add a second cord for the transformer end Right now the EFHW transformer just hangs near the ground. I want to add another piece of cord so I can raise that end off the ground too. This should help with the radiation pattern and might improve performance on the higher bands.
3. Inline fuse for the battery pack Yeah, after the melting springs incident, this is happening. A simple 5-amp inline fuse between the battery pack and the power connector would have saved me a lot of stress. I'll add this before the next activation.
4. Pre-tune the antenna The Reliance Antennas EFHW comes cut long so you can trim it to perfect resonance in the field. I still haven't done this trimming, which is why 40 meters wouldn't tune properly (SWR was a little high). I need to take an hour and actually tune this antenna across all the bands the TR-35 covers. Then I'll know it'll work on 40m,, 20m, and maybe 17m (if I can live with the SWR) without field adjustments. (30 meters never tunes on these antennas so I dont count it.)
5. Add a small groundsheet The bag sits directly on the dirt/grass right now. A small tarp or groundsheet would keep everything cleaner and drier if I'm setting up in damp conditions. Nothing fancy needed, just something to protect the gear.
What's working perfectly:
The bag itself is the right size
Having backup coax has saved me multiple times
Coax with ferrite common mode choke from ABR Industries
The AA battery runtime is more than adequate
The throw weight works great
Everything fits and is organized
Overall, I'm really happy with how this kit performs. These are all minor tweaks, not major problems. The core concept of "everything in one bag" is solid!
Let me give you the actual numbers from this Eagle's Nest activation using just the go bag kit:
Activation Details:
Park: Eagle's Nest, US-0716
Date: November 13, 2024
Equipment: Penntek TR-35 at 5 watts QRP
Antenna: Reliance 40m EFHW at ~15-20 feet
Power: 10 AA rechargeable batteries
Bands: 20m, 17m, 40m (30m wouldn't tune)
Contact Breakdown: I started on 20 meters calling CQ and had a good little run of contacts. After working through the initial pile-up, I switched to hunting for other POTA activators on the band. Then I moved to 17 meters (one of my favorite bands these days!) for a few more contacts before finishing up on 40 meters.
Total activation time was probably 90 minutes, and the batteries still had plenty of charge left. I didn't drain them even close to empty. This confirms what I've seen before with this setup: you can easily get 3+ hours of field time on a single charge of AAs.
The go bag concept worked exactly as intended. I grabbed the bag from my truck, walked about 50 feet to my operating spot, threw the wire up in a tree, and was on the air in maybe 15 minutes. When I was done, everything packed back into the bag just as quickly. No loose gear rolling around in the truck, no forgetting pieces of equipment. It all stays together!
72

Rainy day CW POTA is the best...for me.
When I set out to activate a park today, I didn’t know where, but rather, only how I wanted to do it. I have been using FT8 so much lately that I got to missing my little CW only radios.
When I set out to activate a park today, I didn’t know where, but rather, only how I wanted to do it. I have been using FT8 so much lately that I got to missing my little CW only radios.

The Penntek TR-35 CW QRP radio is perfect for POTA
Today saw the re-emergence of the Penntek TR-35 and all the little widgets I made to go with it. I really love this little radio and now I have built an actual travel kit around it so if I wanted to take it somewhere on a plane, the kit will fit in my carry on baggage.
The travel kit doesn’t include the s-meter module or power pack/speaker, but those are “luxuries” anyway. The kit does have everything needed to get the radio on the air and making contacts and that is all that it has. Anyway, let’s get to today!
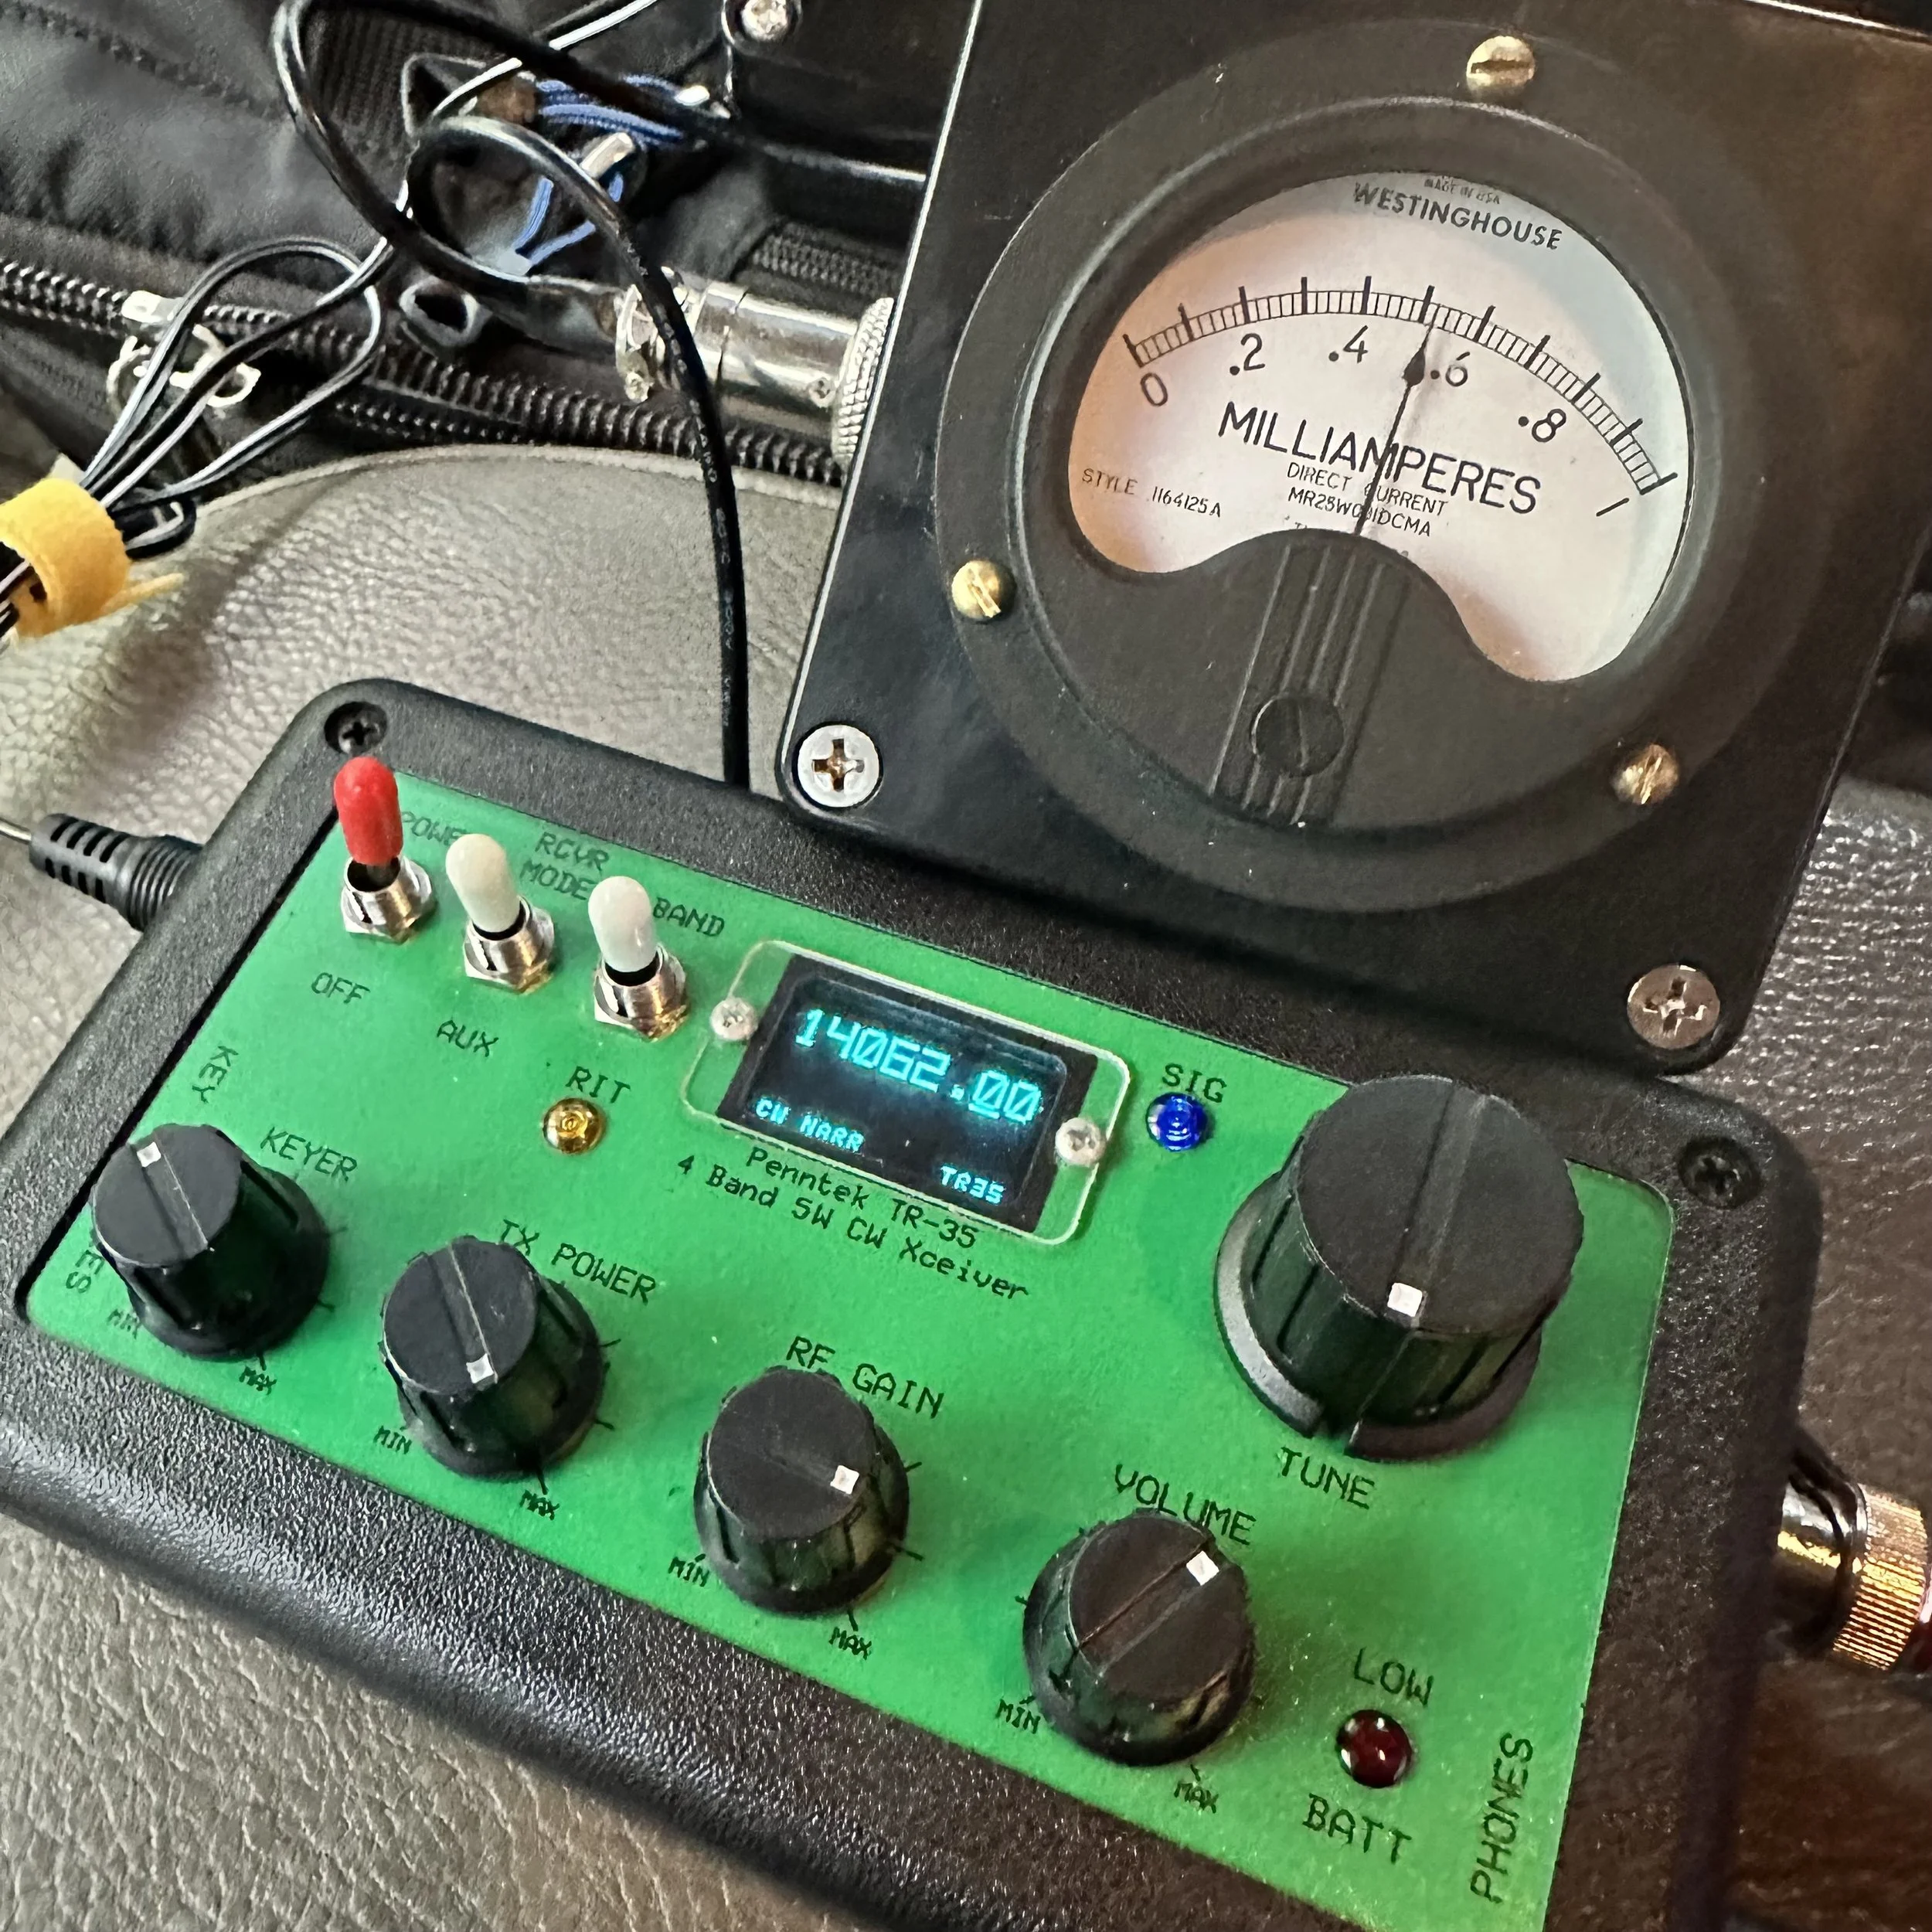
Pictured above is the radio and the “S meter” I built to go along with it. This meter works really well and makes using the radio just a little more fun for me. Is it needed? No, not at all, but that isn’t the point. This needle bouncing around while I copy code somehow is soothing for some reason and I can see how strong the signal is visually as well. I wrote about how I built in in this blog post.
Another thing of note is that this tiny little N6ARA key works REALLY well. Way better than something this simple should work… It actually works so well that it is worth using as a regular key. It is that good. Now to be fair, I dont know what the life of the key would be as it is PC board material so the contact thickness isn’t that much, but these keys do work really well. It takes a while to get it dialed in (read that as adjusted to your sending feel and style) but once you do, it is amazing how well it works. I should have gotten the larger variant, but I had this silly idea about minimalism and because of this, I got the little one.

Getting the key adjusted correctly and then some practice using it and this thing is amazing. Take it from me, if your not super concerned with every gram of weight, then get the bigger unit. It gives you so much more to hold onto that it isn’t even a option for me now. I still have the small one, but I do plan at some point to get the larger case for it.


Getting a spot on the POTA website
I posted this screen shot, of my spot on the POTA website, because I wanted to thank David- WA2OTC for going to the trouble of spotting me on the website while I was at the park without good cellular signal. He even came back to me and let me know that he had gotten the spot on there before moving on with his hunt. Thank you David!
It was really nice to not have to worry about getting on the website and getting myself spotted. You are probably thinking, then how did you get the screen shot? Well, I didn’t have a total black out, but just weak signal, so I simply loaded up the website and waited the 5 minutes or so for it to populate (seriously, I thought it would never load) so I could grab a screen shot for the blog. It would update EVER SO SLOWLY if I left it on the page. This location is a geographical oddity, it is close to the city but in a particular spot where there is terrible cellular coverage for some reason.

Welcome to fall and winter in the south. I have realized over the years that we get most of our water in the winter and I have planned accordingly. Things like the tape on the coax connector below to keep the rain out during an activation… Don’t forget to keep a roll of electrical tape in your car. Another trick I learned in working electrical maintenance over the years is that if you wrap the tape inside out (sticky side to the outside) then it wont leave residue on the cable and it works just as well for this purpose. We used it on factory motor connections so the rubber insulating tape would not stick to the connectors and it make changing the motors so much easier.
This exact weather event is what drove me to build the truck-tenna mount and figure out a power source for inside the truck cab to start with. POTA in the rain can still be fun as long as you plan for it.
The Inside-Out Electrical Tape Trick (From 20 Years of Electrical Maintenance)
I learned this trick working electrical maintenance over the years and it's perfect for POTA rain operations. The standard method that most people use is wrapping electrical tape with the sticky side to the connector, and this works fine for permanent installations where you're never going to take it apart again. But here's the problem for POTA: it leaves sticky residue when you remove it, it attracts dirt and moisture over time, and it's a pain to clean off in the field when you're trying to pack up and get home!
The inside-out method is way better for portable operations. You wrap the tape sticky side OUT, which sounds completely backwards but hear me out! The first wrap still sticks to itself even though it's reversed. It forms a perfect… well, close enough… waterproof barrier just like normal tape would. But here's the magic: when you peel it off after the activation, there's no residue on your connector! You can do this multiple times without any sticky buildup.
So how did I learn this? We used it on factory motor connections in industrial settings so the rubber insulating tape would not stick to the connectors and it made changing the motors so much easier. Motors would run for years in dusty, dirty environments and when it came time to replace them, the tape would peel right off without leaving any mess behind. The connectors underneath would be clean and ready to reconnect immediately.
For ham radio applications, I wrap coax connectors sticky-side-out, cover BNC connections between the radio and coax, and protect any exposed metal from rain. It works perfectly! Here's the actual process: Connect your coax normally first. Start the tape wrap with the sticky side facing OUT (this feels weird at first!). Wrap it around the connector 2-3 times, overlapping each wrap by about half. Press the tape to itself as you go so it forms a good seal. And that's it! You're done and it's completely waterproof…for a little while (long enough to complete the activation).
After the activation when you're packing up, peel off the tape and toss it in the trash.
Just like the tape on the coax connector below to keep the rain out during an activation... Don't forget to keep a roll of electrical tape in your car! This simple trick has saved countless activations from rain-related failures. I'm serious about always having a roll in the truck because you never know when weather is going to change on you!


Another thing that has happened at this location is that someone has cleaned it up… I am guessing the park service since there were chainsaws used…a lot. The cut all of the dead trees out as well as cleaned up all the dead-fall and then mowed the entire site! This is the first time I have seen this happen since doing POTA! The photo below was take just a month or so back.

The Joy of CW-Only Operations
There's something special about CW-only rigs like the Penntek TR-35 that's hard to explain until you've actually used one for a while.
The first thing you notice is there's no mode confusion. It's CW and that's it! You don't sit there thinking "should I try SSB instead?" or "maybe FT8 would work better in these conditions?" You just do CW all the time and you stop second-guessing yourself. That simplification is actually really freeing!
This leads to simplified operating in general. There are fewer controls to fiddle with. There's no mic gain to adjust, no audio levels to mess with(other then the obvious AF Gain knob for your headphones), no VOX settings or anything like that. It's just frequency and volume and you're done. You send code, you receive code, and that's the entire operating experience. No menus, no submenus, no functions buried three levels deep in software!
Here's something I didn't expect when I first started using CW-only radios: it actually forces you to improve! You can't fall back on voice modes if CW is hard. You actually have to learn the code better. You have to build your speed and confidence because there's no other option. And you know what? This makes you a better CW operator! When you go back to radios that have multiple modes, your CW skills are way better than they were before.
There's also this Zen quality to CW that's hard to describe. The rhythmic sending and receiving, the meditative quality of copying code, the direct brain-to-brain communication without any voice involved... it's pure information transfer! No misunderstood words, no voice characteristics, just the message itself getting through. I know that sounds kind of woo-woo but it's real!
After using FT8 (which is great!), phone modes (also great!), and other digital modes (all great!), sometimes I just want the simplicity of CW. One mode, one band (20 meters on the TR-35 is a good safe bet), one purpose which is to make contacts! No computer required, no sound card interface, no USB cables, no software updates. Just the radio, the key, and propagation.
This is exactly why today's activation was so satisfying for me. No menus to navigate, no mode switching to think about, no computer to set up and troubleshoot. Just me, the key, the radio, and the other operators on the other end. Simple! And after almost an hour of non-stop contacts, I realized this is what I really love about ham radio. The simplicity and the direct connection to other people through Morse code. I really love this little radio!

So after getting the radio setup and checked for SWR, I hopped on 20 meters right away. I wanted to be sure to get the activation fairly quickly as I didn’t a long time to stay and I also was using my Penntek TR-35 radio which is QRP power too. This gives me the best possible chances at activating…well, I underestimated the capability of the radio a little as you can see from the log. LOL. I first hunted AC4BT to just see if I could get through, this is because lot’s of activators today use 100 watt radios so just listening to the other stations no longer gives you an idea of how strong your signal will be. I make my point with the signal reaport I got back. He was booming into my radio and I was a 339 to him. 339 is workable so I moved to a clear spot, called QRL a few times, then called CQ and that is when things took off!

For almost the next hour, the bands were on fire! The only time there was a significant time between contacts was when I tried to reply to KM3STU and couldn’t get him. He came in strong and then vanished. Shoot, at one point I worked Germany! He was closer to the noise than the other stations but I was able to dig his call out after a minute. It is ALWAYS awesome to work another continent with a QRP radio!!! Alas, after about 45 minutes of non-stop contacts, the band just fell silent for me and after calling CQ for a few minutes, I called QRT and shut down the station as I needed to pack up anyway. This was a great POTA activation for me and one where I look back fondly at how much fun a tiny little radio can be.
I will say it again, if you have thought about activating a park, just do it. If you have hunted, then you know the exchange. Just write the park number at the top of the page for when you work another activator and the want to exchange park numbers with you. You can see that I paper log in the field then enter it into a computer when I get home to submit it to the POTA site so the hunters get credit. I will be honest here, if the hunters didn’t get credit for the contacts as well, I wouldn’t bother uploading the logs at all. For me it is about the experience and not the awards, this is why I have never submitted anything for awards from any organization. I just like operating on the air. So those logs upload are for you, not me… you see, without the hunter, this would not be a huge hobby like it is today, so I want them to get the credit they deserve. Anyway I will stop rambling and until next time, get your radio out and talk to someone on it!
Frequently Asked Questions About CW POTA and QRP Operations
Can you do POTA activations in the rain?
Absolutely! POTA in the rain can still be fun as long as you plan for it. This is exactly what drove me to build the truck-tenna mount and figure out a power source for inside the truck cab to start with. Here's what you need:
Waterproofing:
Electrical tape on coax connectors (keeps rain out!)
Pro tip: Wrap the tape inside out (sticky side to the outside) so it won't leave residue on the cable and it works just as well
Keep a roll of electrical tape in your car at all times
I learned this trick working electrical maintenance over the years
Operating from the vehicle:
Truck-tenna (receiver hitch) mount lets you operate from inside
Power source in the cab (battery or power supply)
Stay dry and comfortable
Still counts as a valid POTA activation as the whole station is inside the park boundry.
Welcome to fall and winter in the south! We get most of our water in the winter, so I've planned accordingly. Don't let weather stop you from activating parks!
What is QRP and why do you use it for POTA?
QRP means low power operation, typically 5 watts or less. My Penntek TR-35 is a QRP radio, and honestly? I love using it for POTA! Here's why:
Why QRP is awesome:
Small, lightweight radios (easy to carry)
Lower power consumption (batteries last longer)
Challenge and satisfaction (you worked them with 5 watts!)
Proves propagation is good (if you can get through at QRP, conditions are solid)
Fun factor (there's something special about making DX contacts on 5 watts!)
Reality check: The signal report I got from AC4BT was 339 (readable but weak). But you know what? It's workable! I hunted him first just to see if I could get through, because lots of activators today use 100-watt radios so just listening to other stations no longer gives you an idea of how strong your signal will be. At one point I worked Germany with this little radio! It is ALWAYS awesome to work another continent with a QRP radio!!!
QRP isn't for everyone, but if you enjoy the challenge and the simplicity of small radios, it's incredibly rewarding!
What's the advantage of CW over voice or digital modes for POTA?
CW (Morse code) has some real advantages for POTA activations:
Narrow bandwidth:
Gets through noise better than voice
Can copy weak signals that would be unreadable on SSB
Works in poor conditions
Lower power required:
QRP CW is more effective than QRP voice
5 watts CW = 20+ watts SSB in terms of effectiveness
Better battery life
Faster exchanges:
CW POTA exchange can be quick and efficient
Less time per contact = more contacts per activation
Usually people can make clean contacts in poor operating conditions with CW where voice would fail or require many repeats.
Personal preference: I have been using FT8 so much lately that I got to missing my little CW only radios! There's something meditative about copying code and sending with a straight key. The rhythm, the simplicity, the direct connection to the other operator. It's just fun!
That said, use whatever mode you enjoy! POTA is about getting on the air and having fun, whether that's CW, SSB, FT8, or anything else.
How do you activate a POTA park without good cellular signal?
This is a real challenge! At this particular location (a geographical oddity), I'm close to the city but in a spot where there's terrible cellular coverage for some reason. Here's how to handle it:
Before you leave:
Download offline maps of the park
Have your POTA park number written down
Know the exchange you'll use
Pre-plan your frequency and mode and schedule them on the POTA website ahead of time
At the park:
Self-spot if you can get any signal at all (even slow!)
Ask another station to spot you (like WA2OTC did for me!)
Just start calling CQ and hunters will find you eventually
The WA2OTC story: I wanted to thank David WA2OTC for going to the trouble of spotting me on the website while I was at the park without good cellular signal. He even came back to me and let me know that he had gotten the spot on there before moving on with his hunt. Thank you David! It was really nice to not have to worry about getting on the website and getting myself spotted.
Getting screenshots with weak signal: I didn't have a total blackout, but just weak signal, so I simply loaded up the website and waited the 5 minutes or so for it to populate (seriously, I thought it would never load) so I could grab a screenshot for the blog. It would update EVER SO SLOWLY if I left it on the page.
The ham radio community is great about helping activators get spotted. If you can't self-spot, just ask on frequency!
What is the Penntek TR-35 and why do you like it?
The Penntek TR-35 is a tiny QRP CW-only transceiver for 20 meters. It puts out about 5 watts and is incredibly simple. I really love this little radio! Here's why:
What makes it special:
CW only (no distractions, just Morse code)
20 meter monoband (one band, done well)
QRP power (5 watts, battery-friendly)
Small and portable (travel kit friendly)
Simple to operate (no menus, just tune and send)
My travel kit: Now I have built an actual travel kit around it so if I wanted to take it somewhere on a plane, the kit will fit in my carry-on baggage. The travel kit doesn't include the S-meter module or power pack/speaker, but those are "luxuries" anyway. The kit does have everything needed to get the radio on the air and making contacts and that is all that it has!
Real-world performance: For almost the next hour after I started calling CQ, the bands were on fire! I worked Germany! The only time there was significant time between contacts was when I tried to reply to KM3STU and couldn't get him. After about 45 minutes of non-stop contacts, the band just fell silent for me.
This was a great POTA activation and one where I look back fondly at how much fun a tiny little radio can be!
What is the N6ARA key and how well does it work?
The N6ARA key is a tiny straight key designed for portable operations. I have the small version, and honestly? This tiny little N6ARA key works REALLY well. Way better than something this simple should work!
Why it works:
Simple PCB construction (printed circuit board material)
Adjustable contacts and “spring” tension
Compact size (fits in tiny kits)
Surprisingly good feel when dialed in
The adjustment process: It takes a while to get it dialed in (read that as adjusted to your sending feel and style), but once you do, it is amazing how well it works! Getting the key adjusted correctly and then some practice using it and this thing is amazing.
My regret: I should have gotten the larger variant, but I had this silly idea about minimalism and because of this, I got the little one. Take it from me, if you're not super concerned with every gram of weight, then get the bigger unit. It gives you so much more to hold onto that it isn't even an option for me now. I still have the small one, but I do plan at some point to get the larger case for it.
Longevity question: To be fair, I don't know what the life of the key would be as it is PC board material so the contact thickness isn't that much, but these keys do work really well. It actually works so well that it is worth using as a regular key. It is that good!
Why did you build an S-meter for the Penntek TR-35?
The Penntek TR-35 doesn't come with an S-meter, and I wanted one! I built a simple S-meter module that works really well and makes using the radio just a little more fun for me. I wrote about how I built it in this blog post.
Is it needed? No, not at all, but that isn't the point! This needle bouncing around while I copy code somehow is soothing for some reason and I can see how strong the signal is visually as well.
Why I like it:
Visual feedback (see signal strength)
Satisfying to watch (needle bouncing with code)
Helps tune in weak signals
Just makes operating more enjoyable
It's one of those "luxuries" that isn't necessary but adds to the fun factor. And isn't that what ham radio is all about?
Should you upload your POTA logs even if you don't care about awards?
Yes! I will be honest here, if the hunters didn't get credit for the contacts as well, I wouldn't bother uploading the logs at all. For me it's about the experience and not the awards. This is why I have never submitted anything for awards from any organization. I just like operating on the air.
Why upload logs:
Hunters get credit for their contacts
Without the hunter, this wouldn't be a huge hobby like it is today
Those log uploads are for you, not me
It's the right thing to do for the community
My logging process: I paper log in the field then enter it into a computer when I get home to submit it to the POTA site so the hunters get credit. You can see my paper log in the photos!
I want hunters to get the credit they deserve. Without them, POTA wouldn't be what it is today!
What should a beginner know before attempting their first POTA activation?
Just do it! If you have thought about activating a park, just do it. Here's what you need to know:
If you've hunted, you already know the exchange:
Your callsign
Signal report
Park number (write it at the top of your log page)
If working another activator, exchange park numbers
Start simple:
Pick a mode you're comfortable with (CW, SSB, FT8, whatever!)
Bring a paper log (you can log electronically later)
Start on 20 meters (most activity)
Call CQ and see what happens!
Don't overthink it: I underestimated the capability of the radio a little as you can see from the log, LOL. I first hunted AC4BT just to see if I could get through, then moved to a clear spot, called QRL a few times, then called CQ and that is when things took off!
The hardest part is just getting started. Once you make that first contact, you'll realize it's not scary at all. It's fun!
What power source do you use for in-vehicle POTA operations?
I figured out a power source for inside the truck cab specifically for rainy day operations. Options include:
Battery options:
Bioenno LiFePO4 batteries (lightweight, efficient)
Sealed lead acid (cheaper but heavier)
Cigarette lighter adapter (if your vehicle supports it)
QRP advantage: Since the Penntek TR-35 only uses 5 watts, battery consumption is minimal. You can operate for hours on a small battery!
Rain operations: Having power inside the vehicle means you can operate comfortably in any weather. The truck-tenna mount lets me set up the antenna outside while I stay dry inside. POTA in the rain can still be fun as long as you plan for it!
BONUS QUESTION: What's your favorite part about POTA activations?
The experience! For me it's about the experience and not the awards. There's something special about:
Taking radios to beautiful parks
Making contacts from random locations
The challenge of QRP and CW
Meeting other operators on the air
Just being outside with radio gear
Today was a great POTA activation for me and one where I look back fondly at how much fun a tiny little radio can be. The bands were on fire, I worked Germany on 5 watts, and I spent almost an hour making contacts in the rain from my truck!
That's what ham radio should be: fun, challenging, and rewarding. So get your radio out and talk to someone on it!
Getting back to my roots…with CW
Today I activated park US-2169 with the Ten Tec Scout and only used CW.

This was a pleasant change from the FT8 I have been using so much recently. I was actually planning on switching to SSB then FT8 as well and use all three modes in one sitting…but…CW was working SOOOOOO well.
I also decided to setup at the picnic table by the canyon rim so I could use a 41’ wire antenna and a tuner. This allowed me to go up to 10 meters as I checked the spot page and a bunch of people was already there. I worked on getting the antenna tuned a while, only to find that I had used it wrong. Once I figured this out, I was able to get it to tune to about 1.5:1 and this is perfectly fine for a Ten Tec.
I was blown away by what happened next.

Here is what I took with me today… all those cases have different radios in them. The orange case is the sBitx (my goto FT8 rig in the field) the green case is the Ten Tec Argonaut 5 and the tan case is the Ten Tec Scout. I was loaded for bear. Lol. I was going to use the Scout for CW and SSB and then switch to the sBitx for FT8. Then why did I bring the Argonaut 5 out? Because the keyer and paddle are in that case that I wanted to use. HaHa. I also used the tuner and some cabling out of that kit as well.

Let’s talk about the Scout for a minute. This is a unique radio in that to change bands you change these modules that plug into the front of the radio. I have the whole set of band modules for my Scout and keep them in the hard case with the radio. It is an interesting little radio that also has a unique tuning device. The radio has a PTO instead of a VFO. So the knob has a distinctive resistance when you turn it as it is a mechanical screw driving a core into an inductor. This also means it remembers the frequency you are on without the need for a memory battery.

I kept the nanoVNA on the table for tuning when switching bands and I elevated the tuner on a pair of lineman pliers to make tuning a little easier. My Scout is unmodified from original and works really well. It does have some quirks but nothing that is a deal breaker.


The station as operated today. I like this spot as it is also in the public view and can sometimes spark conversations with passerbys. I had a conversation with a man and his wife on this day and he was in the signal corps in Korea and was copying the code as they walked by. He waxed nostalgic for a few minutes and we had a wonderful conversation and then they were gone…
The below photo shows the tree where I strung my antenna up to and you can see the table in the background it went down to. I like to string up a huge 65’ wire most of the time but today I just used my 41’ random wire since it was already in the kit.
These new LiFePO3 batteries are truly amazing to me. They weigh almost nothing and I operated for two straight hours at 50 watts and the battery was still at 13.26VDC. This blows my mind. I can pick this battery up with two fingers! I also ran it through my fuse distribution block so everything was fused.


This log shows how awesome the band was on this day. I started on 10 meters CW as I was listening around and the first call I copied was England! That was when I knew it was going to be good. I didn’t get him, but shortly after I started calling CQ and 6 out of the next 10 contacts were DX!!! The first one was Chile and I am pretty sure that is the first Chilean I have ever worked.
After that I noticed the rest were from the European area of the world which is still awesome! The other domestic callsigns were still very far away and I was stoked to mess with other bands as well to see what I could hear. After these initial 10 QSOs, I found that the band was fading so I figured I had hopped on the air at just the right time and caught a wave. At this realisation, I figured I would give 17 meters a try and see what happens. It was much more difficult for some reason, not much activity at all… I guess everyone was up on 10 meters… haha.
So after that, I figured I would just test 15 meters before calling it quits for the day. Well, I must have hit a band opening on 15 meters as well. The calls started coming in and as you can see below I got South Africa! That is also a first for me!!! I normally cant hear Africa since I use less than ideal antennas. I had a blast on 15 meters and the logbook reflects that. I even worked two “regulars” that I know by name but have never met in person! KJ7DT - Paul in Idaho and K9IS (who I have written about before) - Steven in Wisconsin. Both of these men have worked me well over 50 times and I am pretty sure Paul is over 100!
It is really cool to get “Z” calls in the log though as I rarely hear this call letter on the air. I always think it is way off, and sometimes it is, like the South African station but then I get one and it next door in the Caymen Islands too…lol.

This was an awesome day and I am glad you followed along in the story with me. Until next time, I hope to work you on the air!
WK4DS - David
73
Jumping on 40 meters right quick…
Today saw me testing a theory, that 40 meters wasn’t closed just because it was late in the morning…
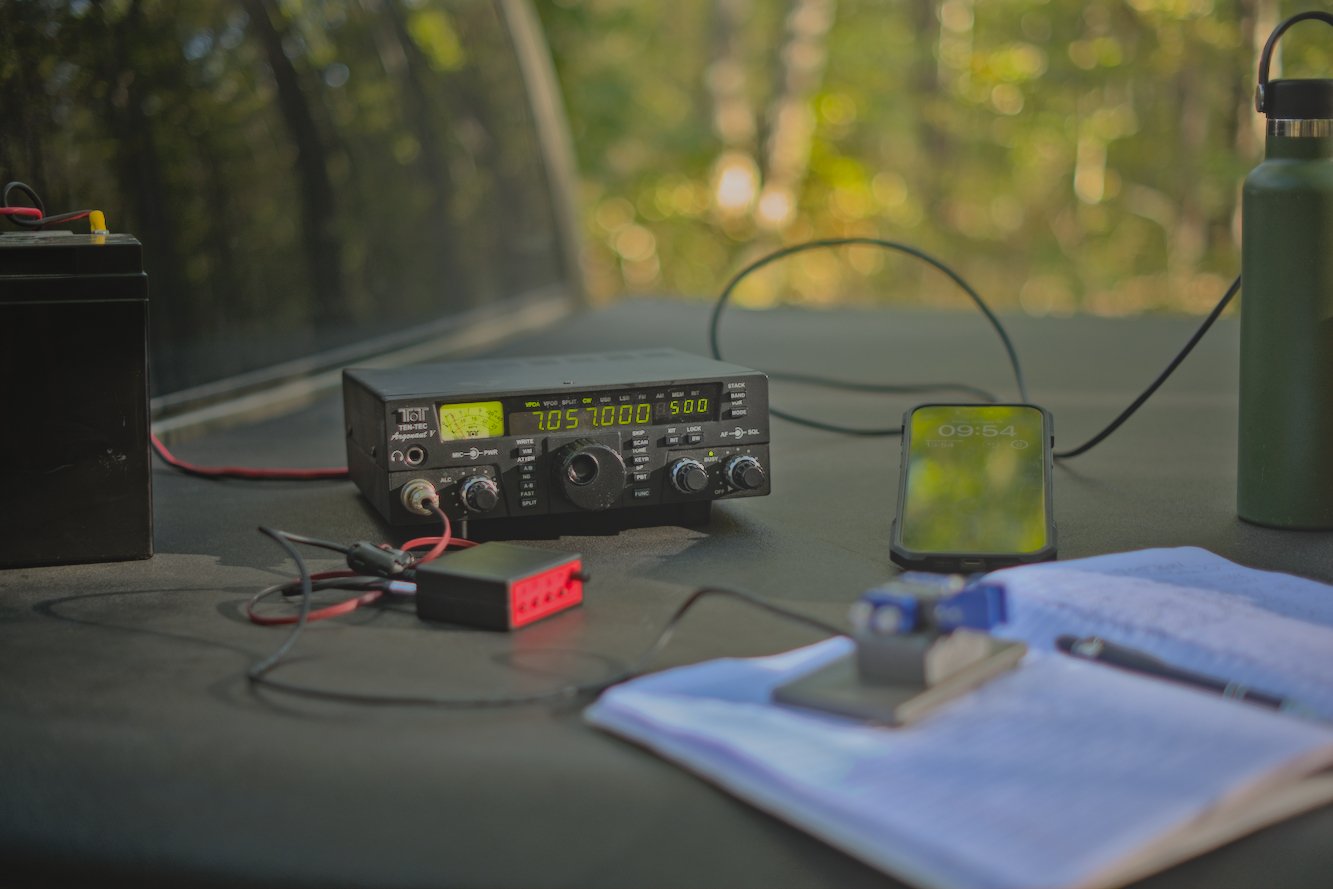
When I got to US-2169 today, I wanted to get on the air quickly, so I decided that I would activate the Sitton Gulch parking lot instead of going to the top of the mountain. This one thing adds about 40 minutes to my operating time as it takes me about 20 more minutes to drive to the top of the mountain from here and then there is the drive back down. Armed with this extra time, I decided to also add a long radial so 40 meters would tune up to a usable SWR. I was able to get the SWR on 40 meters CW down to about 1.6:1 and this is what I made all my 40 meter contacts at. The beauty of Ten Tec radios is their notoriously robust transmitters and the legend that they can survive transmitting into 10:1 SWR without ill effects. I have personally used my Argonaut 5 in 2.5:1 conditions and had no problems at all.
Today I thought I would just jump on 40 meters for a minute and see what I could scare up on CW then move over to FT8 before heading up to 20 meters. I was not ready for the pile up that happened next… It was interesting as there really wasn’t much activity on 40 meters at the time when I hopped on. It was almost lunch time at this point (late morning) and the noise on the band was picking up. I sent out my CQ a few times and it didn’t take long to get an answer. I also spotted myself on the app too and I am certain this helped immensely as well.
I worked over 10 contacts in about as many minutes and was stoked to have bagged the activation so easily. I switched over to FT8 now that I have cleared my little pileup on CW and see what I can find there!

I simply added a couple more radials to the antenna to help with SWR so that I could operate on 40 meters today. One of these radials was over 30 feet long! The 40 meter ham stick that I have is not that great of an antenna from what I have seen. The SWR is really touchy with it and I can not get it to tune without several large radials helping it. I dont know what I am doing wrong with it, but I really need to figure it out as the 40 meter band is a lot of fun!
The measurment kit below has becoume part of my permenant truck POTA kit that I take with me everywhere. It has the nanoVNA and all the associated widgets for it as well as a simple little multi-meter to check things with out in the field. This has been very valuable at times and a I recommend everyone carry a simple meter with them.

Here is a simple little hack that I found with my Ten Tec Argonaut 5 radio that I though was cool. You can make up a front (mic plug) connector for the keyer cable instead of using the tiny one on the back if you will simply wire the keyer contact from the keyer or key across the PTT contact on the mic plug. It works flawlessly and is simpler to setup for me. I have the cable for the back too should this one fail for some reason, but this is more elegant for me. Notice all the RF blocking devices I have added to the lines to reduce (read that as eliminate) erroneous characters from being sent due to stray RF.


After my little interlude on 40 meter CW, I switched radios to the sBitx to be able to work some FT8 on 40 meters as well… This was not a great idea as the SWR was 3.5:1 in the part of the band and I didn’t want to risk damage to the finals so I made one contact and then moved to 20 meters for the duration of the activation. Once on 20 meters, this is where things REALLY took off for me today. I started hunting and pouncing on contacts on FT8 before I finally just setup on an empty slot and started calling CQ myself. This produced a lot of contacts. A really good run ensued and I was glad to see that I was able to put many calls in the log on this day with the sBitx. Shoot, I even worked a couple of SSB contacts as well, but it was a struggle to be honest with only about 9 watts or so in the SSB portion since my antenna is tuned for the CW portion of the band.

Here is a rare glimpse into my “go” kit for my Ten Tec Argonaut 5 as a CW kit. I need to add the microphone to it so I can use it for SSB as well but I am not sure if the SSB mod has been done to this one yet. Haha. It works so well for CW that I have not bothered to check! But the kit contains the radio, tuner, wire antenna, key and keyer plus all the cabling to get everything connected. It is only missing a power source but that is by design. I carry batteries for remote ops or plug into the truck for mobile operations which is why I dont have a battery in the kit.


Here we have yours truly operating the sBitx on FT8 and to be honest, it works almost too well for this. To the point that I am almost not even interested in the other modes with it… Almost… I love working from the bed cover if it is nice outside as it is the perfect height for my uses.

This was a great day for radio and the logbook reflects it, looks like the solar cycle is picking up for the winter run! This is the time to get on ten meters and work some DX yall! I should know as the next blog post will reveal next week!
73
David


Activating a park in bad conditions
POTA activating in bad conditions can be challenging… for some modes. Seems that FT8 doesn’t really care if the bands are crappy and will gleefully allow you to play radio anyway.
This was an experiment to see if the sBitx amateur radio could work in terrible space weather like you see below in the report.


The above and below photo show how fast the band conditions changed on me while activating on this day. The band noise could be seen on the display “walking” across the band segment at times. This band noise would pretty much wipe out what you could hear on the band, but the radio could still decode the FT8 signals so I was able to work almost 20 stations in about an hour even with this sort of noise coming into and out of the band.
I normally dont bother activating in bad band conditions, but this day I really wanted to see just how good FT8 was at extracting signals from the noise. I can honestly say that I was impressed by the performance of this mode. Digital modes have their place and this is very much one of those places. Weak signal in poor band conditions shows just how important it is to use all the modes available to the amateur radio operator. I was once a die hard CW only op and to be honest, it is still one of my favorite modes, but of late I have started getting into SSB more and now I am also dipping my toe into digital modes more and more and I am really liking it. Dont limit yourself out of a stigma like I did, you might just like what you find.

Below is a photo of the display that shows something that i had never seen before and that is the pulsing band noise. That was a new one for me. It too would come in waves and these would last much longer it seemed. The sBitx just kept chugging along though, I would sometimes pick calls and sometimes answer calls and this is what makes FT8 awesome. I couldn’t have possibly made SSB contacts in these conditions…


Here you can see the operating position for the day. Perfect blue skies and nice temps makes for a great day on the air at a park. I had to goto this spot as the lower lot was completely full since the weather was so nice, it was fall and a Saturday. Sometimes going to this spot has it’s perks like lower band noise from the campground inverters and such so I dont really mind it.
I had planned on using a battery and setting up on the picnic table I usually occupy down next to the canyon rim, but there just wasn’t anywhere to park and I didn’t want to wait on someone to leave just so I could park.


This radial is on it’s last leg. I have twisted this broken radial back together for months now and on top of that, the connector on the other end has also broken off. This is almost comical as this is the best performing radial in my set! That is why I am reluctant to repair it at this point…lol. It just works and if it ain’t broke (figuratively) then dont fix it.
I dont know when this bug (I think it is a jumping spider) decided to join in on the fun but here he was playing on the antenna mount. By the time I finished the activation, this little guy was long gone. Kinda fun to notice the little things like this when you are out in the park.


By the end of the activation, I had worked 18 unique contacts and garnered one dupe because I didn’t read my logbook very carefully and called one ham two times…then I decided to attempt to work some CW. This was pretty futile though as I only worked one contact out of about 15 minutes of calling as this is abysmal for me when I work CW. I can usually work about one call per minute even when I am running QRP power levels. So when I only work one…that is bad band conditions. The stations would literally just disappear then reappear and it was impossible to get complete calls so I called it quits after one.
All in all, it was still a great day in the field. Hope to work you soon!
WK4DS
Finally got back in the groove!

It took me a few weeks since I had a ton of things happening. Now that things have settled down a little, I am able to get out and do some radio and then also to write about it too. That has also compounded the problem it seems… anyway, here we are at US-2169 again and this time I am setup at the canyon rim parking lot as Teresa went with me and she wanted to go to the canyon rim to read while I made contacts with ya’ll. I chose this corner as it was in the shade and it was evening too, so this meant that the sun would not cross my truck for the whole of the activation. This is nice as I am usually out in the sun when I am up on top of the hill and today was quite warm if in the direct sun.

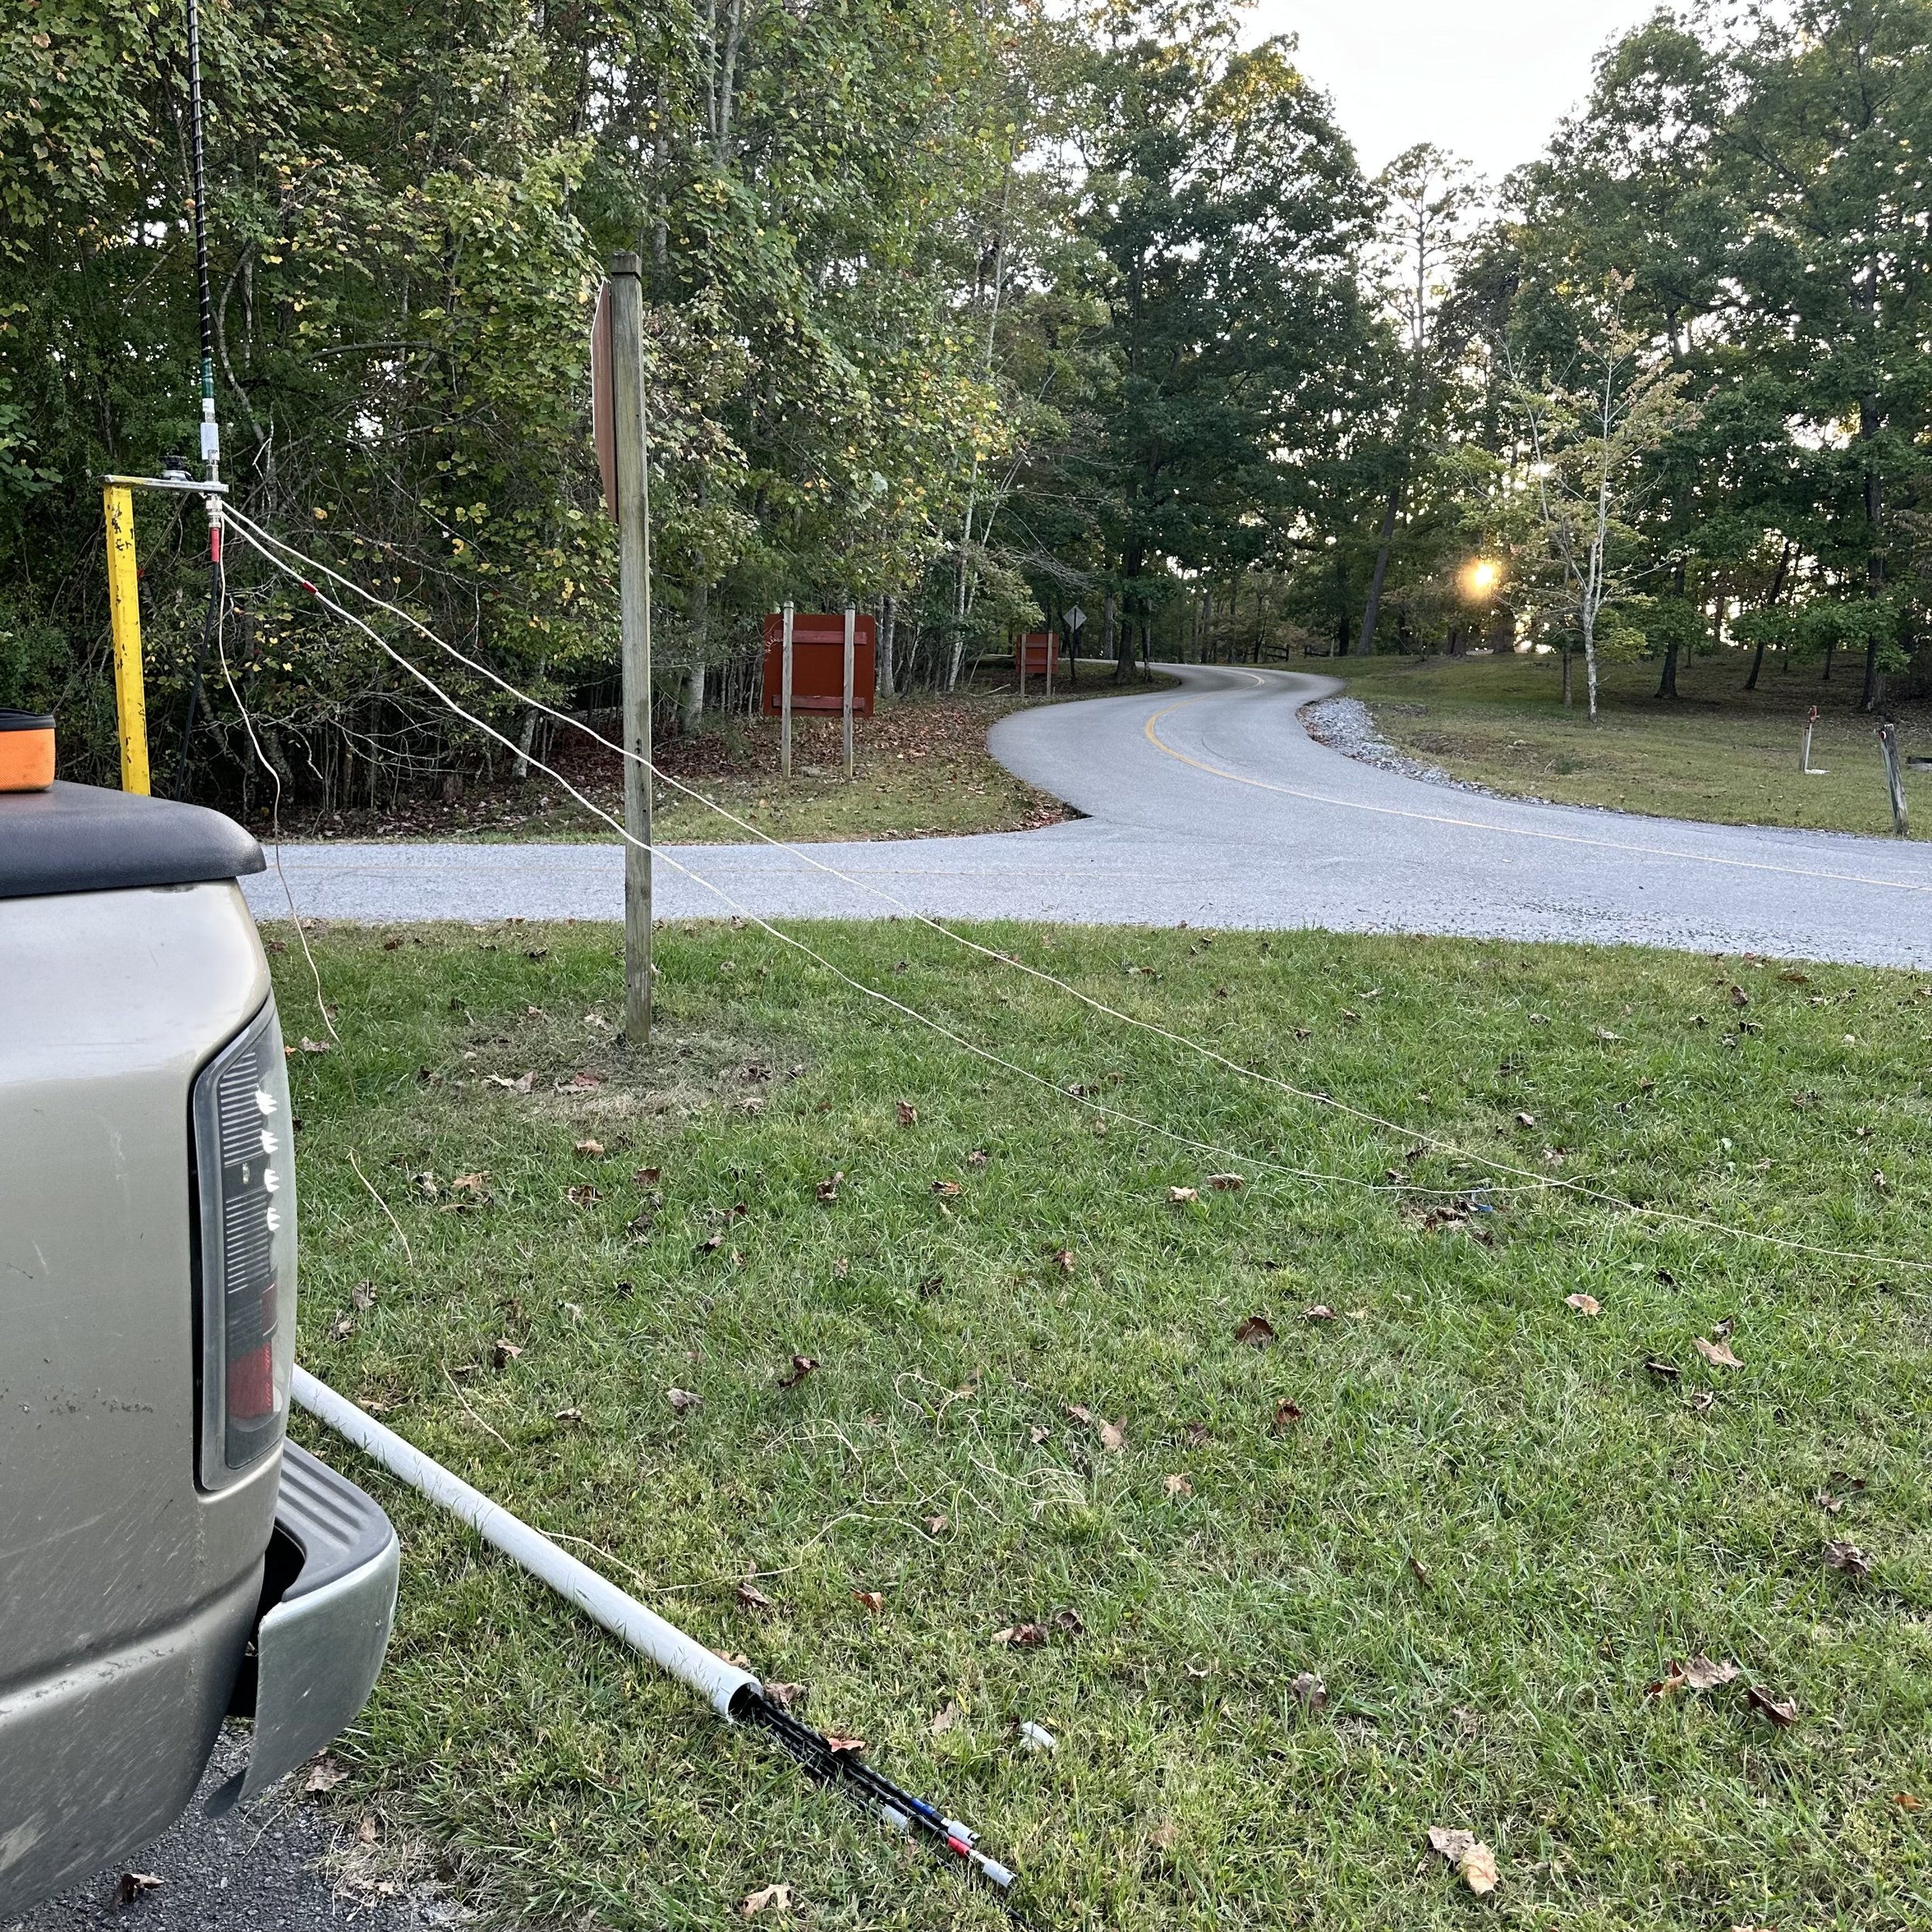
I had spoken with a new friend and we agreed that if he could hear me that we would work each other from the park so he could get hunter credit as well as me getting activator credit. We had already “tested the waters” so to speak as we had already gotten on 15 meters SSB in the shack at my house and talked for a while earlier in the day. This is what let me know that the band was open too. The recent solar storms had me pretty well convinced that the higher bands would be a ghost town, boy was I wrong about that!

I decided to just run the 15 meter band all day so that I could see if I could get the activation on 15 meters even with the terrible band conditions. Turns out I could! I worked three different modes today on two different radios, just so I could use them. The first thing though was to get the SWR as low as I could and I would up with this plot on the nanoVNA. This is perfectly usable and I, in fact did use it like this to great effect! It was only about 1.1:1 down in the CW portion with is a wonderful reading for the radio. I made my adjustments by adding and moving the radials around till the plot looked like I wanted it to on the VNA. This has worked really well for me thus far.

The first radio that I used today was the Ten Tec Scout 555 with the 15 meter module in it. My particular radio has not had the output power mod done to it so it still puts out the rated power and is not readily adjustable. Mine makes about 40 watts on the truck batteries (they are kind of old at this point so they are not quite 13.8 volts anymore) and a solid 50 watts if the alternator is running. This is perfect for SSB POTA operations in my book so I got on the air and started calling CQ. It didn’t take long till K7LZZ answered me from one of the New England states. He was operating mobile with a FT-897 if I remember right running about 100 watts and we both agreed that the path was strong and reliable even with my 40 watts. After we chatted a for a minute, we exchanged 73s and I proceeded to call CQ for several minutes without another single op answering me at all…it was like the band simply closed down or something. I finally gave up and moved down to the CW portion…
I also used this radio for the CW portion of the activation as it is really easy to switch over to CW on this machine. This radio has no mode switch. SSB and CW use the exact same mode and you simple inject a side tone for CW when you close the key contact. You just have to remember that the side tone is running in the sideband so the VFO will read low if you are using upper side band and high if you are on the lower bands by about 700 hertz. I had the radio set to 21.0534 and it was coming up on the RBN as 21.054. On SSB it seems to not matter for some reason, but on CW it does. Also of note, the radio has a built in paddle keyer (I think it is simply a Curtis keyer chip wired into the radio), but I prefer to run my HamGadgets Pico keyer as it has memories and for this you simply plug into the straight key input.

You can see below where the RBN showed me at 21.0541 while the VFO said 21.0534 (I think…it did fluctuate a little as the radio warmed up to be honest) Propagation was fading and the CW reports kinda show it, but the RBN numbers really showed it. Too bad I didnt get a photo of that for you, so you will just have to take my word for it…haha.
I made quite a few contacts in short order with CW once the spotter page showed my activation. It was good to get some familiar calls like KJ7DT and K1PUG along with some DX stations as well!!! It is always awesome to get those in the log. At one point I had a station down in the noise that I am pretty sure was a J call but everytime I tried to copy the band would just fade away… That made me sad… Getting a J call in the log is always awesome and especially during an activation!!!
What struck me as odd was that I got zero replies on SSB save for the one with K7LZZ who was looking for me to activate. Here is the kicker though, he was mobile and I was on a ham stick and we were both 59 signals into New England!!!

The second radio for this outing was the sBitx V3 with the new V4 software installed. I have every version of the software saved in the hardcase on micro SD cards ready to install in the radio should I want to downgrade or if the one in the radio just dies or something like that. They might not have all the fluff the new version has, but they were a working version so I hang on to them anyway.
The V4 version has an astonishing amount of updates and changes and I am still learning about all the new features that came with the V4 release. I will write about it soon and share some of them with you. For now, we are focusing on the FT8 stuff that I noticed right away. The new color scheme for things makes it a lot easier to use. All the calling stations are now in red, the CQ are white and the grids are color coded so that you can see which ones you need and which ones you have already collected. The orange line is your line where your sending and this helps to know where the cutoff is for the last cycle so you dont waste time scouring calls that are not there now… That alone was a huge help. The completed and logged note is still a solid white line like you see in the image below.


For me the output power levels didn’t change, I think it is because I did the update to my existing V3.027 release instead of simply burning a new image that doesn’t contain my radio‘s personality. I didn’t lose my logbook or anything so it was great. You can see I get about 10 watts output on 15 meters. This is plenty when the band is open, especially for digital modes.

As you can see in the log, there are more CW ops hunting on 15 meters (that could hear my 40 watts…to be fair) than there was on voice. I was using 40 watts on SSB though so I should have been able to make a few more than just the one. Either way, it worked out and all the DX in the log just made it sweeter. So this should be a testament to everyone that if one mode isn’t producing results then maybe hop on a different more and you will have better luck.
Until next time, I hope to hear you on the air!
73
WK4DS

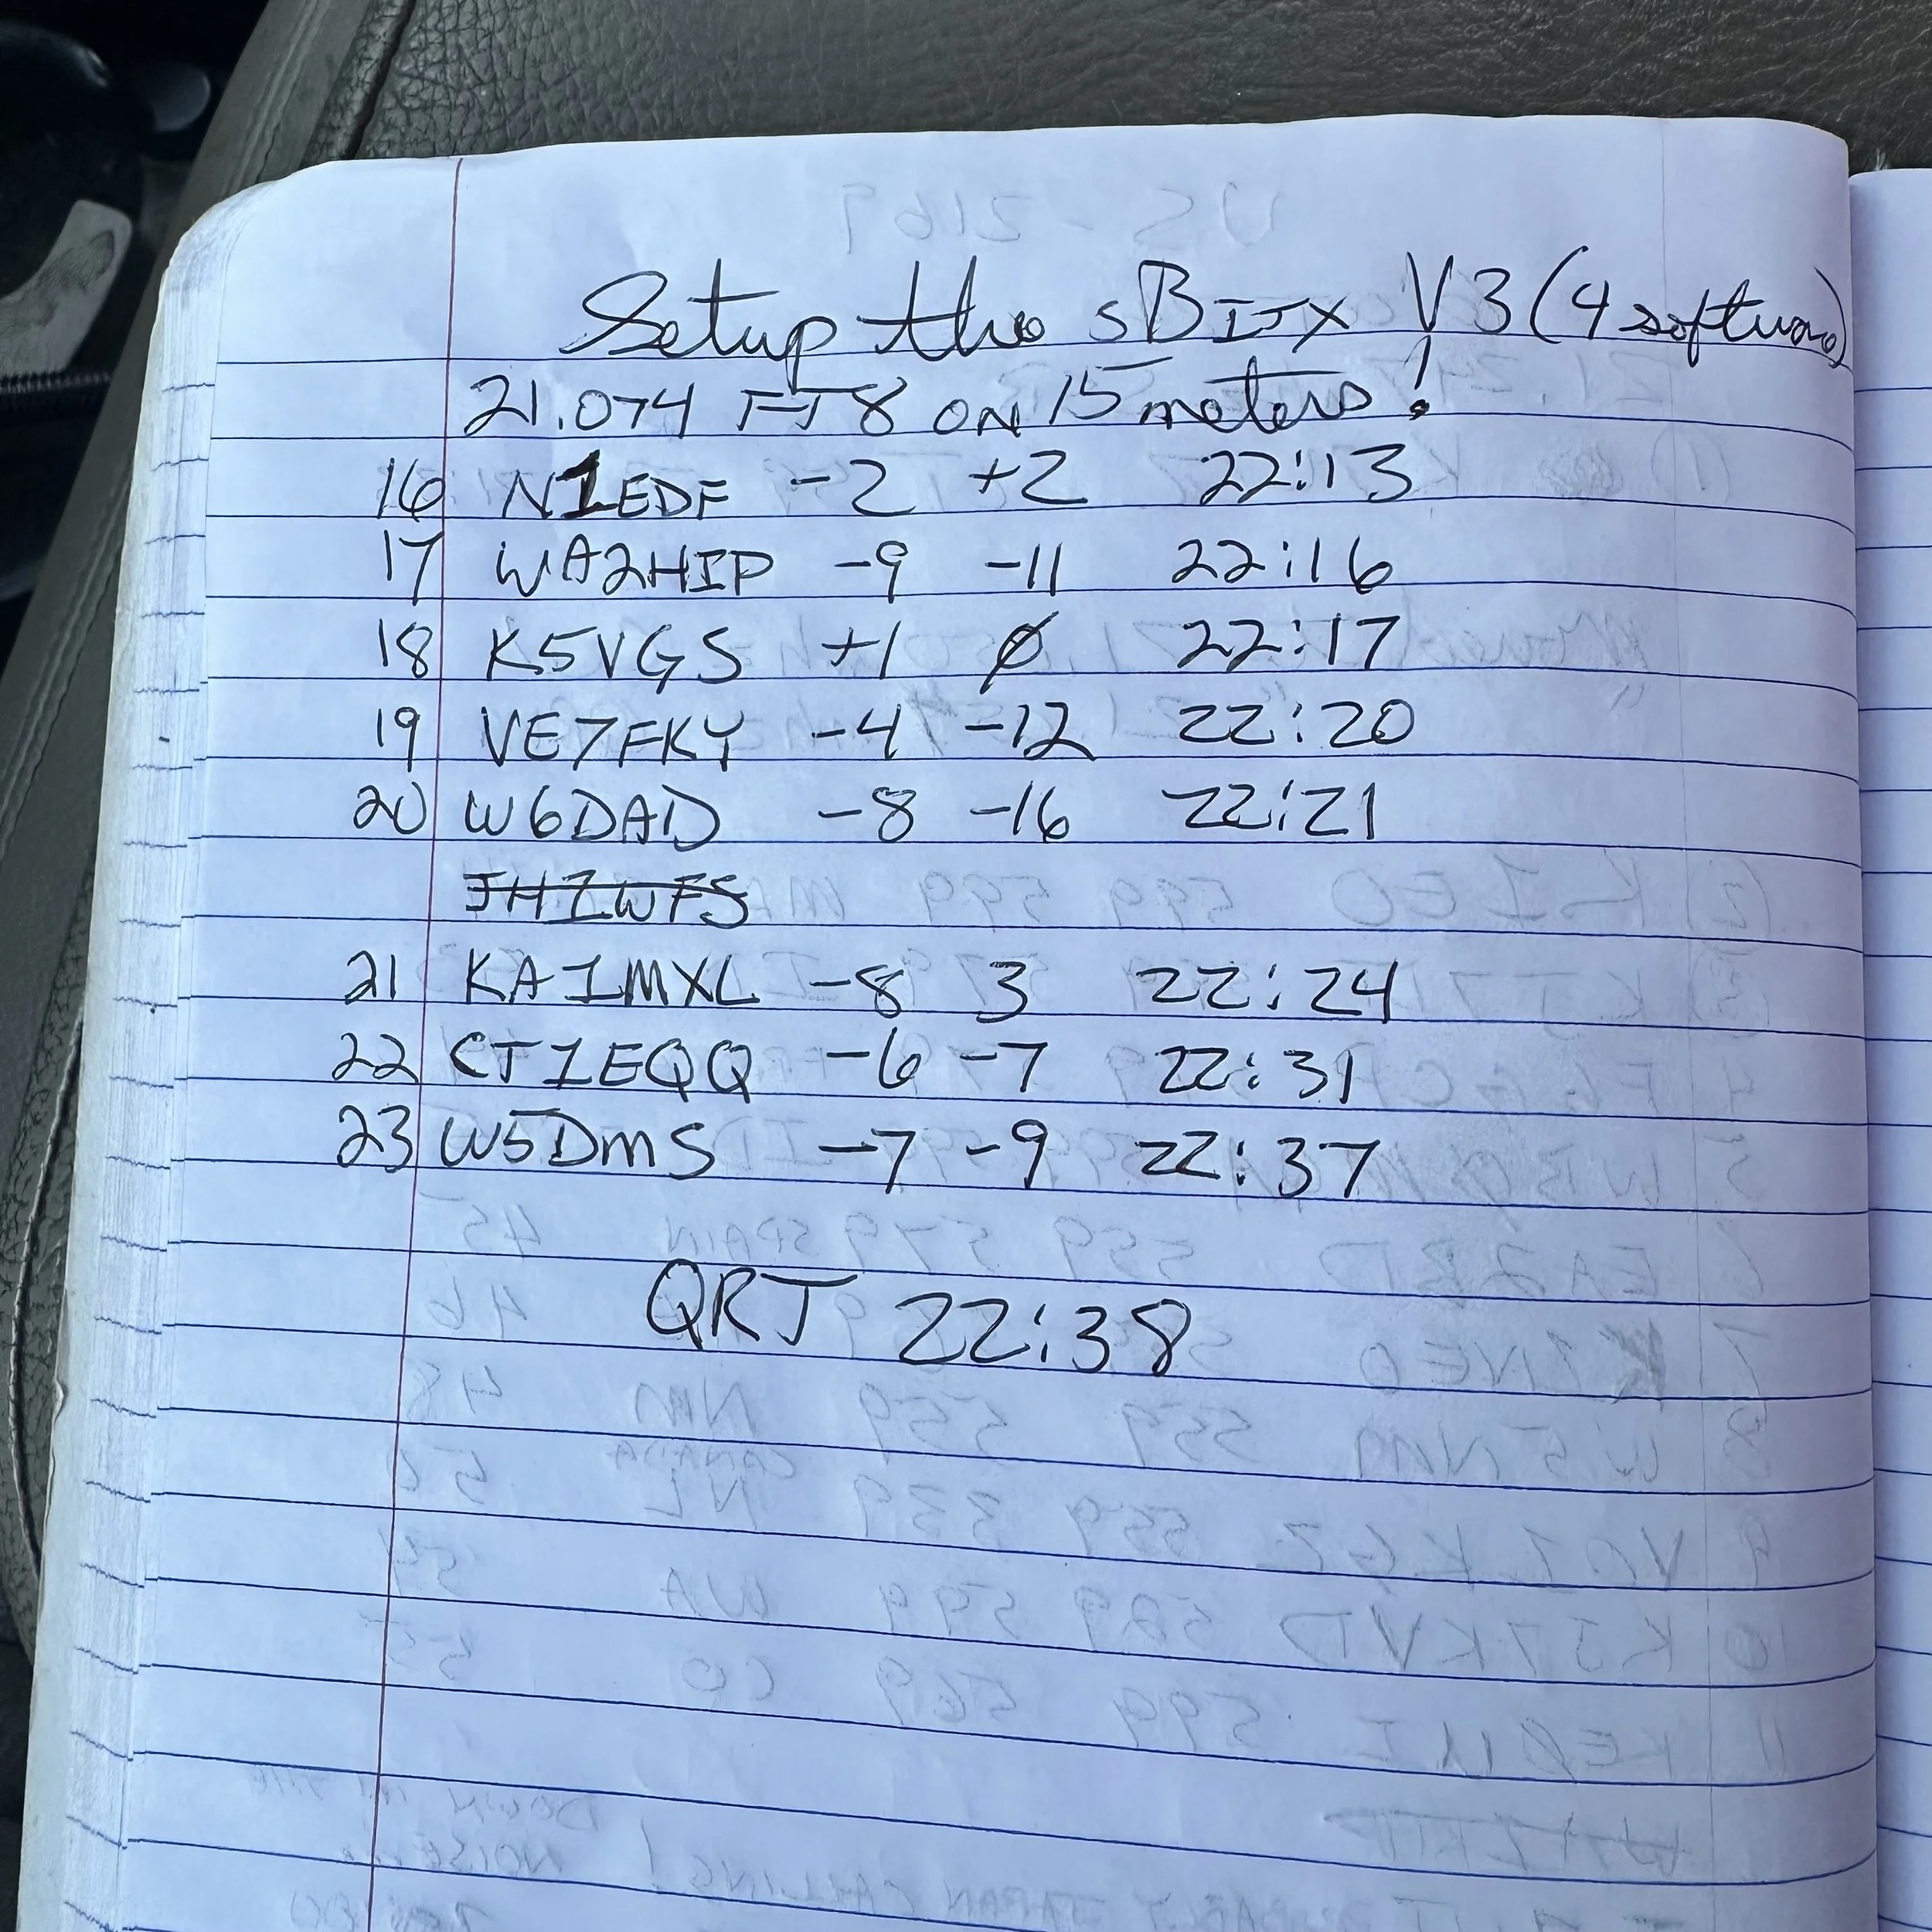
sBitx V3 HF radio special functions
I recently activated a couple of parks and decided to add a bluetooth keyboard to the sBitx V3 and see how operational it would be like that.
On this day I decide to activate Chickamauga Battlefield but first it seems a “widow maker” dead tree fell into the pull off at US-0716… I cleared what I could without a chainsaw and then setup the radio.
The below view gives you a good measure of just how big this “parking lot” is…lol. This lot would hold two small cars or my truck and a motorcycle and that is about it. The cars going by are the worst part though. These cars sometimes emit terrible amounts of RF hash… first world problems I guess…
I setup the usual antenna system but only for 15 meters as I was feeling a bit adventurous today and figured I would stick it out on 15 meters till I got the activation secured. I could have done the same thing in 15 minutes on 20 meters using CW, but there are plenty of ops on 20 meters already so I figured I would warm up another band instead. Well, the QSB was obvious when watching the FT8 waterfall, you could see the band come in and out as the stations would get real loud then fade almost all the way out. This made FT8 challenging since it takes a couple of minutes to complete the series of messages. None the less, I was able to get 11 contacts anyway, even with the frustration of some more that never did complete… but so is HF, she is a fickle girl at times…
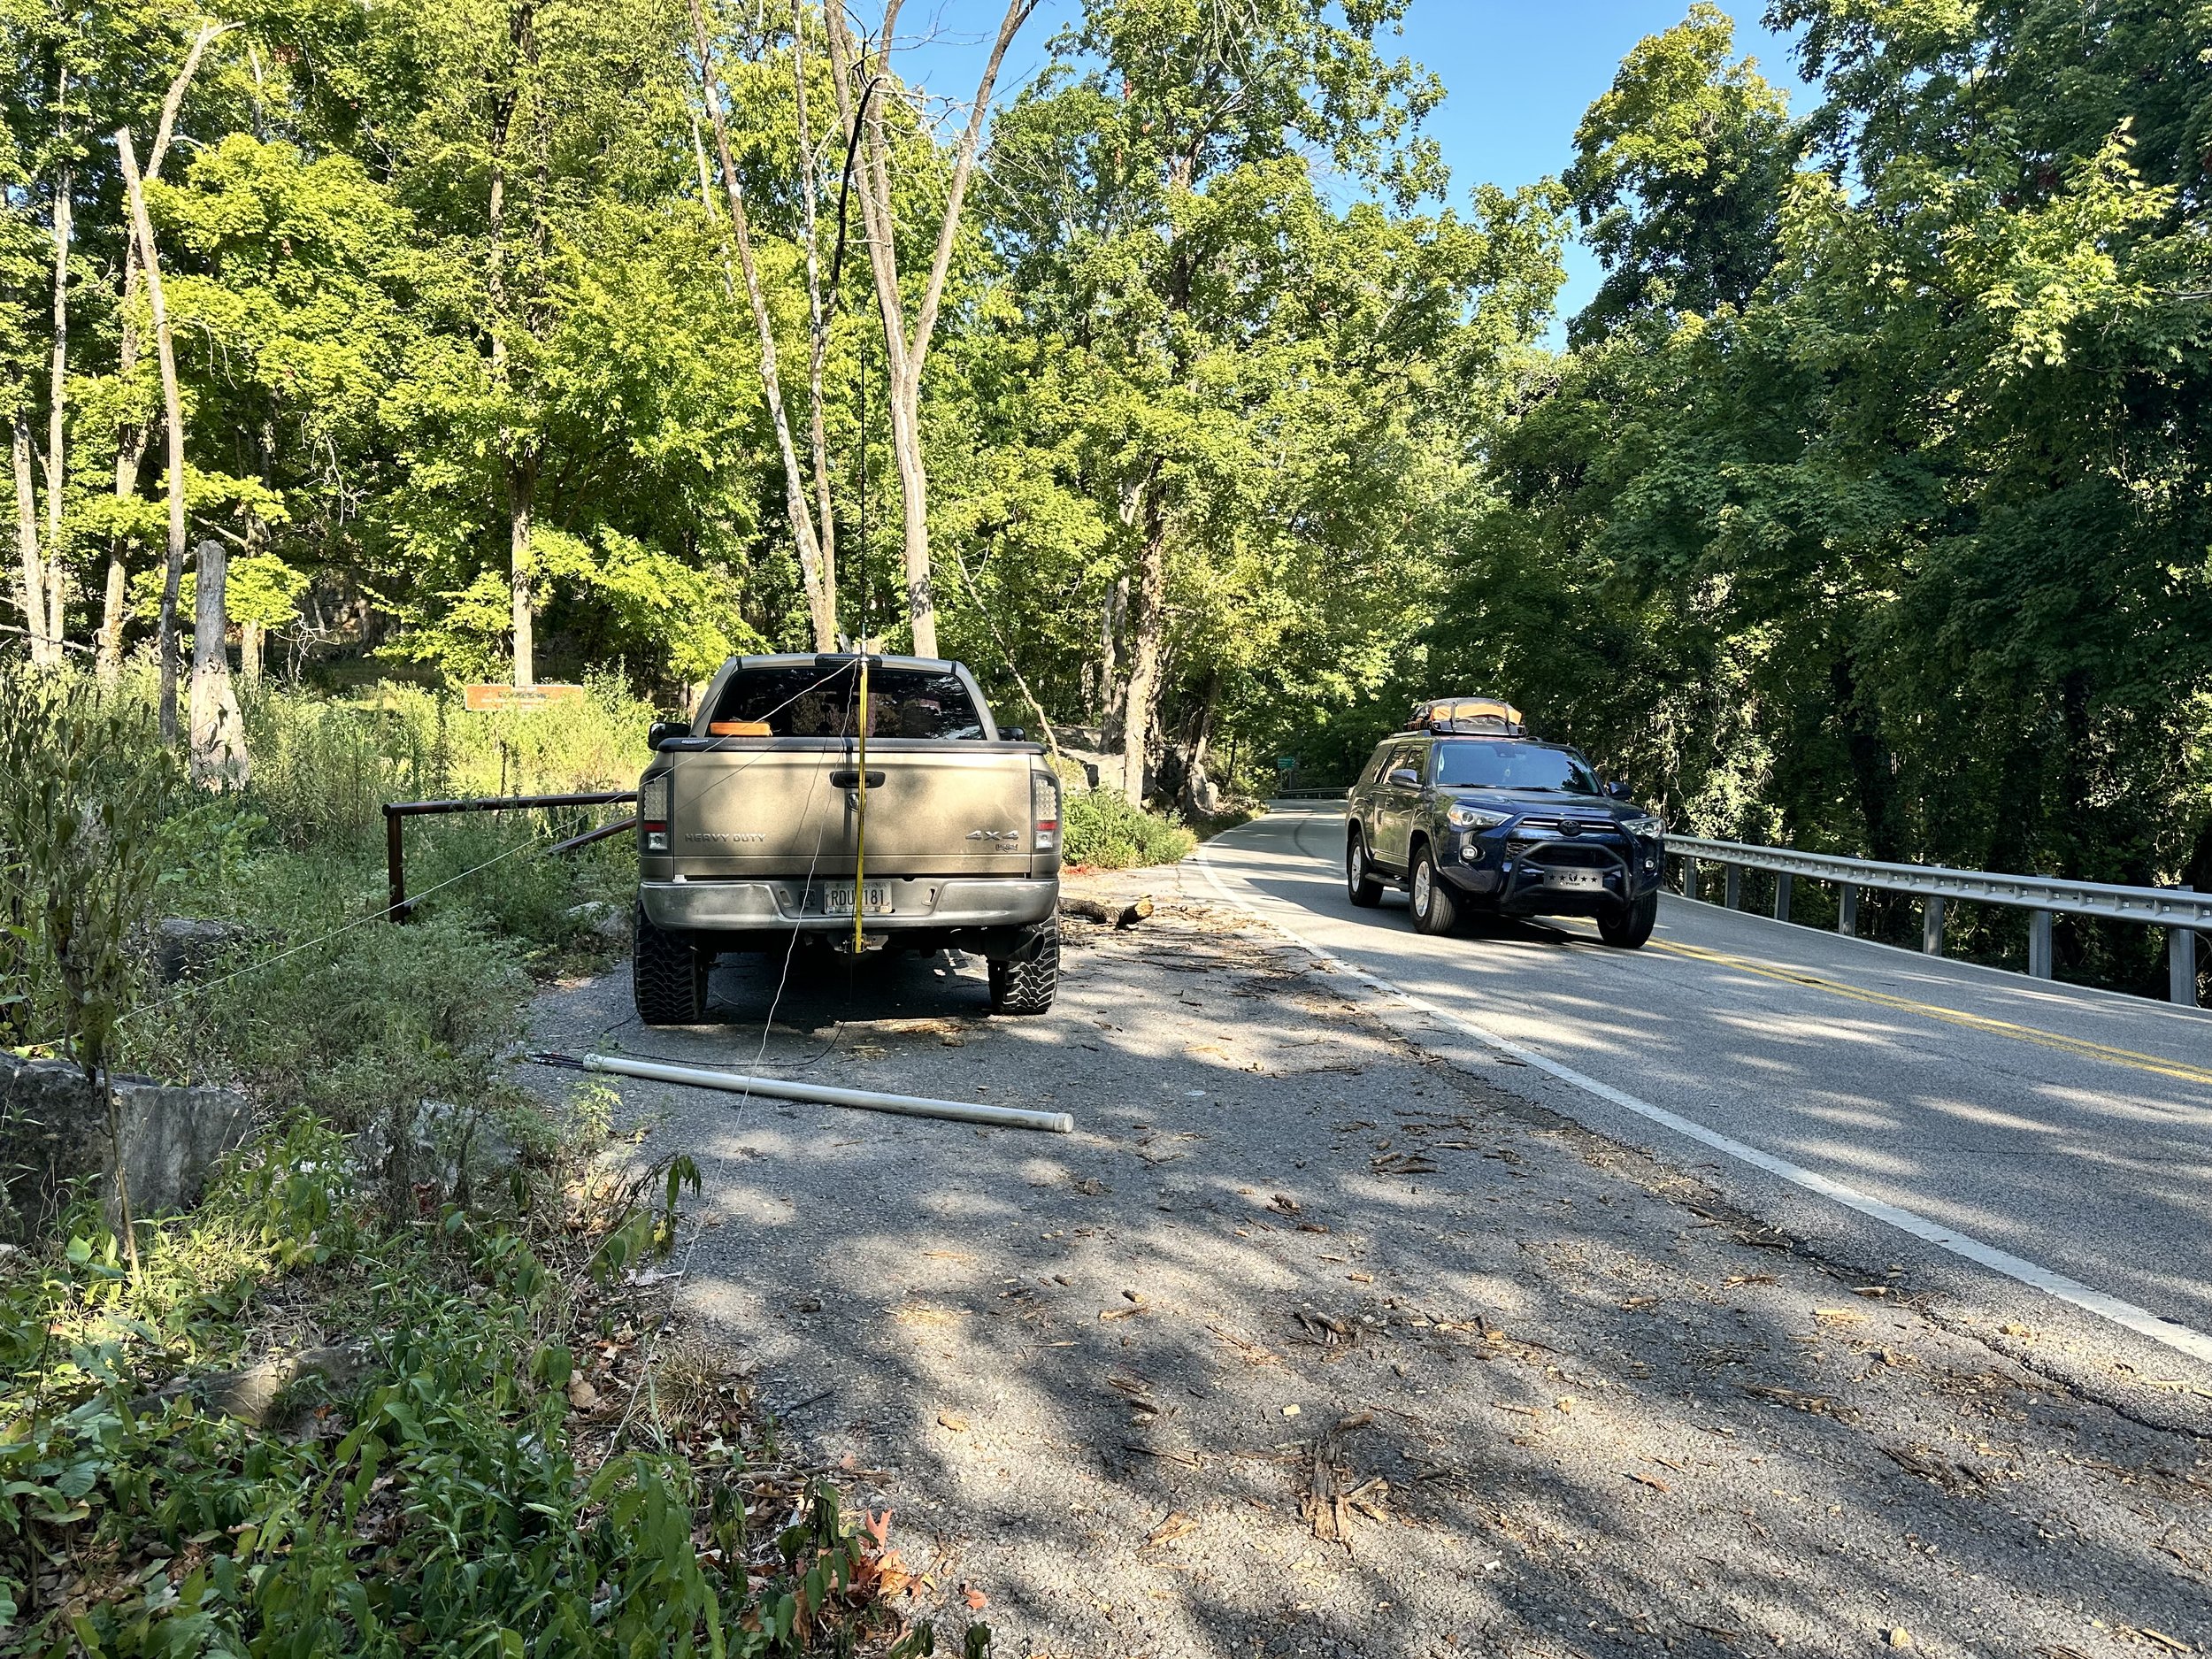

Today saw the common mode choke come back as I had it nearby and the SWR was a little off. So I threw it inline with the radio to keep it happy. These are really simple to make and I show how I do it on a video, that is in live-stream format, on YouTube, at this link if your interested. Link to video about making a common mode choke for QRP work (it can probably handle 100 watts without issue but I have not tried it) and POTA ops.
Below we have the operating position for today, notice I didnt even bother with the CW key today as I had planned from the outset to only work FT8 and then pack up. Took me longer than I had anticipated but I did it! haha. Well, to be fair, I did have a CW key in this photo, you see the sBitx will also send CW from the keyboard. I use this to great effect at the other activation I am going to talk about shortly…
The one thing I really like about using 15 meters from a park with a ham-stick antenna is that I am able to work DX pretty consistently. As we see here I worked 5 DX stations out of the 11 I got into the logbook that day. That is a phenomenal amount of DX stations for me. I just seem to get REALLY good propagation when I get on 15 meters for some reason. I will get one every now and then on 20 meters, but I get them regularly on 15… just something to think about if you are into chasing DX and want to also do POTA…and use a ham-stick antenna. You see every contact you make from the park counts towards your POTA log, so even if they are not participating in the program, like a recent ragchew I had while at a park, still counts to your 10 you need for that day.


The other park I went to recently was Booker T Washington just NE of Chattanooga TN. I have not been back to the park for a while so it was nice to put it in the log again. Instead of struggling around on 15 meters at this location I chose to run 40 meters and 20 meters for a while instead. I hopped on 40 meters FT8 to start with as I have not been on that band from a park using FT8 yet. It did not disappoint. There were a few stations still lingering on the air so I was able to work several of these stations before the band noise got so bad that I could not complete contacts and further. I even worked the W0E special event station which is really cool.

This is a really old park and has changed over the years. These were once campsite areas but have since been simply turned into day use “picnic” areas with most of them essentially becoming simply parking spaces for people that go for walks. There are a few that have picnic tables and even grills but most are now just parking spaces along the loop.

After working 40 meters FT8 for about 1/2 hour or so, I decided to give keyboard CW a try on the sBitx V3. This also did not disappoint. I was surprised how easy it was to transition from using a paddle to using the keyboard to send CW. It did take a little getting used to for me to become proficient with it, but after just a few minutes it was like I had been doing it for years and I even figured out the keyboard short cuts for the memories too, so I could use them easily for the exchange and such. This made it easy to log as well as send so I kinda liked using it this way to be honest. It is more fun to me to use a keying device of some sort, but if I forget my key, I now know I can still get on CW and make POTA contacts with it easily. That is a nice option to have in a 400$ radio to be honest about it. Well, to be fair, if you have used an sBitx for sending CW, then you also know how frustrating the keying is with it. It is possible to use it to about 20 WPM or so without much issue but above that, the keying delay because of the way the code is written, will cause the radio to send mistakes. Once you learn to hold the key just a little longer than usual it works just fine at speed of 20 WPM and less so it isnt a huge deal for me. Much over that though and the radio just wont work as of right now. From what I have heard, there is a beta of the next version of the code that will address this problem, but I am not able to compile the code properly so I am patiently waiting for the official release to drop before upgrading again. JJ just released an update to his fork of the code as well and it has a bunch of new features like a tune button and such, but I am also waiting on that one as well so that the bugs get ironed out before I install it on my machine. Now back to the activation…
After that I hopped on 20 meters FT8 and jumped into the fray for a few minutes to see if I could grab a few more calls for the day right quick and that would be a yes! I got 3 more stations in the log using this mode on 20 meters as well. What a day!

Today also saw nice enough weather to setup on the bed cover and these two photos show how I have to do this if I am on the truck power cable from the cab. It is just long enough to reach out the window and power the radio…lol. Barely… (I really should make a longer power cable or something…haha) This worked out today as the whole location was in the shade so I didn’t have to fight off the sun while trying to activate. A lot of the time, this is the reason I don’t operate from the bed cover in the summer, it is in the sun and just plain hot…
As you can see below, the height is about right for me activating too, I can write as well as operate the radio and it is at just the right height for me and my stature. If you like to work POTA, and you do regularly activate, what is your normal operating position? I have a few with this one being one of my favorites even though I don’t use it much.


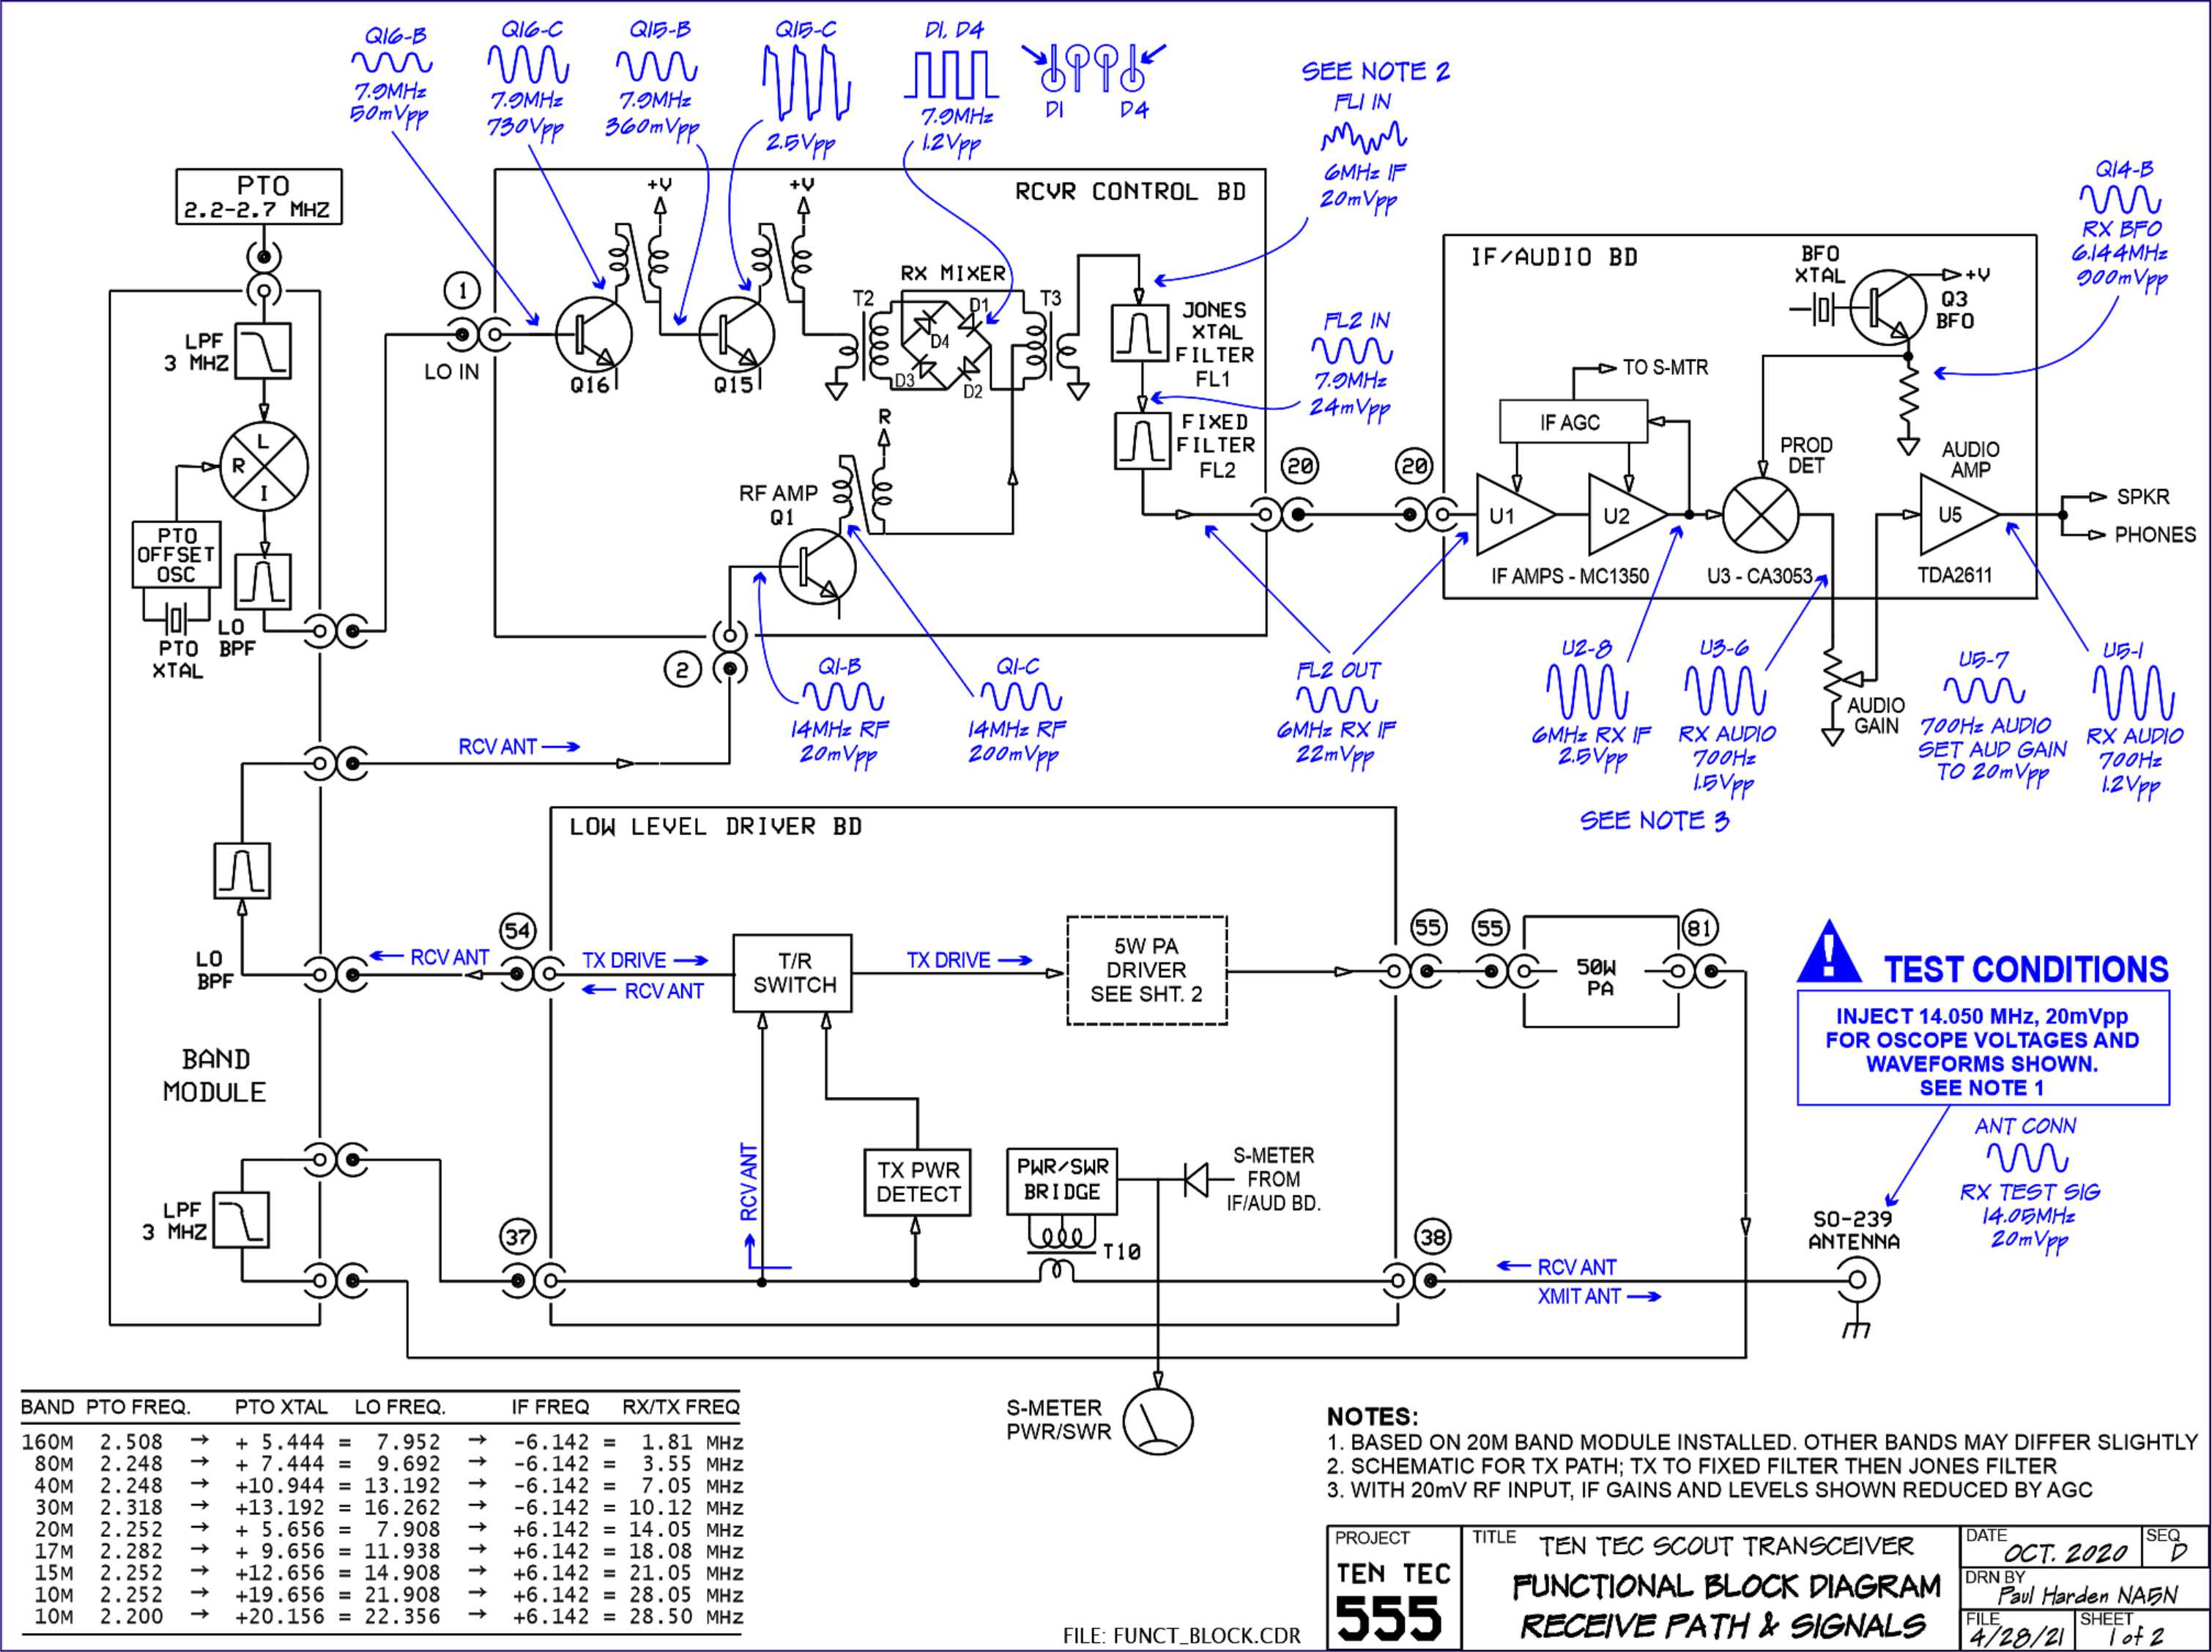
Thank you for following along and I hope to work you on the air soon!
73 - WK4DS