WK4DS Amateur Radio Blog
Search Posts

WK4DS CW Keys…and why I stopped making them…
As you can see, when I was building them back in the day, I spent a lot of time on finishing. They were all highly polished…by me… and that isn’t all. I don’t remember the total parts count anymore, but it was over 40 parts to build one key and I made something like 35 of those parts. I bought the cable (of course) and a handful of fasteners to assemble it with and 4 ball bearings and the rest was made by me. Towards the end, I had another master machinist working for me and he helped make a lot of the components as well, but we were just trying to finish out the existing committed orders before shutting down production.
I am not sure how many of you actually know that I am a CW key maker…or was a CW key maker… I built semi-custom, high precision CW keys back about 20 years ago. There are about 20 of them out in the wild at this point and have become quite collectable now. I still have two of them for myself. One was the last key I made, and of course, the first key I made as well.
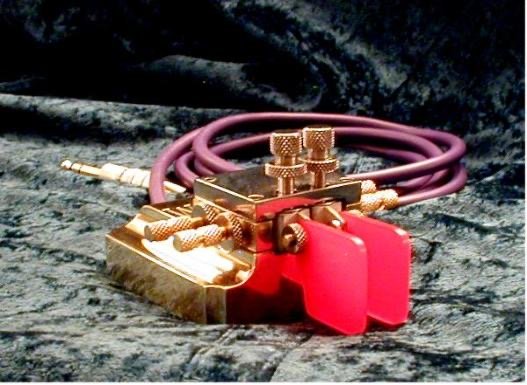
Archive Photo #1 - WK4DS CW Keys
As you can see, when I was building them back in the day, I spent a lot of time on finishing. They were all highly polished…by me… and that isn’t all. I don’t remember the total parts count anymore, but it was over 40 parts to build one key and I made something like 35 of those parts. I bought the cable (of course) and a handful of fasteners to assemble it with and 4 ball bearings and the rest was made by me. Towards the end, I had another master machinist working for me and he helped make a lot of the components as well, but we were just trying to finish out the existing committed orders before shutting down production.
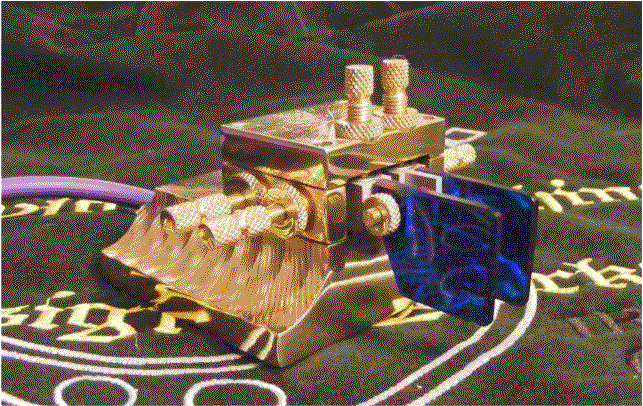
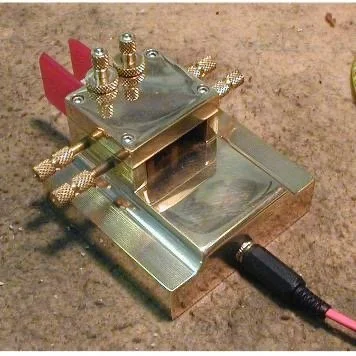
Pictured above is one of the first keys I built. I know because the bearing tension “towers” are not connected to the top plate and later variants had these towers threaded directly into the top plate instead. You can see what became my signature styling, which was the square base with the filleted shelves on the sides. All the keys after the prototype carried some variant of this feature. I set out to make a key I could be proud to own and use. You see, at the time, the March CW key was a bucket list kind of item for me, but I couldn’t easily afford one. What does a skilled machinist do it he can’t have a high end CW paddle? Make it himself out of surplus brass he had in the shop of course! So the prototype doesn’t look exactly like the one above as you can see in the next photo (it is the red handled key on the left). It was hacked out of metal I had and as you can see has a smattering of stainless steel parts mixed in with the brass parts.
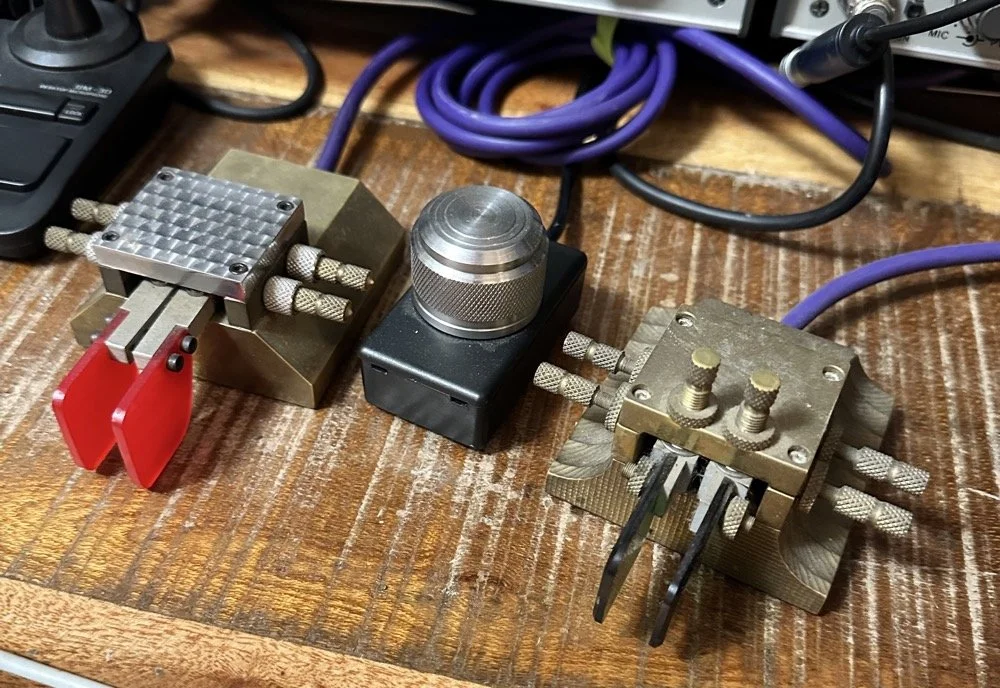
My personal WK4DS CW keys I use on the daily to mostly work POTA activators and occasionally ragchew…
The things I wanted in my key were as follows:
Heavy - you don’t want to be chasing it around on the bench while your in a QSO!
Short lever throw - I looked at the geometry of the lever arms and decided I wanted a 1:! or better throw distance if at all possible. The prototype has a higher lever ratio, but it turns out that it is still usable as I was able to adjust to contact spacing like I wanted anyway and it no longer made it a problem. The key you see opposite of it is the final key I made as I wanted one of the ones like the “production” variants since it had all the revisions. You can see the lever length is much shorter on the green handled paddle as compared to the red one. I shortened the lever arms all the way back to the body and this gave me a 1:! ratio at the end of the paddles to the center axle and from the axle to the contact pads.
Gold contacts - These are not pure gold, but rather gold plated as this provides a much lower contact resistance and reduced corrosion of the contacts so you don’t have to clean them.
Ball bearing pivots - I chose dental drill bearings on the prototype and that was a bad idea as they are actually loose. I guess they tighten up as the drill runs from thermal expansion or something. These are really loose though. You can also see that there is no way to hold tension on the bearings either on the prototype, this turned out the be a bad design flaw, so the production keys cam with bearing tensioners as well. The production keys got larger bearings that were also flanged and this made preloading them much easier too. You can almost see the bearings in the prototype are just under the top plate and they stick out a little on the green key. Same location of the axle which gets the lever as close to the front as possible. This is how I was able to shorten the lever length.
Light weight lever arms - This was done for the high speed CW crowd actually, I don’t go fast enough to need it, but I wanted it anyway. Turns out if you want to go fast, the lever arms need really low mass. I started out with the idea of using pure magnesium lever arms as it is lighter than aluminum (if you can imagine that), but the problems with using pure magnesium far out weighed the weight savings. Magnesium has a terrible propensity to corrode gloriously and aluminum has almost none of these problems. I just milled away every part or the arm that wasn’t needed and the weight was fine. The mass needs to be as little as possible to reduce contact bounce. The lighter the lever the lower the force needed to get it moving and the lower the force to get it to stop. So you can run with a very light touch.
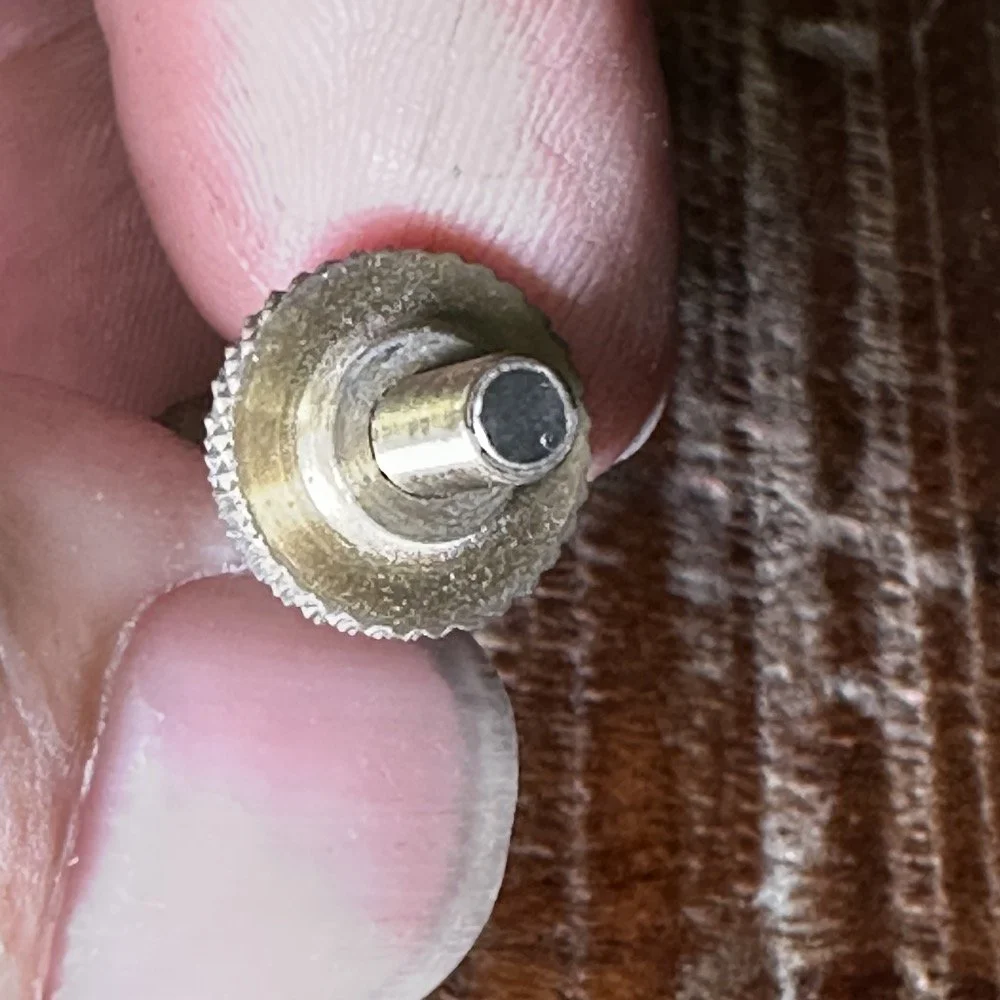
Magnetic springs - I used Neodymium Iron Boron (NdFeB) magnets is opposition as springs as this allows for ZERO friction from the spring, incredible spring force compared to their size and they also allowed my design to be electrically isolated too.
Adjustable bearing tension - This came after I built the first couple of keys, I realize that I wanted to be able to set the bearing preload on the lever bearings as well. This allows the removal of any vertical play in the arms while still allowing free rotation of the bearings. This turns out to be a really nice feature once you have it.
Adjustable spring force - this is a given that even many of the lowest cost keys have in them, but some keys dont have it so I wanted it on mine. The closer the contact spacing the more force you need too. Contact bounce is a real problem at 80WPM
Adjustable contact spacing - All upper echelon cw keys have this feature, but I took mine one step further. Since these keys needed very close contact spacing for really high speed operation, I wanted them to be easily adjusted in something like .001” increments easily. The answer was right there on my lathe too. 72 threads per inch. It was also my mechanical limit at the time too, my lathe would not cut a finer thread without modification… So the Spring screws and the contact screws all got this thread spec applied to them. See the photos below for close up shots of this feature and the magnets embedded in the ends of the screws.
Properly electrically connected - good electrical engineering states that current should never flow through a bearing. It can cause arcing in the bearing which will damage it. So I ran tiny little ground wires from each contact post to the ground cable on every key to eliminate this possibility.
1/4” Stereo plug - I know this is now a dated connector but at the time, (and even to this day) my favorite radios are TenTec and almost all of them use the 1/4” connector.
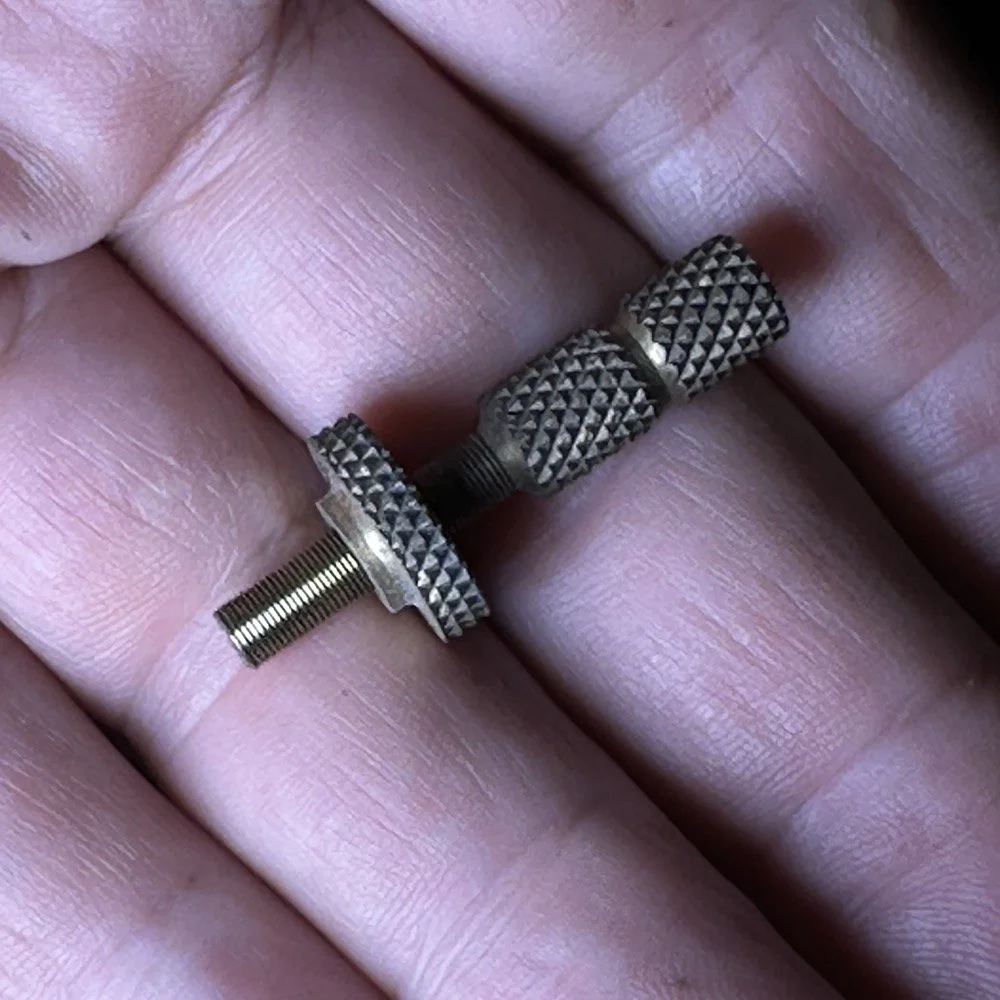
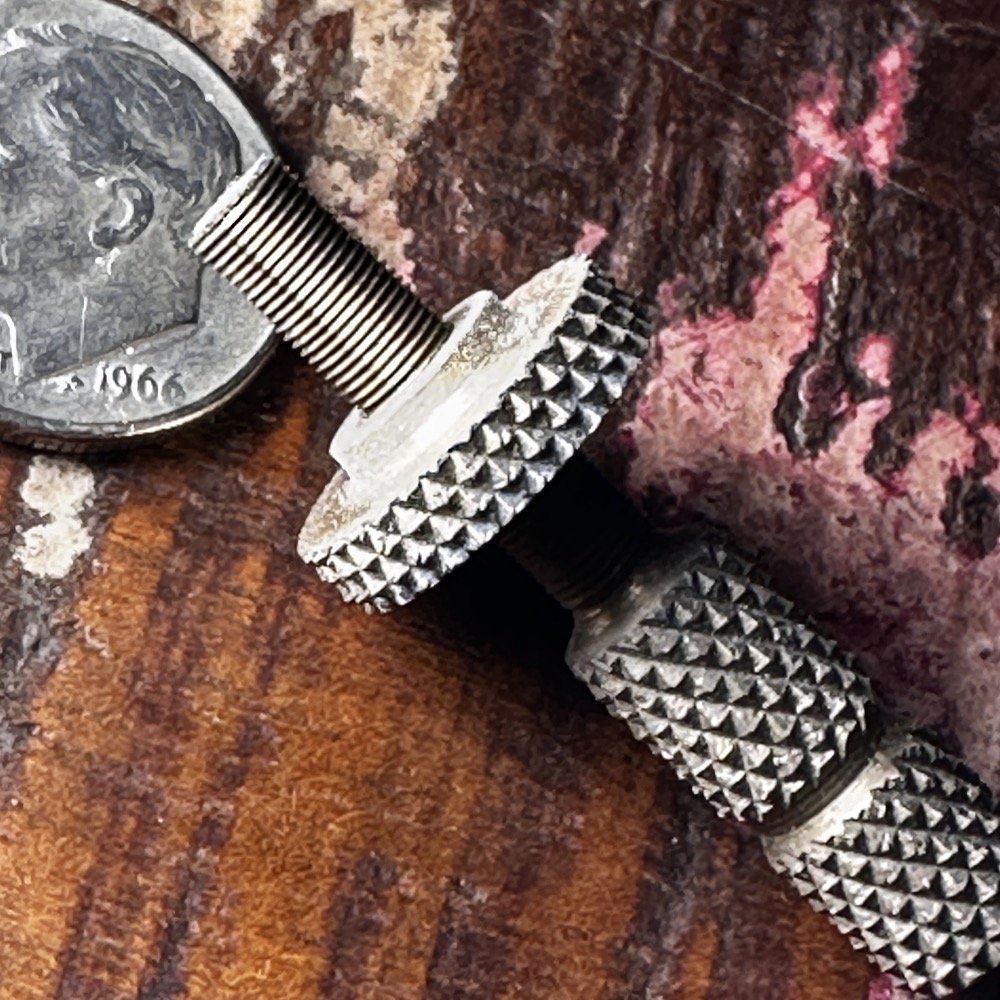
You can see the 72 threads per inch here on this spring adjustment screw. Those threads are just a few thousandths thick. It takes a jeweler’s loupe to even see what I am doing when I cut them in the lathe… I was able to buy taps to cut the internal threads so I would make the lock nuts first and then fit the external threads to them. It worked really well. What this ultimately gives you is a full rotation of the screw will advance it .0139” Essentially 14 thousandths per revolution. That means a quarter turn is only .0035” so it is pretty easy to see that I could make .001” adjustments if I wanted to…maybe less. That was the goal with the high thread count screws. That and the fact that everyone else was using 32TPI screws on their builds…haha.
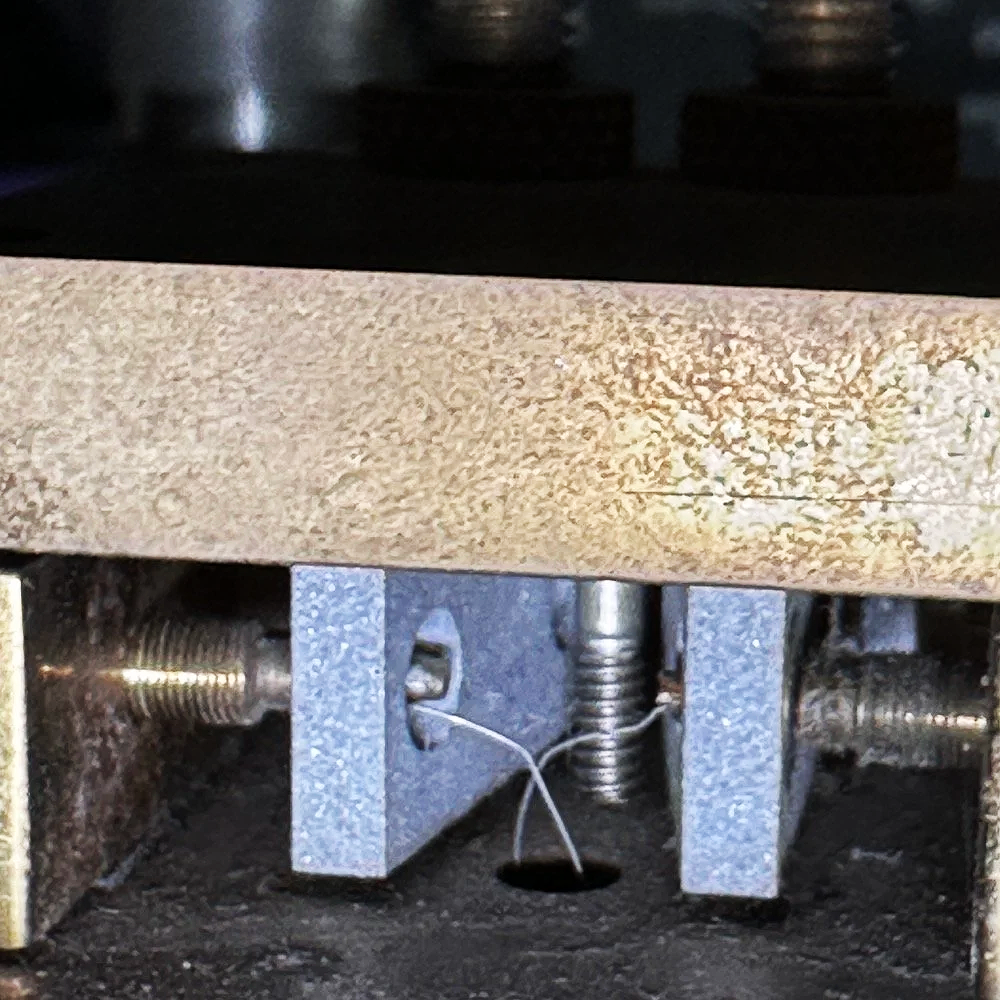
Above is a shot of the two ground wires that tied each arm back to the return lead on the cable so the current, no matter how little it was, had a path that was not through the bearings. This was very important to me as I was not sure what radio these keys would be plugged into and wanted the key to last.
Below shows the magnet that I set in the end of the spring tension screw. Yes, there is literally just enough screw there to drill a hole in the end and glue a magnet into it…barely.
Archive Photo #2 - WK4DS CW Keys
Archive Photo #3 - WK4DS CW Keys
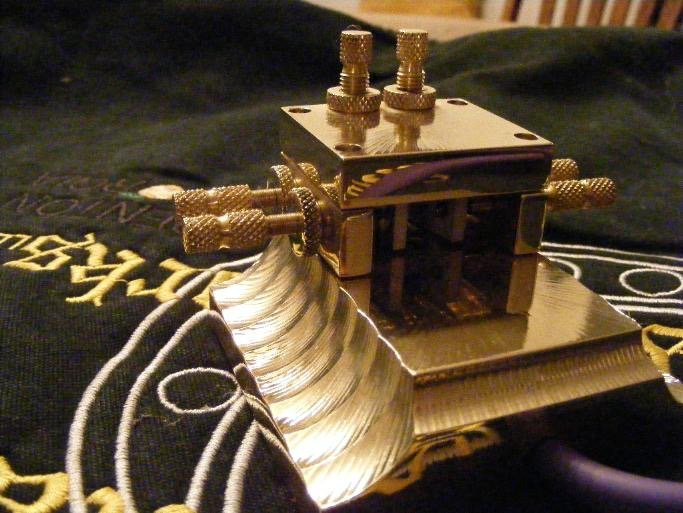
Archive Photo #4 - WK4DS CW Keys
I made each one of these keys a little different from the last one so that each person essentially had a custom key made by me.
As you can see from these old photos, it took a lot of time to make all the parts, finish all the parts and then to assemble and adjust them into a working CW paddle. I had way over 60 hours in each one and that is what ultimately made the whole project untenable. I was spending most of that time doing two things. One was making the ultra fine threaded adjustment screws (one wrong move or a dull tool and you had to scrap the one you was working on and start over) and the other was polishing. If I could eliminate either of these two operations then suddenly the cost to make one was within a reasonable window. The problem was that they looked so good polished that I couldn’t being myself to not do it… As long as it took that long to make them, there was no way anyone would be willing to pay what the price needed to be for me to be compensated properly for my time. I charged 55$ per shop hour back then (and it should have been closer to 75$ but I didn’t have a lot of overhead) so just the shop hours alone made this key cost over 3300$ and we have not added materials or finishing supplies yet. You can see why at 450$, it was crazy how little the shop made on each one. I was doing ultra precision machine work for less than $7 per hour and I still had to take power and supplies out of that… I couldn’t feed my family on that so I had to make the hard decision to stop production till I could figure out a more efficient way to make them. Well, it turns out that was way harder than I thought. I never got back to making them. I have since then done some designs where they are not built like these, but still carried most of the features from the original list. This turns out to be very difficult and to make them to where they can be produced on a turning center. I take my hat off to Tony Baleno (N3ZN) & Piero Begali (I2RTF) for figuring it out and making astonishingly good keys at the same time. Both of these men make fine CW sending instruments and I can recommend them both since I own keys made by both of them.
I have looked at approaching this project again now that I have more modern and capable machines at my disposal. Maybe there is a way that I can make a new key that can be made in a reasonable amount of shop hours and we can come back to market with something new soon. Till then, all that is left are the keys that I have already made…
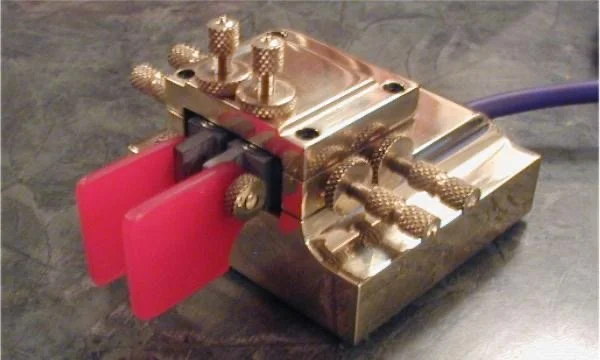
Archive Photo #5 - WK4DS CW Keys
Thanks for taking the time to read about my old keys and what I wanted to do with them.
You can help support this channel by using these Amazon Affiliate Links as well:
QRP/Portable Radios:
Antennas & Tuning:
CW Equipment:
Power & Accessories:
Organization & Transport:
BONUS ITEMS (Optional 16-20):
73
WK4DS - David
Activated The Great Smokey Mountain National Forest
Here is the after action report where I finally activated a park in North Carolina. The Great Smokey Mountain National Park is a well used park in the POTA network, but it was one that I had not yet activated in my travels.

This particular area is called the Cataloochee valley and there is a heard of elk in this area that I like to try to photograph in the fall. Well since I was here, had a radio and the elk were not very close either…why not POTA?!? I decided to activate this park the night before and gave myself a decent little window of time to get it done in as well since I wasn’t sure how the elk would be doing… I had remembered from the last time that cell service was nonexistent here so I scheduled the activation on the POTA site the night before just as a precaution. This is a pro tip, if you even think you are not gonna have internet, go ahead and schedule the activation and pay close attention to the time as it is UTC time on the website and don’t do like I did and get the time off by several hours because you chose the wrong time zone… I did this on another activation and the results are as you think.

I found this spot and setup the truck-tenna (a hamstick on a receiver hitch mount I made) and the Ten Tec Argonaut 5 for this activation to just get on the air as I wasn’t sure how long I would have with band conditions being not great lately, so I wanted to stack the odds in my favor as much as possible ahead of time. Well it worked… as you will see later.

Here is a sign that lets you know just how unpredictable wild animals can be… Elk are VERY large creatures so it is prudent to heed this warning… I also thought it was interesting that the park rangers have to put out these signs at all… I guess getting a selfie is more important than getting killed by a bull elk…who knows?

This is what i found on this day though. The whole heard was just chillin in the edge of the treeline, so it wasn’t too heart stopping of an event to photograph them on this day. It was fun to just sit and peer at them through the camera for a while though. I have a video on my YouTube channel that showed a few more photos as well as talks about the rest of the trip some more as well.

Back to the activation though… I ran the coax into the cab as it was kind of cool this morning so I wanted to stay warm while I operated and just ran the cable through the window and left it down a little while I did since it wasn’t raining. This 15’ coax is just long enough to reach in this configuration too, which is nice.

Here we have the operating position today. I just sat the Argonaut in the seat, added a common mode chock and hooked up the HamGadgets cw keyer and my N3ZN tiny paddle and I got on the air. Power for the radio is pulled straight off of the truck batteries if I operate from this location as I have a power cable ran to the cab from the battery with power poles on it just for this. The arm rest makes for a decent desk, but it could be better. At some point I plan to make a table top that sits on the arm rest and goes forward to the shifter and even has a leg that sits on the console to support it as well. This will probably be covered with some sort of cloth so it wont be so rough on the arms and will allow me to spread out the notebook, pen and key a little more.

I could tell that the scheduled activation on the POTA site was working as I almost immediately got a pile up once I went live on the air and the RBN picked me up. It is night and day different as to what you get with and without the reverse beacon network picking you up. One QSO of note here is the Canadian call on the first page. We had quite the QSO and spent a few minutes chatting about things before I got back to the activation and went to work on that. I am not one to shy away from a ragchew even though I wanted to work a bunch of contacts too, it is all about talking on the radio so I love all of it.


I had a steady stream of calls come in for a little over an hour. that is awesome! I love it when I am able to catch what I think is all the QSOs that are calling. The band was really strong today too as I was only using 15 watts and was able to get really good signal reports back from most everyone. It was a really stable day as well as it can also be seen in the log that the signal reports were steady and not sinusoidal. Sixty three contacts later I called QRT to go get some lunch and fuel for the truck before heading on to Ashville for the afternoon. If you are interested in the rest of the trip, I have a YouTube channel where I talk about the photography aspect more. Thanks for coming along and until next time, go get on the air!
72
WK4DS
Activating K-1832 Anastasia SP in Florida!
Today I got to activate another new-to-me park! Anastasia State Park (K-1832) located in St Augustine, Florida.

Today was a special day for two reasons. The first reason is I am in St Augustine Florida and the second is that I had about an hour to fit in a POTA activation. So I drop off the wife at the yoga studio and from this parking lot I have about 1 hour and ten minutes to goto a park, setup a radio, get 10 contacts, tear it all back down, grab some photos for the blog post and go back to the yoga studio. I can report that I was successful in the mission.
So I chose Anastasia State Park because of its proximity to the yoga studio. It was a 7 minute drive to the spot where I setup the radio from the yoga studio parking lot…there goes 14 minutes of my 70! Part of the game so we are off!

There is a park access fee to use Anastasia State Park. It is 4$… Not bad for such a lovely place complete with a snack shop and even a restaurant from what I could tell. Not to mention THE BEACH! Did I mention it has BEACH ACCESS?!?!? Well, it is some of the most beautiful beach I have seen in the mainland USA to be quite honest about it.

The scene above was down the street from where I setup for the activation. This is the life! As you can see the salt water (The Atlantic Ocean) was also in close proximity so propagation should be good! It also had good “facilities” at this location too as I had just finished drinking a bunch of coffee… lol This is not a perk I am used to having at most locations. There is a restroom at the canyons edge back home at Cloudland Canyon next to the parking lot but my usual spot at the frisbee golf course has no such luxury so I was glad to see it today. Sometimes its the little things that make all the difference…


The location I chose was next to the shop where you rent small watercraft like kayaks and such. Since it was a Monday morning there were practically no people there. In the photo above you can see the sand dunes at the beach in the background. This is a good spot for POTA. Salt water has a reputation for being one of the best ground planes in radio and I normally dont have access to salt water so I get really excited when I can operate near salt water.

The parking area is on the side of the road (notice the wind swept trees, isnt that cool?) and backs up to a fence so I backed in and set up the 20 meter hamstick on the truck. Since time was of the essence here, I opted for a single radial and ran it over the fence and out into the recreational space on the other side. I threw the nanoVNA on it right quick and the SWR was good at 1.3:1 so on the air I went! I opted to hop straight way on 20 meters as this band usually has the highest percentage of operators of all the bands. This proved to be a wise decision too as I secured the activation in short order thanks to the plentiful hunters that sought me out today.


I get setup in the truck and power on the radio to a very active band, also giving me hope! So I start calling and it doesn’t take long to get a reply. Then the gates open! Wow! There were so many hunters! I actually got a little overwhelmed and couldn’t send code for squat!!! (Apologies to all of you guys and gals where I butchered your call sign trying to send decent code) So I just took a deep breath and started with the loudest stations and cleared the pileup in a little while. Since I was in Florida and not at home I could hear stations that are normally deaf to my radio and antenna combination. I logged several Tennessee contacts today and even one or two from the west coast!

I might modify this operating position just a little more with time, but it is almost perfect now. I would like to make a small stand that sits in front of the armrest that will hold the N3ZN key and PICO keyer allowing me to move the logbook a little more forward. Currently the bottom of the page is hard to reach for my old back as it is almost behind me. Lol. But other than that, this staion setup is going to end up being my wintertime POTA activation setup for the upcoming winter.
Looking at the QSO map shows that the skip distance today for my hamstick lies in the 500 to 1200 mile range and the second hop is coming down on the west coast. The signal reports on these stations (west coast) today were rough. I struggled to copy the call sign on one for certain and probably both. Still got them into the logbook though so we are good. But it did reveal to me how much energy is lost in that second “hop”. It was significantly weaker copy on those stations. I am going to speculate that it was probably 6 full S units of signal weaker. I dont use the S meter as a strict reference but today I found myself comparing signals such as these weak ones running in the S2-3 range and the Tennessee stations booking in at S9!

When I am back at my home the west is still difficult but at those times I normally have both counterpoise wires setup and this seems to alter the takeoff angle a little and I will get Utah, Colorado and Arizona and even the Dakotas sometimes so the other counterpoise seems to make a big difference in lowering the take off angle some to improve propagation to those areas for me. I am also fortunate to be where there is an abundance of ham radio operators so I can easily secure my activation due to the sheer density of hams most of the time. Actually I have only failed to secure the activation one time and that was my fault entirely, not because of a lack of hunters, but me not calling where they were hunting… Anyway, that is another story and is in the blog somewhere if you would like to read that sometime.


Looking back over the log and seeing all those Tennessee contacts makes me happy to know that I was able to activate a park in Florida even if it was only for an hour, it was still a great time and I was able to get a bunch of people into the log that day that is always a good reason to activate! Till next time…
73
WK4DS - David